

Choosing the right roof insulation batts can make a massive difference to your home's comfort and energy bills. Whether you're building a new home in Melbourne, renovating an older property, or simply trying to keep your family cooler in summer and warmer in winter, understanding roof insulation batts is essential. These pre-cut pieces of insulation fit snugly between roof joists and ceiling frames, creating a thermal barrier that stops heat from escaping in winter and entering in summer. With Victoria's variable climate and rising energy costs, getting your roof insulation right is one of the smartest investments you can make.
What Are Roof Insulation Batts and Why Do They Matter?
Roof insulation batts are pre-cut sections of insulation material designed to fit between the structural members in your roof and ceiling space. They come in standard widths to suit typical Australian roof framing (usually 430mm or 580mm between joists) and various thicknesses to achieve different R-values.
Unlike blanket or roll insulation, batts arrive ready to install without cutting or measuring. This makes them ideal for DIY projects and reduces installation time significantly.
How Roof Insulation Batts Work
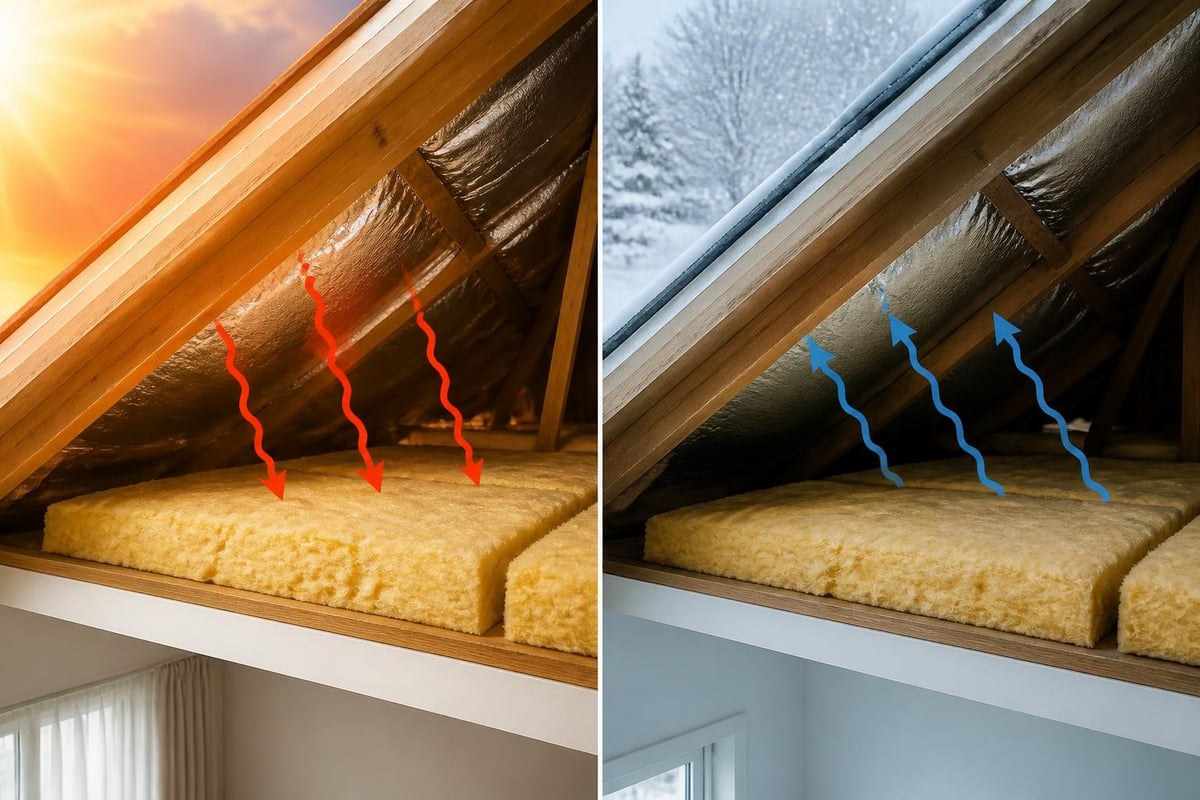
The science behind roof insulation batts is straightforward. Your roof absorbs enormous amounts of radiant heat during summer, with temperatures in the roof cavity often exceeding 60°C. Without proper insulation, this heat radiates down into your living spaces.
- Summer performance: Batts block heat transfer from the hot roof cavity into your home
- Winter performance: They trap warm air inside and prevent heat loss through the ceiling
- Year-round benefits: Reduced heating and cooling costs, improved comfort, and lower carbon emissions
According to ASHRAE building science principles, proper roof insulation can reduce heating and cooling energy consumption by 30-50% in Australian climate zones.
Common Materials Used in Roof Insulation Batts
Australian homeowners have several excellent material options when selecting roof insulation batts:
| Material | Key Benefits | Common Applications | Density Range |
|---|---|---|---|
| Glasswool | Cost-effective, fire-resistant, widely available | General roof and ceiling insulation | 10-25 kg/m³ |
| Polyester | Non-itch, eco-friendly, moisture-resistant | Homes with limited ventilation | 20-35 kg/m³ |
| Natural fibres | Sustainable, breathable, low environmental impact | Eco-conscious builds | 15-30 kg/m³ |
Glasswool batts manufactured with ECOSE® Technology offer a great balance of performance, safety and value. They're soft to handle, low in dust, and provide excellent thermal and acoustic properties.
For Melbourne homeowners exploring sustainable options, check out our guide to natural insulation in Melbourne.
Understanding R-Values for Roof Insulation Batts
The R-value measures thermal resistance - essentially how well your insulation stops heat flow. Higher R-values mean better insulation performance, but the right R-value depends on your climate zone, roof type, and building design.
Recommended R-Values for Victorian Homes
Victoria spans multiple climate zones, and the National Construction Code (NCC) sets minimum standards based on your location:
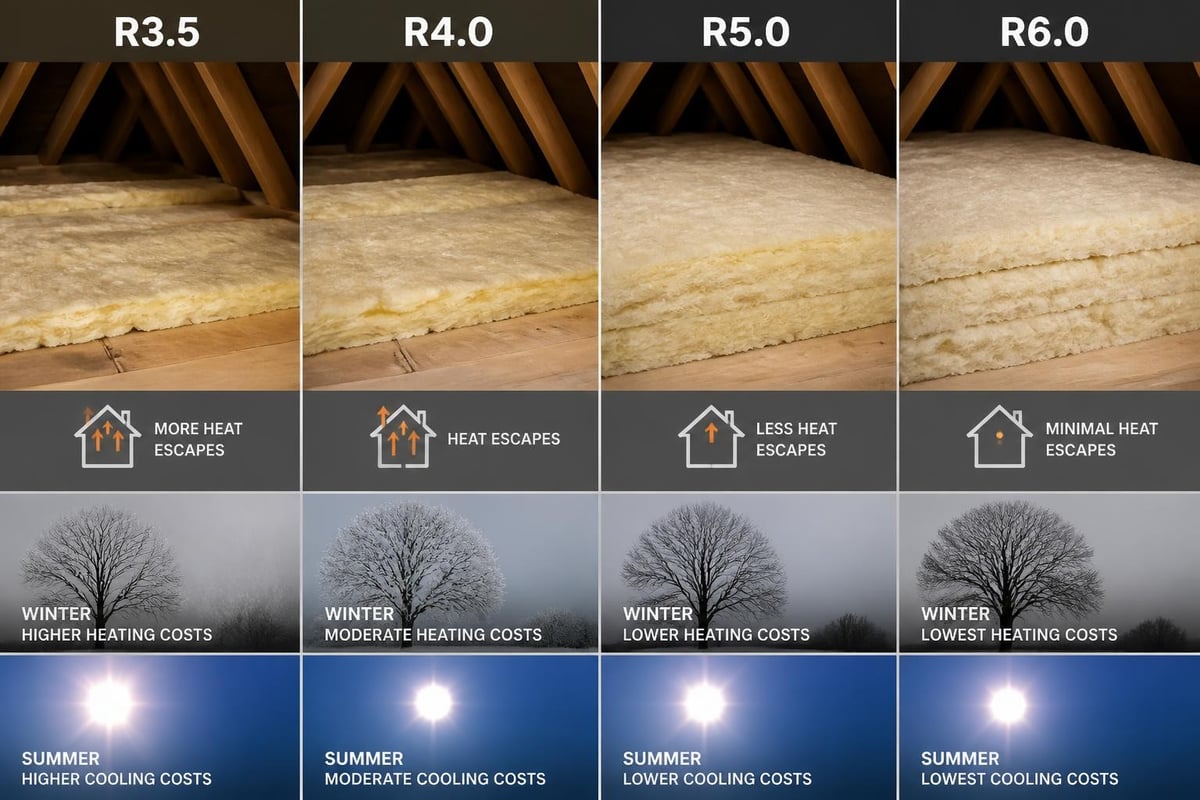
- Melbourne and most of Victoria: R4.0-R6.0 for ceilings (Climate Zone 6)
- Coastal regions: R3.5-R5.0 may suffice
- Alpine areas: R6.0+ recommended for extreme cold
Most Victorian homeowners choose roof insulation batts with R4.0 to R6.0 for optimal year-round performance. These values provide excellent thermal resistance without requiring excessively thick batts that won't fit standard roof spaces.
How Thickness Affects R-Value
R-value increases with insulation thickness, but the relationship isn't perfectly linear. Material density and composition also play crucial roles.
Common roof insulation batt configurations:
- R4.0: Typically 140-145mm thick
- R5.0: Usually 170-200mm thick
- R6.0: Generally 210-230mm thick
Before purchasing, measure the depth between your ceiling joists. Many older Melbourne homes have limited roof cavity depth, which may restrict your options. If space is tight, consider high-density batts that achieve higher R-values in thinner profiles.
Choosing the Right Roof Insulation Batts for Your Project
Selecting appropriate roof insulation batts involves more than picking the highest R-value. You need to consider your roof type, installation method, budget, and specific performance goals.
Pitched Roof vs Flat Roof Applications
Pitched roofs (most common in Australian homes):
- Allow easy installation of standard batts between ceiling joists
- Provide natural ventilation in the roof cavity
- Typically use R4.0-R6.0 batts installed at ceiling level
- May require additional considerations for cathedral ceilings
Flat or low-pitch roofs:
- Often require specialised installation approaches
- May need moisture barriers or bulk insulation above the ceiling
- Ventilation is more critical to prevent condensation
Faced vs Unfaced Roof Insulation Batts
Facing refers to a protective layer attached to one side of the batt:
Faced batts include a paper or foil backing that serves as:
- A vapour barrier to control moisture movement
- Extra support during installation
- A radiant barrier (foil-faced options)
Unfaced batts are pure insulation material:
- More flexibility in placement
- Better for applications where separate vapour barriers are used
- Often preferred for ceiling insulation in well-ventilated roof spaces
For most Melbourne roof applications, unfaced batts work brilliantly. The roof cavity typically has adequate ventilation, making a vapour barrier unnecessary.
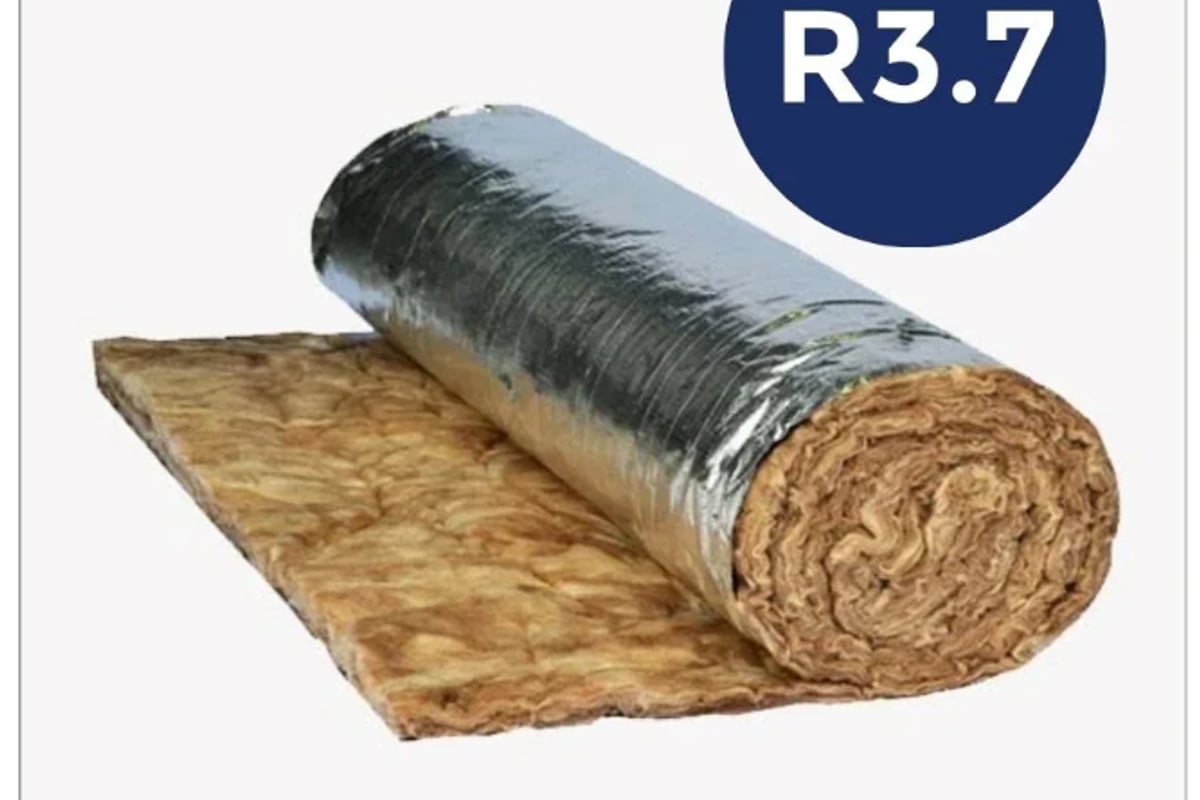
When selecting thermal blanket products for metal roof installations, consider higher-density options. The Thermal Blanket R3.7 22kg/m³ offers excellent performance under metal roofing systems where temperature extremes are more pronounced.
Acoustic Performance Considerations
While thermal performance is paramount, roof insulation batts also provide valuable acoustic benefits. High-density batts (20kg/m³ and above) offer superior sound absorption, reducing:
- External noise from traffic, aircraft, and neighbours
- Rain noise on metal roofs
- Sound transmission between rooms
If you're near a busy road or under a flight path, prioritise high-density roof insulation batts. Learn more about acoustic insulation batts for specific sound-blocking applications.
Installing Roof Insulation Batts: What You Need to Know
Proper installation is just as important as choosing quality roof insulation batts. Even the best insulation performs poorly if installed incorrectly, with gaps, compression, or moisture issues compromising effectiveness.
Safety First: Essential Precautions
Working in roof spaces presents several hazards:
- Structural safety: Only step on ceiling joists, never between them
- Heat stress: Roof cavities can exceed 60°C in summer - work early morning
- Electrical hazards: Identify and avoid all wiring before starting
- Protective equipment: Wear long sleeves, gloves, dust mask, and safety glasses
- Ventilation: Ensure adequate airflow while working
Never compress roof insulation batts to make them fit. Compression dramatically reduces R-value by removing the trapped air that provides thermal resistance.
Installation Process Step-by-Step
Preparation phase:
- Measure your joist spacing (typically 430mm or 580mm)
- Calculate area and quantity needed
- Check roof cavity depth to confirm batt thickness will fit
- Ensure adequate roof ventilation exists
Installation sequence:
- Start at the furthest point from the access hatch
- Work backwards towards your exit
- Place batts gently between joists without forcing
- Ensure batts fit snugly without gaps
- Cut around obstructions (vents, lights) carefully
- Maintain clearance around recessed lights (50mm minimum)
- Don't cover eave vents or block ventilation pathways
Common installation mistakes to avoid:
- Compressing batts to fit tight spaces
- Covering electrical junction boxes
- Blocking soffit vents or whirlybirds
- Leaving gaps between batts
- Installing wet or damaged batts
The ENERGY STAR guide to choosing appropriate insulation provides additional installation best practices for blanket batts and rolls.
DIY vs Professional Installation
Installing roof insulation batts is a manageable DIY project for many homeowners, but professional installation makes sense in certain situations:
DIY-friendly scenarios:
- Simple pitched roof with easy access
- Standard joist spacing
- No complex obstacles
- Good physical fitness and comfort with heights
Consider professional installation if:
- Your roof cavity is difficult to access
- You have health conditions affected by dust or heat
- Multiple complex obstacles exist (numerous lights, ducts, etc.)
- You're unsure about electrical clearances
For comprehensive guidance, review our insulation installation tips specific to different insulation types.
Roof Insulation Batts and Building Regulations
Australian building regulations establish minimum standards for roof insulation to ensure energy efficiency and occupant comfort. Understanding these requirements helps you make compliant, future-proof choices.
National Construction Code Requirements
The NCC divides Australia into eight climate zones, each with specific insulation requirements. Melbourne falls primarily into Climate Zone 6, requiring:
- Minimum ceiling R-value: R4.0 for new builds
- Renovation standards: May differ based on scope of work
- Condensation management: Adequate ventilation required
These are minimum standards. Most energy-conscious homeowners exceed these requirements, choosing R5.0 or R6.0 roof insulation batts for superior long-term performance.
Compliance and Documentation
When installing roof insulation batts, keep records for building permits and future property sales:
- Product specifications and R-value certificates
- Installation photos showing coverage
- Compliance certificates from installers (if applicable)
- Receipts and warranties
Proper documentation protects your investment and helps during property valuations. Energy-efficient homes with verified insulation command premium prices in the Victorian property market.
Cost Considerations for Roof Insulation Batts
Understanding the cost structure of roof insulation batts helps you budget effectively and identify the best value options for your needs.
Material Costs and Price Factors
Roof insulation batt prices vary based on several factors:
| Factor | Impact on Cost | Typical Range |
|---|---|---|
| R-value | Higher R-values cost more | 10-40% increase R4.0 to R6.0 |
| Material type | Glasswool cheapest, polyester mid-range | $5-$20/m² |
| Density | Higher density increases price | 15-30% premium |
| Brand reputation | Premium brands command higher prices | Variable |
| Quantity | Bulk purchases reduce unit cost | 5-15% savings |
Average material costs for roof insulation batts (2026 indicative pricing):
- R4.0 glasswool batts: $8-12/m²
- R5.0 glasswool batts: $11-16/m²
- R6.0 glasswool batts: $14-20/m²
- Premium polyester batts: $15-25/m² across R-values
These are material-only costs. Professional installation typically adds $15-30/m² depending on roof complexity and access difficulty.
Return on Investment
While roof insulation batts require upfront investment, the returns are substantial:
Energy savings: A typical Melbourne home can save $300-600 annually on heating and cooling costs with proper R5.0 ceiling insulation. At these rates, quality batts pay for themselves in 3-7 years.
Additional benefits:
- Increased property value (3-5% in many markets)
- Improved comfort year-round
- Reduced carbon footprint
- Lower HVAC system wear and maintenance
- Better acoustic comfort
For more insights on maximising energy efficiency, explore our guide to best ceiling insulation in Melbourne.
Maintenance and Longevity of Roof Insulation Batts
Quality roof insulation batts are a long-term investment. Proper maintenance ensures they continue performing effectively for decades.
Expected Lifespan
Well-installed glasswool and polyester batts typically last:
- Glasswool batts: 50-70 years with minimal degradation
- Polyester batts: 50+ years
- Natural fibre batts: 30-50 years depending on conditions
Factors affecting longevity include:
- Moisture exposure (the biggest threat)
- Physical damage from roof work
- Pest activity
- Installation quality
When to Inspect Your Roof Insulation
Regular inspections help identify issues before they compromise performance:
Recommended inspection schedule:
- After severe storms or extreme weather events
- Every 3-5 years as part of general home maintenance
- Before selling your property
- If you notice unexplained increases in energy bills
- After any roof repairs or modifications
Warning signs that indicate problems:
- Water stains on ceilings
- Compressed or displaced batts
- Gaps in coverage
- Pest damage or nesting
- Mould or moisture in roof cavity
Building Science Corporation's guidance on unvented roof assemblies offers valuable insights into moisture management and ventilation strategies that extend insulation life.
Upgrading Existing Insulation
Many Melbourne homes built before 2000 have inadequate or deteriorated insulation. Adding new roof insulation batts over existing insulation is possible in many cases:
Assessment considerations:
- Current R-value and condition
- Available roof cavity depth
- Moisture or pest issues
- Ventilation adequacy
Upgrade options:
- Add higher R-value batts between joists
- Install bulk insulation above existing batts (if space allows)
- Replace entirely if existing insulation is damaged or wet
- Combine with other energy efficiency improvements
Never place new batts over damaged, wet, or mouldy insulation. Address underlying issues first.
Environmental and Health Considerations
Choosing roof insulation batts with lower environmental impact and better indoor air quality characteristics benefits both your family and the planet.
Sustainable Material Choices
Modern roof insulation batts increasingly incorporate sustainable manufacturing practices:
Glasswool with ECOSE® Technology:
- Uses recycled glass content (up to 80%)
- Bio-based binder instead of traditional formaldehyde
- Lower embodied energy in manufacturing
- Reduced airborne particles during installation
Polyester batts:
- Often made from recycled plastic bottles (PET)
- No chemical binders required
- Fully recyclable at end of life
- Non-toxic and non-irritating
The EPA's guide to identifying greener insulation helps evaluate environmental and health impacts across different batt materials.
Indoor Air Quality Impact
Quality roof insulation batts contribute to healthier indoor environments:
- No off-gassing: Modern batts don't release harmful volatile organic compounds (VOCs)
- Dust reduction: ECOSE® Technology reduces airborne particles
- Moisture control: Proper installation prevents condensation and mould growth
- Chemical sensitivity: Formaldehyde-free options suit sensitive individuals
When comparing products, look for third-party certifications and health product declarations that verify low emissions and environmental attributes.
Troubleshooting Common Issues with Roof Insulation Batts
Even well-installed roof insulation batts can develop problems. Understanding common issues and solutions helps maintain peak performance.
Condensation and Moisture Problems
Causes:
- Inadequate roof ventilation
- Bathroom or kitchen exhaust venting into roof cavity
- Plumbing leaks
- Damaged roof covering
Solutions:
- Ensure all exhaust fans vent outside, not into roof space
- Install adequate eave and ridge ventilation
- Repair roof leaks immediately
- Replace wet insulation - it cannot be effectively dried
- Consider vapour barriers in high-moisture applications
Gaps and Thermal Bridging
Gaps between roof insulation batts or around obstructions create thermal bridges where heat bypasses the insulation:
Prevention strategies:
- Measure carefully and order correct widths
- Cut batts accurately to fit around pipes and wires
- Overlap slightly rather than leaving gaps
- Use offcuts to fill small spaces
- Pay extra attention to edges and corners
Even a 5% gap can reduce overall thermal performance by 20-30%.
Compression and Settlement
Compressed insulation loses R-value. Common compression causes include:
- Forcing oversized batts into spaces
- Storage items placed on ceiling joists
- Roof work after installation
- Incorrect fastening methods
Solutions: Replace compressed batts and ensure adequate support without compression. Never use insulation as storage space support.
For additional technical resources and installation best practices, the National Insulation Association offers comprehensive guides.
Combining Roof Insulation Batts with Other Insulation Types
For optimal whole-home performance, roof insulation batts work best as part of a comprehensive insulation strategy.
Bulk Insulation Plus Reflective Barriers
Combining batts with reflective foil creates a multi-layered system:
- Batts: Provide bulk resistance to conductive and convective heat flow
- Reflective foil: Blocks radiant heat (critical under metal roofs)
- Combined performance: Better than either alone
This approach particularly suits Australian conditions where summer radiant heat is intense.
Wall and Floor Insulation Integration
A well-insulated home addresses all six surfaces - ceiling, four walls, and floor:
Coordinated approach benefits:
- Consistent comfort throughout the home
- Maximum energy savings
- Better acoustic isolation between rooms
- Reduced HVAC system sizing requirements
Explore our comprehensive guides to wall insulation in Melbourne and underfloor insulation for complete home solutions.
Acoustic Enhancement
Where noise control matters, consider combining standard roof insulation batts with acoustic-specific products:
- Use higher-density batts (22kg/m³+) in noise-sensitive areas
- Add acoustic ceiling batts between living spaces and roof
- Seal penetrations and gaps that transmit sound
- Consider resilient ceiling mounting systems
Our acoustic batts guide explores sound-blocking strategies in detail.
Making Your Purchase Decision
Armed with knowledge about roof insulation batts, you're ready to select products that match your specific needs and budget.
Quick Decision Framework
Step 1: Determine your R-value requirement
- Check climate zone and NCC minimums
- Consider your budget for energy savings
- Factor in roof cavity depth constraints
Step 2: Choose material type
- Glasswool for cost-effectiveness and fire resistance
- Polyester for non-itch, eco-friendly options
- Natural fibres for sustainability focus
Step 3: Calculate quantity needed
- Measure your ceiling area
- Add 5-10% for cutting waste
- Verify joist spacing (430mm or 580mm)
Step 4: Consider additional factors
- Acoustic performance needs
- Installation method (DIY vs professional)
- Delivery requirements and timing
- Warranty and product support
Working with Insulation Supplies Australia
When you're ready to purchase roof insulation batts, working with a trusted supplier makes the process straightforward and stress-free. Access to expert advice helps ensure you select products perfectly matched to your project requirements.
Quality suppliers provide:
- Clear product specifications and R-value certifications
- Competitive pricing without compromising quality
- Fast delivery across Melbourne and Victoria
- Technical support to answer installation questions
- Comprehensive product range covering all applications
Visit the ISA blogs section for additional guides covering every aspect of home insulation.
Choosing and installing roof insulation batts is one of the most effective ways to improve your Melbourne home's comfort, reduce energy bills, and enhance property value. Whether you're building new, renovating, or upgrading existing insulation, understanding R-values, material options, and proper installation techniques ensures you get maximum performance from your investment. Insulation Supplies Australia offers Victoria's homeowners, renovators, and builders expert advice, quality products, and competitive prices to make your insulation project successful. Browse the range, compare options, and order online today for fast delivery across Melbourne and Victoria.