

Australian garages often serve multiple roles beyond vehicle storage – they're workshops, home gyms, storage areas and sometimes even additional living spaces. Yet most garage doors remain uninsulated, creating a weak point in your home's thermal envelope that affects both comfort and energy costs. Garage door insulation kits offer a straightforward retrofit solution for homeowners who want to improve temperature control without replacing their entire door. Whether you're working in the garage during Melbourne's cold winters or trying to keep the heat out during summer, understanding what these kits deliver and how to install them properly can make a meaningful difference to your space.
What Garage Door Insulation Kits Actually Do
Garage door insulation kits work by adding a thermal barrier between your garage interior and the outdoor environment. Most kits consist of pre-cut foam panels or batts designed to fit between the structural ribs or panels of your existing garage door.
The primary function is reducing heat transfer. An uninsulated metal door can reach extreme temperatures – scorching hot in summer sun or freezing cold on winter mornings. Insulation moderates these swings, creating a more stable internal environment.
Beyond thermal performance, these kits also provide:
- Noise reduction from street traffic, rain and the door mechanism itself
- Reduced condensation on metal door surfaces in humid conditions
- Improved structural rigidity that can reduce door vibration and noise
- Lower energy costs if your garage is attached to your home or climate-controlled
It's worth noting that insulation alone won't transform an unheated garage into comfortable year-round living space. You also need proper air sealing around the door perimeter, weather stripping and potentially insulation in the garage walls and ceiling. The EPA Indoor AirPlus program provides detailed guidance on garage-to-house air sealing and ventilation when upgrading thermal barriers.
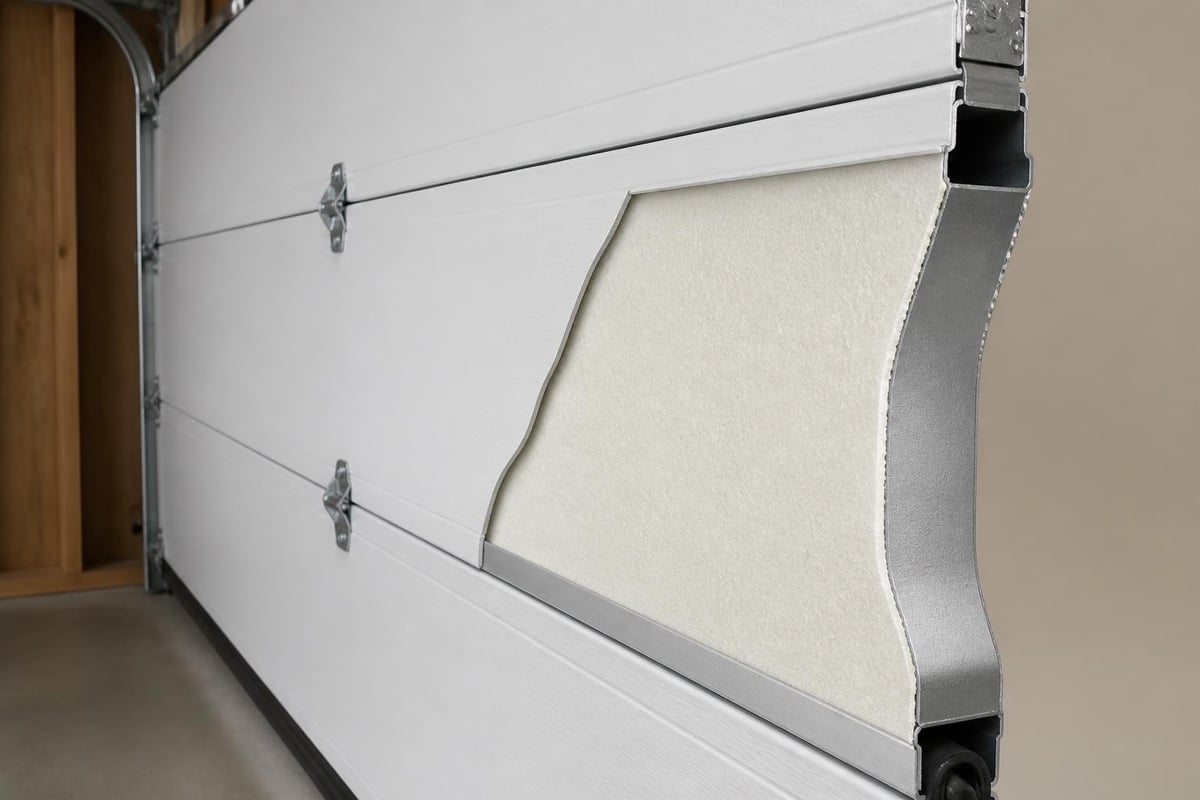
Types of Insulation Materials Used in Kits
Different garage door insulation kits use distinct materials, each with specific performance characteristics and installation requirements.
Polystyrene Foam Panels
Rigid polystyrene – either expanded (EPS) or extruded (XPS) – is the most common material in retrofit kits. These panels are lightweight, moisture-resistant and easy to cut to size.
Expanded polystyrene (EPS) is the white beaded foam you might recognise from packaging. In garage door applications, it typically provides R-values between R-3.0 and R-4.0 per 25mm thickness. EPS is affordable and does a decent job of resisting heat flow, though it can be more fragile than other options.
Extruded polystyrene (XPS) has a denser, closed-cell structure that offers better moisture resistance and slightly higher R-value per millimetre. XPS panels are stiffer and more durable, making them suitable for high-traffic garages where the door might cop a knock. For projects requiring rigid board insulation in other areas, products like Styroboard XPS Insulation Board 75mm x 600mm x 2400mm R2.27 350kPa demonstrate the load-bearing capacity and moisture resistance available in XPS materials.
Polyurethane and Polyisocyanurate Foam
Higher-end kits sometimes use polyurethane or polyiso foam, which deliver better R-values per millimetre of thickness – often R-6.0 to R-7.0 per 25mm. These materials are more expensive but worthwhile if space is limited or maximum thermal performance is the goal.
Polyurethane foam can be spray-applied (typically during door manufacture) or supplied as rigid panels. The closed-cell structure blocks moisture effectively and adds structural strength to door panels.
Reflective Foil and Bubble Wrap
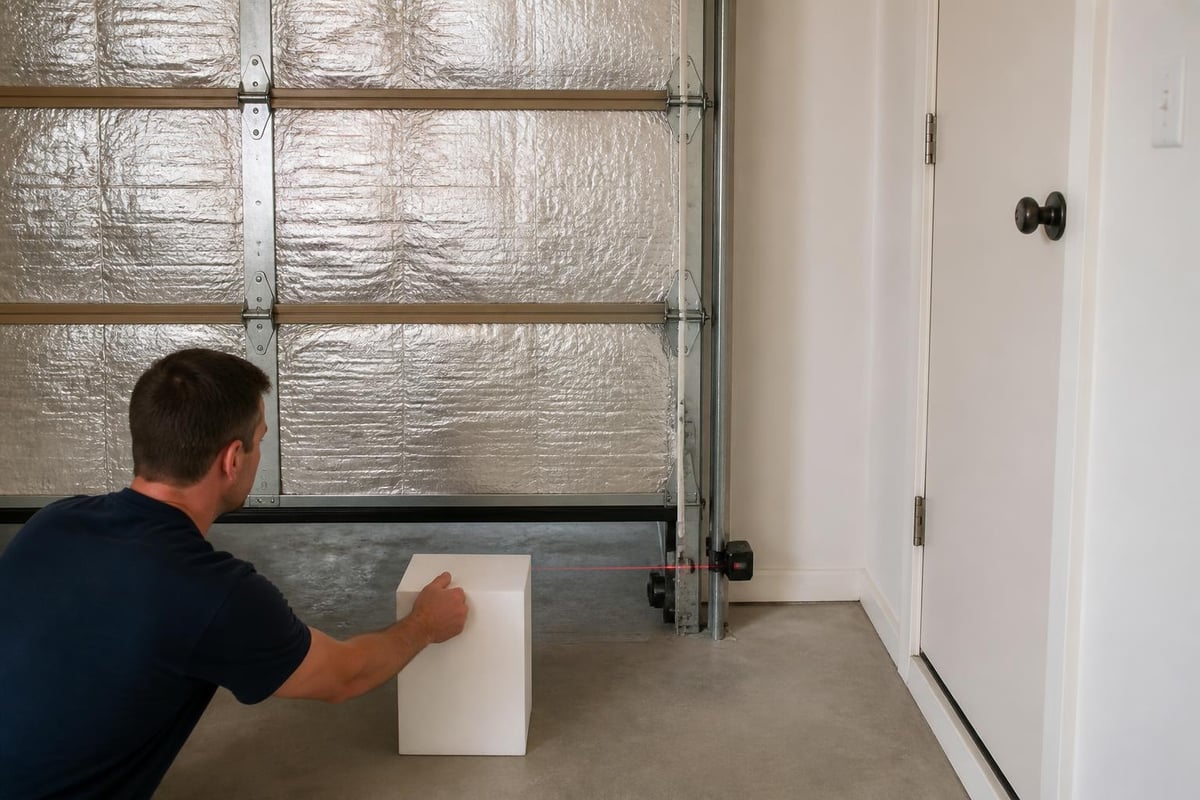
Some budget kits use reflective foil with or without bubble wrap cores. These products work primarily by reflecting radiant heat rather than resisting conductive heat flow. They're lightweight and simple to install but generally provide lower R-values compared to foam panels.
Reflective insulation performs best when facing an air gap, which isn't always achievable in garage door applications. If you're considering reflective options for underfloor or other applications, explore resources on bubble wrap foil insulation to understand where these products excel.
| Material | Typical R-Value (per 25mm) | Moisture Resistance | Cost | Best Use Case |
|---|---|---|---|---|
| EPS Foam | R-3.0 to R-4.0 | Good | $ | Standard retrofit, budget-friendly |
| XPS Foam | R-4.0 to R-5.0 | Excellent | $$ | Durable applications, moisture-prone areas |
| Polyurethane | R-6.0 to R-7.0 | Excellent | $$$ | Maximum thermal performance, limited space |
| Reflective Foil | R-1.0 to R-2.0 | Fair | $ | Radiant barrier, supplementary use |
How to Choose the Right Kit for Your Garage Door
Not all garage door insulation kits suit every door type or performance goal. Your choice depends on door construction, climate requirements and budget.
Assess Your Door Construction
Single-layer metal doors with a frame-and-panel design are the easiest to insulate with retrofit kits. The structural ribs create natural cavities for inserting foam panels.
Flush doors (smooth on both sides) can be trickier. Some kits include adhesive backing or fastening systems to secure insulation panels to the door's interior surface. Check that the added thickness won't interfere with door operation or clearance.
Timber doors generally don't benefit as much from retrofit kits since the wood already provides some insulating value. If you have a timber door, focus on weather sealing gaps instead.
Consider Climate and R-Value Needs
Melbourne sits in climate zone 6 under the Australian building codes, experiencing warm summers and cool winters. For an attached garage where temperature stability matters, aim for an R-value of at least R-4.0 across the whole door assembly.
Detached garages or those used purely for storage can manage with lower R-values (R-2.0 to R-3.0) unless you're heating or cooling the space. The DOE Building America technical support resources offer insights into envelope performance and retrofit priorities.
Don't forget that air leakage often matters more than insulation alone. Even an R-8.0 door loses heat rapidly if gaps around the perimeter allow drafts. Inspect weather seals and replace worn strips before or during your insulation upgrade.
Measure Your Door Panels
Kits come sized for common door configurations – typically 8-foot or 9-foot wide doors with four or five horizontal panels. Measure the width and height of each panel cavity, accounting for any structural ribs or bracing that might reduce usable space.
Pre-cut kits save time but only work if dimensions align. Universal kits with full sheets require you to cut panels to fit, which adds effort but ensures a precise match.
Step-by-Step Installation Process
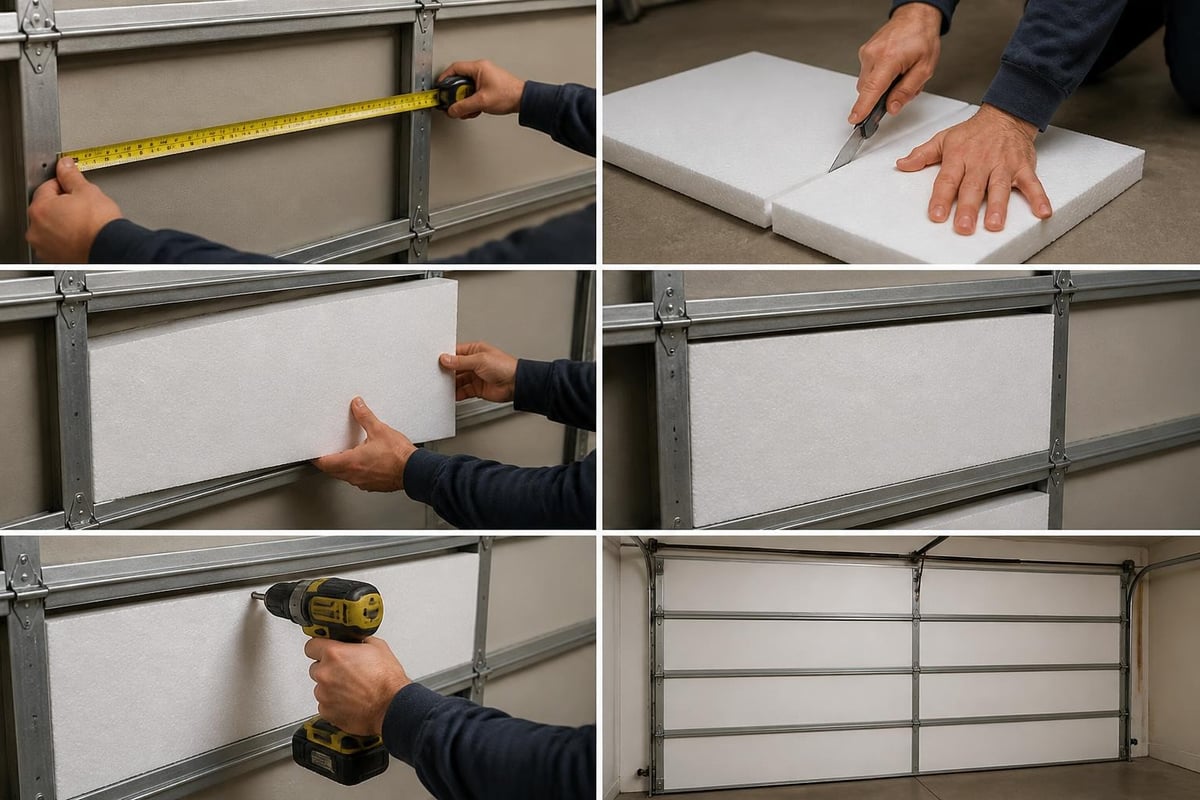
Installing garage door insulation kits is a manageable DIY project for most homeowners. The process typically takes 2-4 hours depending on door size and kit type.
1. Gather Tools and Materials
You'll need:
- The insulation kit (panels, fasteners and any adhesive)
- Tape measure and marker
- Utility knife or handsaw for trimming foam
- Safety glasses and gloves
- Step ladder
- Optional: weather stripping, caulk gun
2. Clean the Door
Wipe down the interior door surface to remove dust, grease and debris. Adhesive or fasteners won't stick properly to dirty metal or paint. Let the surface dry completely before proceeding.
3. Measure and Cut Panels
If using pre-cut panels, check fit in each cavity before securing. For universal kits, measure each panel opening and cut foam slightly oversized by about 5-10mm. You can compress the foam slightly for a snug fit, which helps hold panels in place without adhesive.
Use a sharp utility knife or fine-tooth saw for clean cuts. A straight edge or metal ruler prevents wandering cuts.
4. Insert or Attach Panels
Most kits use one of three attachment methods:
- Friction fit: Slightly oversized foam panels wedge into place between door ribs
- Adhesive backing: Peel-and-stick panels bond directly to the door surface
- Retaining clips or pins: Plastic fasteners snap through the foam and lock onto the door frame
Follow the kit's instructions carefully. For friction-fit installations, start at the top panel and work down. If using adhesive, apply even pressure across the entire panel for 30 seconds to ensure good contact.
5. Seal Edges and Gaps
Check for gaps around panel edges or where foam meets door framing. Small gaps won't drastically reduce performance, but larger openings (over 10mm) can create thermal bridges. Use foam sealant or flexible caulk to fill noticeable gaps.
6. Update Weather Stripping
While the door is accessible, inspect the bottom seal and side/top weather stripping. Replace any cracked or compressed strips. New weather seals dramatically improve overall thermal performance and often cost less than $50 for a full door kit.
7. Test Door Operation
Before finishing, operate the door through several full cycles. Insulation adds weight – typically 5-10kg for a standard double door. Check that:
- The door moves smoothly without binding
- The automatic opener (if fitted) handles the extra load without strain
- The door balances correctly when manually lifted halfway
If the door feels heavy or struggles to open, you may need to adjust spring tension. This is a job for a qualified garage door technician – springs are under high tension and can cause serious injury if mishandled.
Common Installation Mistakes to Avoid
Even straightforward retrofit projects can go wrong. Watch out for these common pitfalls:
Ignoring door balance and spring tension. Adding insulation changes the door's weight distribution. If your door was already marginal or springs are old, the extra mass can overload the opener mechanism or make manual operation difficult.
Using the wrong adhesive. Some foam types react chemically with certain adhesives or solvents, causing melting or degradation. Always use the adhesive supplied with the kit or one explicitly rated for polystyrene/polyurethane foam.
Blocking ventilation slots or drain holes. Some garage doors have small vent openings or weep holes designed to release condensation. Don't cover these with insulation or sealant.
Over-compressing foam. While a snug fit is good, crushing rigid foam by forcing it into undersized cavities reduces its R-value. Compression eliminates air pockets that provide much of the material's insulating power.
Forgetting about clearances. Insulation adds thickness to the door interior. Check that the extra bulk doesn't interfere with wall-mounted shelving, lighting or the garage door opener's sensors and hardware.
Thermal Performance: What to Realistically Expect
Marketing claims for garage door insulation kits sometimes promise results that don't match real-world performance. Understanding realistic outcomes helps set proper expectations.
A typical retrofit kit can raise a bare metal door from around R-0.5 to somewhere between R-4.0 and R-8.0 depending on material and thickness. That's a meaningful improvement, but it won't turn a garage into a climate-controlled workshop by itself.
The Whole-Assembly Picture
Your garage door's effective R-value depends on more than just the insulation panels. The Building Science Corporation's thermal metric resources explain whole-assembly performance and thermal bridging concepts.
Metal door frames, hinges and bracing create thermal bridges – conductive pathways that bypass insulation. These bridges can reduce the overall effective R-value by 20-40% compared to the insulation material's rated performance.
Air leakage around the door perimeter often has a bigger impact than modest R-value differences. A poorly sealed R-8.0 door can perform worse than a well-sealed R-4.0 door in real conditions.
Temperature Impact in Attached Garages
For attached garages, insulating the garage door is part of a broader thermal strategy. You're protecting the conditioned space of your home from the unconditioned garage, which acts as a buffer zone.
Expect the garage temperature to stay 3-8°C closer to outdoor temperature compared to your living areas. On a 35°C summer day, an uninsulated garage might hit 40°C or higher; with insulation and proper sealing, you might keep it around 32-35°C. Not comfortable for extended work, but much better for stored items and reducing heat transfer into the home.
In winter, insulation helps prevent the garage from dropping to freezing temperatures, which protects paints, lubricants and other temperature-sensitive materials.
Comparing Retrofit Kits to Factory-Insulated Doors
If you're renovating or building new, you might wonder whether a retrofit kit or a factory-insulated garage door makes more sense.
Factory-insulated doors sandwich insulation between two layers of steel or aluminium, creating a sealed panel with minimal thermal bridging. These doors typically achieve R-values between R-6.0 and R-18.0 depending on construction and materials.
Advantages of factory doors:
- Higher R-values and better thermal bridging control
- Cleaner appearance (insulation is hidden)
- Better structural integrity and wind resistance
- Longer product warranties
Advantages of retrofit kits:
- Much lower cost (typically $150-$400 vs $1,500-$4,000+ for a new door)
- No need to remove and dispose of existing door
- DIY-friendly installation in a few hours
- Effective upgrade if existing door is structurally sound
For homeowners on a budget or with doors in good condition, retrofit kits deliver solid value. If your door is old, damaged or you're planning major upgrades anyway, investing in a factory-insulated door often makes more long-term sense.
This Old House provides practical guidance on weighing factory door installation against retrofit approaches.
Building Code and Safety Considerations
Australian building codes don't generally mandate garage door insulation in existing homes, but upgrades must still meet safety requirements.
Fire Safety and Separation
If your garage is attached to your home, building regulations require fire-rated separation between the garage and living spaces. This typically means:
- Fire-rated doors (usually 30-minute rating minimum) between garage and house
- Proper sealing of penetrations (ducts, pipes, cables)
- Self-closing mechanisms on access doors
Adding insulation to your garage door doesn't change these requirements, but it's a good opportunity to inspect and upgrade your fire separation if needed. Check with your local council for specific requirements in your area.
Ventilation Requirements
Garages need adequate ventilation to prevent carbon monoxide buildup and remove fumes from stored fuels, paints and chemicals. Some insulation upgrades inadvertently block ventilation pathways.
Maintain at least 0.5 air changes per hour through a combination of passive vents, gaps under the door and mechanical extraction if you run engines or store volatile materials. The NAHB best-practice guidance covers garage ventilation alongside insulation and air sealing strategies.
Door Operation Safety
Your garage door is the largest moving object in your home. After installing insulation, verify that:
- Automatic reversing mechanisms still function correctly
- Photo-eye sensors aren't obstructed
- Manual release mechanisms operate smoothly
- Warning labels remain visible
If you're unsure about any safety system, consult a licensed garage door technician for an inspection.
Cost Breakdown and Budget Planning
Understanding the full cost of a garage door insulation project helps with planning and product selection.
Kit Prices
Budget kits (EPS foam, basic fasteners): $120-$250 Mid-range kits (XPS or denser EPS, better fasteners): $250-$400 Premium kits (polyurethane, comprehensive hardware): $400-$650
These prices reflect 2026 retail costs for kits covering a standard 2.1-2.4m wide by 2.1m high door. Larger doors or commercial sizes cost more.
Additional Materials
Budget for weather stripping replacement ($30-$80), caulk or foam sealant ($15-$25), and potentially new bottom seal or threshold ($40-$100). If your door needs spring adjustment after adding weight, professional service typically costs $120-$200.
DIY vs Professional Installation
Most homeowners can install retrofit kits themselves in 2-4 hours. Professional installation adds $200-$400 to the total cost but ensures proper fit and door adjustment.
DIY installation makes sense if:
- You're comfortable with basic tools
- The door is in good working condition
- You can safely reach all panels (ladder work)
Hire a pro if your door is older, you're uncertain about spring tension or you want the work done quickly without risk.
| Project Scope | DIY Cost | Professional Cost | Time Required |
|---|---|---|---|
| Basic kit + weather seal | $180-$300 | $500-$700 | 2-3 hours DIY / 1-1.5 hours pro |
| Mid-range kit + seals + bottom threshold | $350-$550 | $700-$950 | 3-4 hours DIY / 1.5-2 hours pro |
| Premium kit + full seal replacement + spring adjustment | $550-$850 | $1,000-$1,400 | 4-5 hours DIY / 2-3 hours pro |
Maintenance and Long-Term Performance
Garage door insulation requires minimal maintenance but does benefit from occasional attention.
Annual checks:
- Inspect foam panels for damage, compression or detachment
- Look for moisture stains or mould growth (indicates air sealing issues)
- Check that fasteners or adhesive remain secure
- Verify weather seals still compress properly when door closes
Replace damaged panels promptly – thermal performance degrades quickly once insulation is compromised. Most manufacturers offer replacement panels for their kits.
Clean the door interior every 1-2 years with mild detergent and water. Avoid harsh solvents that might damage foam or adhesive bonds.
Additional Resources for Garage Insulation Projects
If you're planning broader garage improvements, consider these related upgrades:
Wall insulation: If your garage adjoins your home, insulating the shared wall delivers significant benefits. Explore options for wall insulation that suit your construction type.
Ceiling insulation: Heat rises, so an uninsulated garage ceiling wastes much of the thermal improvement from door insulation. Standard ceiling batts work well in garages with accessible roof spaces.
Underfloor (if applicable): Some garages are built over crawl spaces or on suspended floors. Adding underfloor insulation prevents cold air infiltration from below.
The Consumer Reports guide to shopping for home insulation offers independent advice on selecting products and understanding R-value requirements across different applications.
For deeper technical detail, the DASMA (Door & Access Systems Manufacturers Association) publishes standards and test methods covering thermal performance of garage doors and insulation systems.
Energy Savings and ROI Calculations
Many homeowners want to know whether garage door insulation will "pay for itself" through energy savings.
The honest answer: probably not quickly if your garage is detached and unheated. The return on investment comes more from comfort, usability and protecting stored items.
For attached garages, insulation reduces the heating and cooling load on adjacent rooms. Depending on your home's layout, climate control costs and existing insulation levels, you might save $50-$150 annually on energy bills.
At that rate, a $300 DIY kit breaks even in 2-6 years. Premium kits or professional installations take longer to recoup costs through savings alone.
Non-energy benefits often justify the investment:
- Garage becomes usable workspace year-round
- Reduced condensation protects vehicles and tools
- Quieter operation (both from weather and door mechanism)
- Higher home value (modest but positive impact)
The DOE Weatherization Assistance Program resources frame home envelope improvements including garage insulation within broader comfort and energy-efficiency goals.
Regional Considerations for Melbourne and Victoria
Victoria's climate range affects garage door insulation priorities. Coastal Melbourne has milder winters than inland areas like Ballarat or Bendigo, but summer heat affects all regions.
Summer Heat Management
During January and February, uninsulated garage doors in Melbourne can exceed 50°C on the interior surface. This radiant heat penetrates into adjacent living spaces and makes garage storage risky for heat-sensitive items.
Insulation combined with reflective surfaces (some kits include foil facing) can drop interior door temperatures by 10-15°C. Even better results come from adding shade structures or light-coloured exterior door finishes.
Winter Condensation Issues
Melbourne's winter humidity combined with cold door surfaces creates condensation problems in many garages. Water droplets form on the interior door surface when warm, moist air contacts the cold metal.
Insulation raises the interior surface temperature above the dew point, preventing or reducing condensation. This protects stored items from rust and mould while reducing musty odours.
If condensation is a major issue, also address air leakage and consider a small dehumidifier for enclosed garages.
Bushfire-Prone Areas
Some Victorian locations have bushfire attack level (BAL) ratings that affect building material choices. While garage doors aren't typically subject to the same strict requirements as roofing or windows, check with your local council before making changes if you're in a BAL-rated zone.
Most foam insulation materials are combustible and shouldn't be exposed on door exteriors in high-risk areas. Retrofit kits installed on interior door surfaces generally comply, but verify with your local building surveyor if in doubt.
Garage door insulation kits offer Melbourne homeowners a practical, affordable way to improve thermal comfort, reduce noise and protect garage contents from temperature extremes. The installation process suits DIY renovators while delivering measurable benefits for both attached and detached garages. Whether you're upgrading ceiling, wall or underfloor areas, Insulation Supplies Australia stocks the thermal solutions you need with expert guidance and delivery across Victoria to help you complete your project efficiently.