

Cold floors can make your home uncomfortable and drive up your heating bills, especially during Melbourne's chilly winters. Learning how to install insulation under floor areas is one of the most effective ways to improve thermal comfort and energy efficiency in homes with suspended timber floors. This practical guide walks you through the entire process, from choosing the right materials to securing insulation properly, helping you achieve professional results whether you're a homeowner tackling a DIY project or an owner-builder managing a renovation.
Why Underfloor Insulation Matters
Uninsulated floors can account for up to 20% of heat loss in Australian homes, particularly in older properties with suspended timber floors raised off the ground. When you install insulation under floor systems, you create a thermal barrier that prevents warm air from escaping through gaps and draughts.
The benefits extend beyond just warmth. Properly installed underfloor insulation reduces energy consumption, lowers heating costs, prevents moisture-related issues, and improves overall comfort throughout the year. During summer, it helps keep floors cooler by blocking heat transfer from the ground.
Melbourne's climate zone (Zone 6) experiences significant temperature variations, making underfloor insulation especially valuable for maintaining consistent indoor temperatures. According to YourHome's guidelines on floor insulation, proper installation can deliver substantial energy savings while also reducing noise transmission between floors in multi-storey homes.
Choosing the Right Underfloor Insulation Materials
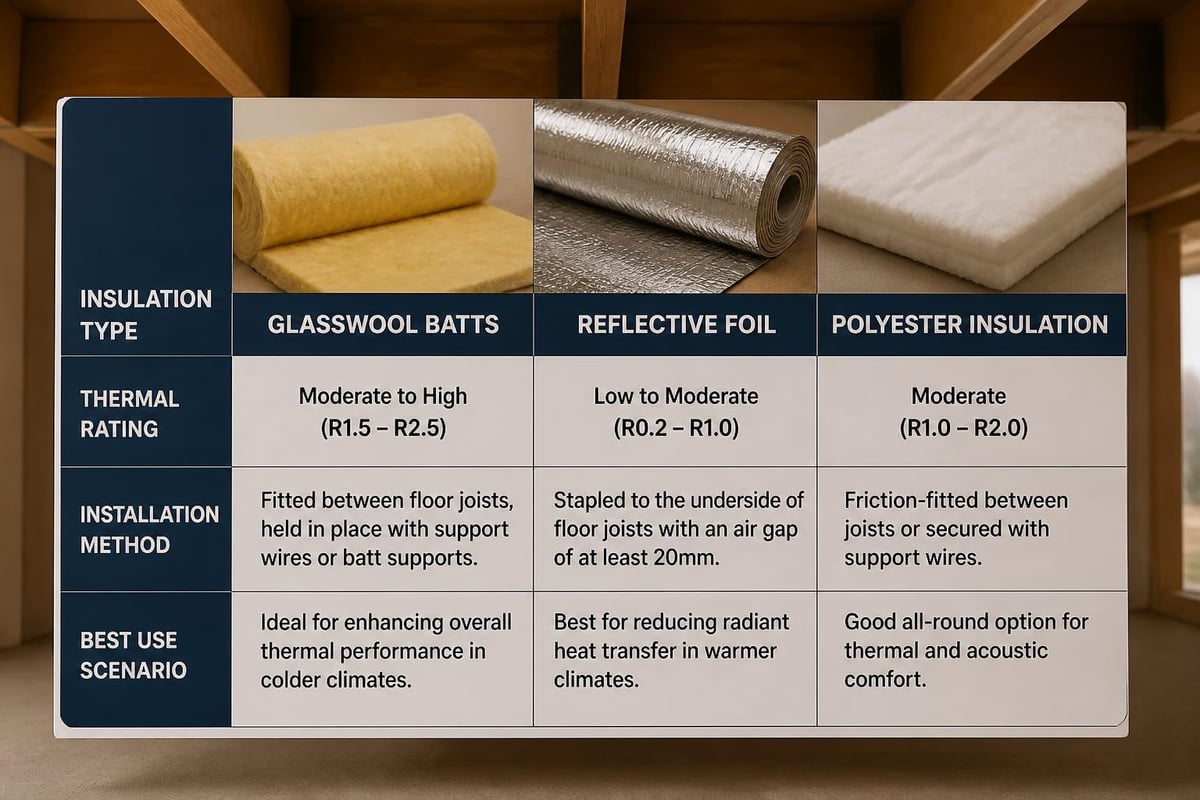
Several insulation types work well for underfloor applications, each with distinct characteristics:
Glasswool Batts
- Pre-cut to fit between standard joist spacings
- Excellent thermal performance
- Soft and easy to handle with modern ECOSE Technology
- Available in various R-values
- Cost-effective solution
Reflective Foil Insulation
- Lightweight and flexible
- Acts as both insulation and moisture barrier
- Reflects radiant heat back into the home
- Quick to install with staples or battens
- Ideal for shallow floor cavities
Polyester and Natural Fiber Batts
- Non-allergenic and safe to handle
- Moisture-resistant properties
- Environmentally friendly options
- Suitable for DIY installation
The right choice depends on your floor construction, joist spacing, available clearance height, and desired R-value. For Victorian homes, aim for at least R2.0 to R2.5 thermal resistance to meet comfort and efficiency standards.
Tools and Materials You'll Need
Before you start, gather everything required to complete the job safely and efficiently:
Safety Equipment:
- Dust mask or respirator
- Safety glasses
- Work gloves
- Protective clothing with long sleeves
- Knee pads for crawling
Installation Tools:
- Staple gun and staples (6-8mm)
- Utility knife with sharp blades
- Measuring tape
- Straight edge or ruler
- Work light or headlamp
- Wire supports or mesh (if required)
Materials:
- Underfloor insulation batts or rolls
- Reflective foil if using batts without facing
- Adhesive tape for sealing joins
- Insulation supports or chicken wire mesh
Having the right tools makes the job safer and more straightforward, especially when working in confined subfloor spaces with limited visibility.
Preparing the Underfloor Area
Proper preparation ensures your insulation performs effectively and lasts for decades. Start by inspecting the entire subfloor area thoroughly.
Clear out debris, old materials, and any obstructions that might interfere with installation or reduce clearance. Check for moisture issues, pest damage, and structural problems that need addressing before insulation goes in.
Key Preparation Steps
- Remove existing damaged or wet insulation
- Repair any floor joist damage or rot
- Install vapor barriers if required for your climate
- Ensure adequate ventilation exists around the perimeter
- Check electrical wiring and plumbing for damage
- Measure joist spacing and floor area accurately
According to EcoMaster's installation guidelines, proper ventilation must remain unobstructed even after insulation installation. Subfloor vents should never be blocked, as airflow prevents moisture buildup and timber decay.
Document your measurements carefully, including joist depth, spacing, and any irregular sections where standard batts won't fit. This information helps you order the correct quantity and dimensions.
How to Install Insulation Under Floor: Step-by-Step Process
The installation process varies slightly depending on whether you're using batts, blankets, or foil insulation, but the core principles remain consistent.
Installing Glasswool or Polyester Batts
Step 1: Measure and Cut
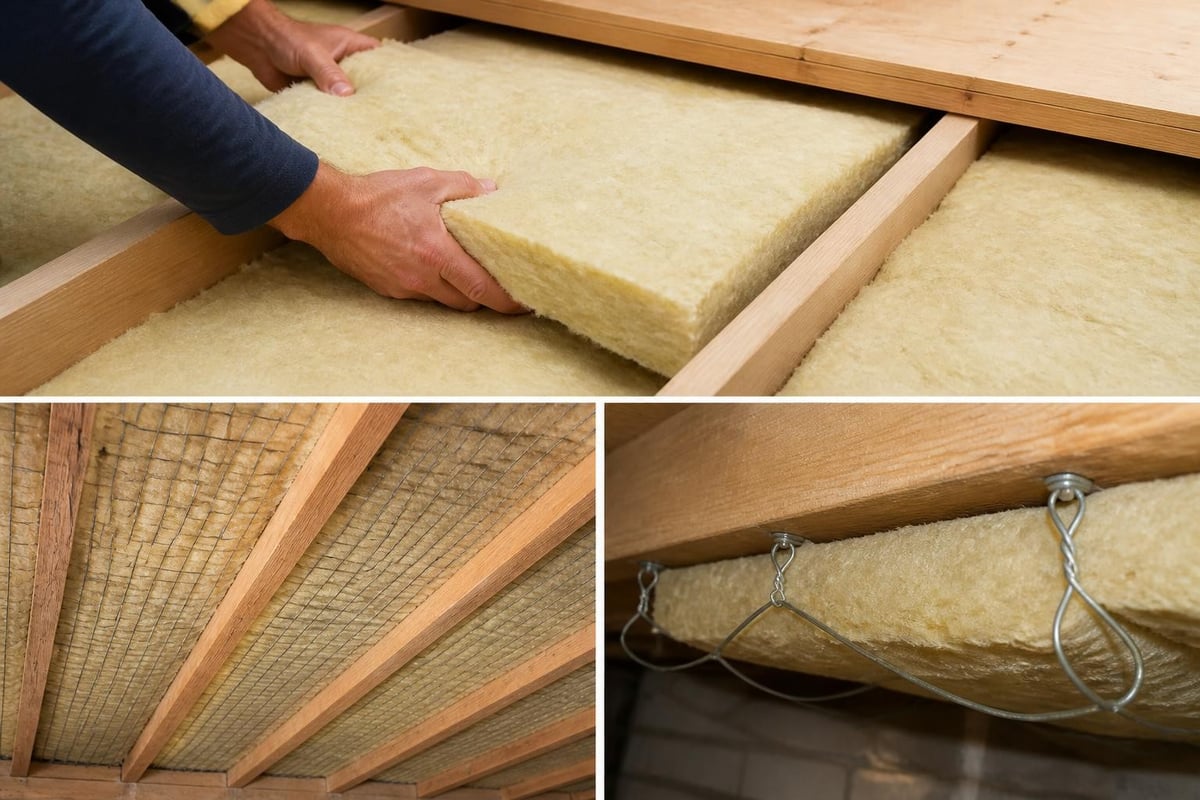
Measure the distance between floor joists accurately. Most Australian homes have joists spaced at 450mm or 600mm centers. Cut batts to length if necessary, leaving a slight compression fit for friction hold.
Step 2: Position the First Batt
Starting from one corner, push the batt up between the joists until it sits snugly against the underside of the floorboards. The batt should fill the cavity without compression, which reduces its R-value.
Step 3: Secure in Place
Use one of these securing methods:
- Friction fit: Batts slightly wider than joist spacing stay in place through compression
- Wire mesh: Staple chicken wire or purpose-made insulation mesh across joist bottoms
- Metal supports: Use spring wire supports designed for underfloor applications
- Battens: Install timber battens to create a supporting grid
Step 4: Work Systematically
Continue installing batts in parallel runs, ensuring each piece sits firmly against the floor above without gaps. Work methodically from one end to the other, checking as you go.
Step 5: Handle Obstacles
When you encounter pipes, cables, or ducts, carefully cut the insulation to fit around them without compressing the material. Split batts where necessary and rejoin them on the other side of obstacles.
The Insulation Institute's DIY guide emphasizes maintaining consistent coverage throughout the floor area, paying special attention to edges and corners where gaps commonly occur.
Installing Reflective Foil Insulation
Reflective foil products require different installation techniques to maximize their effectiveness.
Create an Air Gap
Foil insulation works by reflecting radiant heat, which requires at least 25mm of still air space on the reflective side. Install the foil so it drapes between joists with the shiny surface facing upward toward the floor.
Staple Securely
Staple the foil to the sides of joists at regular intervals (every 300-400mm). Keep the material taut but not stretched tight. Overlap joins by at least 100mm and seal with aluminum tape.
Seal Penetrations
Cut neat slits for pipes and cables, then tape around penetrations to maintain the vapor barrier integrity. This prevents moisture and air movement that reduces insulation effectiveness.
| Installation Method | Best For | R-Value Range | Difficulty |
|---|---|---|---|
| Friction-fit batts | Standard joist spacing | R2.0 - R2.5 | Easy |
| Wire mesh support | Deeper cavities | R2.5 - R4.0 | Moderate |
| Reflective foil | Shallow spaces | R1.5 - R2.0 | Easy |
| Combined system | Maximum performance | R3.0+ | Moderate |
Working Safely in Confined Subfloor Spaces
Underfloor areas present unique safety challenges that require careful attention and proper precautions.
Ventilation and Air Quality
Subfloor spaces often have poor air circulation and may contain dust, mold spores, or animal droppings. Always wear appropriate respiratory protection and ensure adequate ventilation before entering confined spaces.
Essential Safety Practices
- Never work alone under a building
- Use battery-powered LED lighting (not mains power)
- Watch for low-hanging obstacles and exposed nails
- Take regular breaks in fresh air
- Stay alert for signs of pest activity
- Keep your work area tidy to prevent trips and falls
Electrical Awareness
Be extremely cautious around electrical cables and junction boxes. Never move or disturb existing wiring. If insulation must go near electrical components, maintain required clearances as specified by Australian Standards.
According to Standard Insulating Company's safety recommendations, homeowners should consider professional assistance if subfloor access is severely restricted, electrical work is involved, or structural issues are present.
Common Mistakes to Avoid
Even experienced DIYers can make errors that compromise insulation performance. Watch out for these frequent issues:
Compression and Gaps
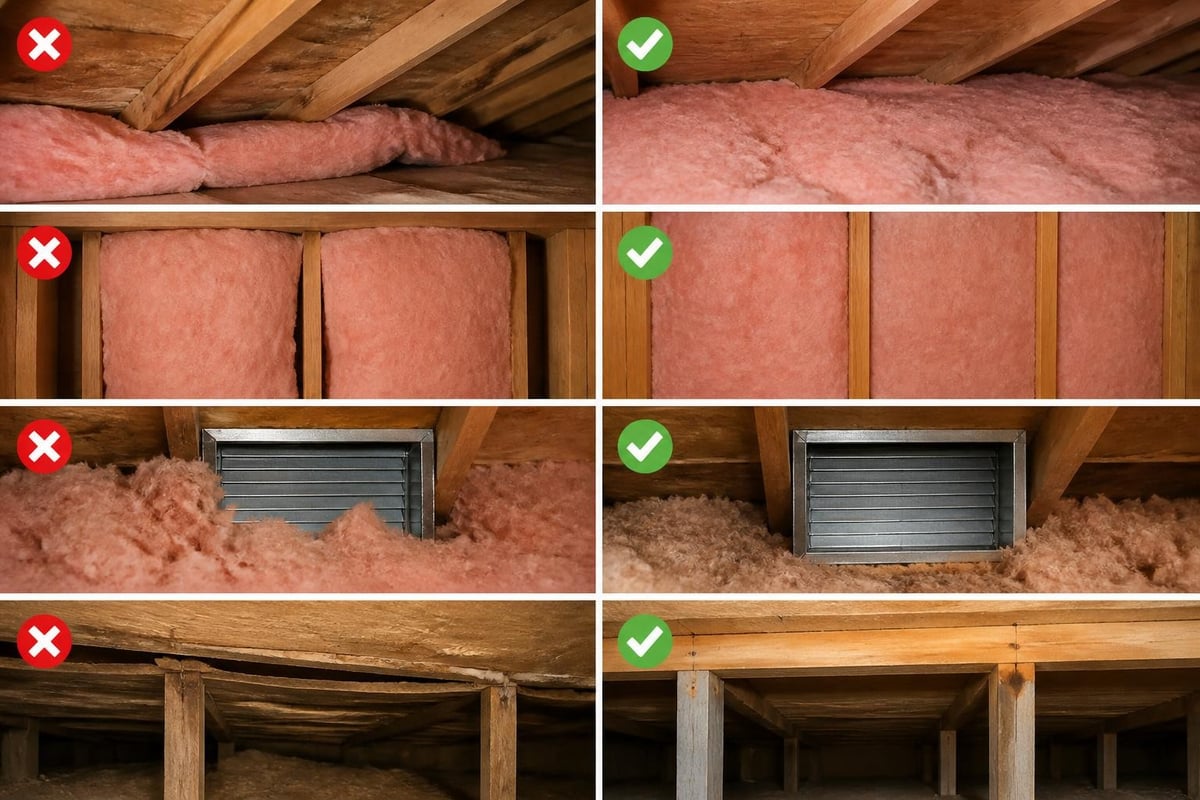
Compressing insulation to force it into tight spaces reduces its R-value significantly. Similarly, leaving gaps between batts creates cold spots where heat escapes. Aim for complete coverage with slight compression only at the edges for friction fit.
Blocking Ventilation
Never block subfloor vents or restrict airflow around the building perimeter. Adequate ventilation prevents moisture buildup that can lead to timber rot, mold growth, and insulation deterioration.
Incorrect Facing Direction
If using faced batts, the vapor barrier must face the correct direction based on your climate zone. In most Australian applications, any facing should be toward the heated interior space.
Inadequate Support
Relying solely on friction fit in wide joist spaces often results in sagging insulation that leaves gaps at the top of the cavity. Always use appropriate support methods for your specific installation.
Insulating Around Services and Obstacles
Real-world floor structures contain numerous services that require careful handling during insulation installation.
Plumbing Pipes
Cut insulation carefully around pipes, ensuring the material wraps closely without crushing. In cold climates, consider whether pipes should be on the warm or cold side of the insulation to prevent freezing.
Electrical Cables
Maintain clearances around electrical cables as required by regulations. Don't compress insulation tightly against cables that might generate heat. If uncertain about electrical safety, consult a licensed electrician.
Subfloor Vents
Leave at least 75mm clearance around vent openings to maintain required airflow. Mark vent positions clearly before installation to avoid accidentally blocking them.
Cross-Bracing and Supports
Work insulation carefully around structural cross-bracing, cutting and piecing as necessary to maintain continuous coverage while preserving structural integrity.
Maximizing Performance and Longevity
Once installed, underfloor insulation should perform effectively for many years with minimal maintenance. However, certain practices ensure optimal long-term results.
Inspection and Maintenance
Check insulation annually for signs of sagging, moisture damage, or pest activity. If you notice any issues, address them promptly to prevent further deterioration.
Moisture Management
Ensure adequate drainage around the building perimeter and maintain proper subfloor ventilation. Rising damp or pooling water can saturate insulation and reduce its effectiveness dramatically.
Combined Systems
For maximum thermal performance, combine underfloor insulation with proper ceiling insulation and wall insulation. A whole-house approach delivers the best energy efficiency results.
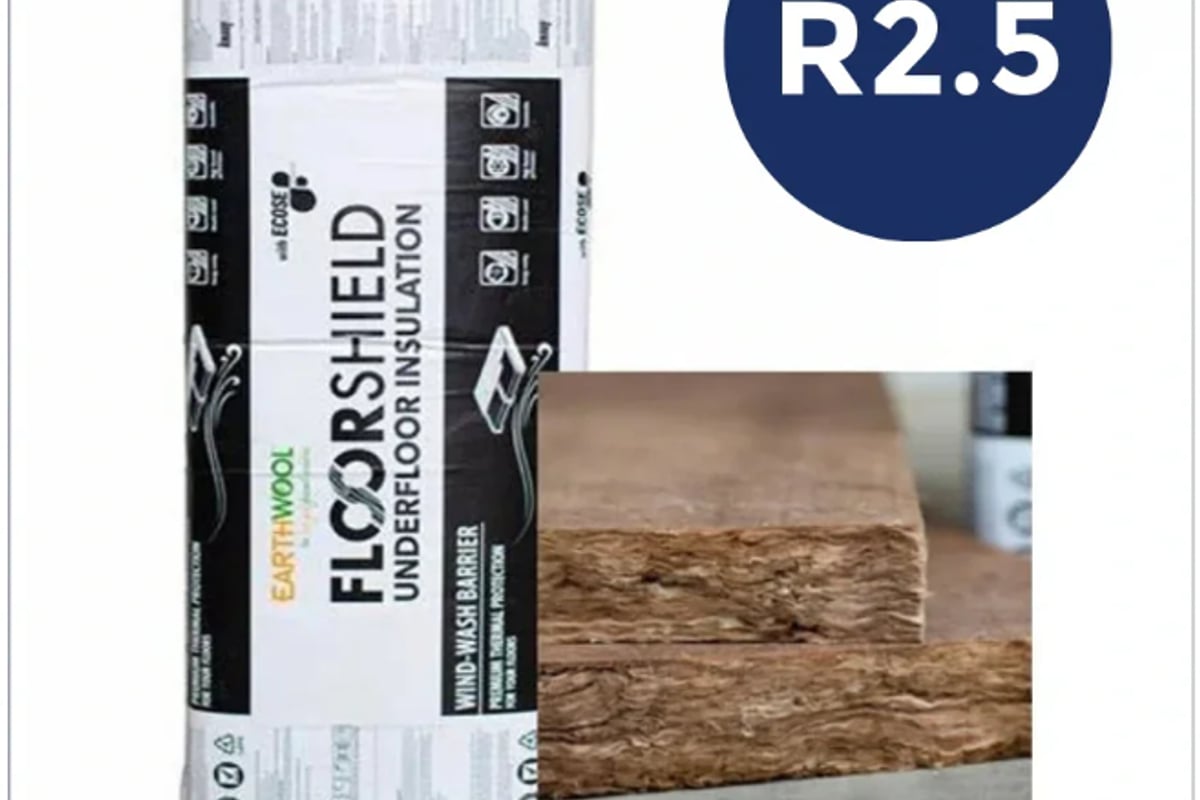
If you're planning to install insulation under floor areas in your home, choosing quality products makes a significant difference in both installation ease and long-term performance. The Floorshield R2.5 Underfloor Batts are specifically designed for suspended timber floors, offering excellent thermal resistance with the soft, low-dust handling characteristics of ECOSE Technology.
Measuring Your Floor Area Accurately
Ordering the right quantity of insulation requires accurate floor area measurements and understanding of joist configurations.
Calculate Total Area
Measure the length and width of each room or section, then multiply to get square meters. Add 10% to account for cutting waste, obstacles, and irregular areas.
Account for Joist Spacing
Standard joist spacing in Australian homes is typically:
- 450mm centers (older homes)
- 600mm centers (modern construction)
- Irregular spacing (renovated or extended areas)
Map Irregular Sections
Create a simple sketch showing areas with different joist spacing, unusual dimensions, or specific challenges. This helps ensure you order batts in appropriate sizes.
Coverage Calculation Example
For a 60m² floor area with 600mm joist spacing:
- Add 10% waste allowance: 60m² × 1.1 = 66m²
- Select batts sized for 600mm spacing
- Order sufficient packs to cover 66m²
Most insulation products clearly state coverage per pack, making quantity calculation straightforward once you know your total area.
Building Code and Compliance Considerations
While underfloor insulation isn't always mandatory in existing homes, new construction and major renovations must comply with National Construction Code requirements.
Victorian Building Requirements
The NCC specifies minimum R-values for different building elements based on climate zone. For floors in Melbourne and regional Victoria (Zone 6), the code provides performance requirements that inform best practice even for voluntary upgrades.
DIY Installation Compliance
When you install insulation under floor areas yourself, you're responsible for meeting relevant standards for material placement, fire safety, and moisture management. Keep records of products used, including R-values and installation dates.
For complex projects or where structural modifications are involved, consider engaging a building surveyor to ensure full compliance with current regulations.
Timing Your Underfloor Insulation Project
Strategic timing can make installation easier and more comfortable.
Best Seasons for Installation
- Autumn: Moderate temperatures, dry conditions, reduced pest activity
- Spring: Similar advantages to autumn with improving weather
- Avoid winter: Cold, wet conditions make subfloor work uncomfortable
- Avoid summer: Heat, spiders, and snakes are more active
Project Duration
For a typical 100m² home, expect to spend:
- Preparation and measurement: 2-4 hours
- Installation: 1-2 days (depending on access and obstacles)
- Final inspection and cleanup: 1-2 hours
Working methodically with proper planning prevents fatigue and reduces mistakes.
When to Consider Professional Installation
While many homeowners successfully install insulation under floor areas themselves, certain situations warrant professional assistance:
- Severely restricted access making DIY impractical
- Extensive electrical or plumbing work required
- Structural repairs needed before insulation
- Very large floor areas requiring specialized equipment
- Physical limitations preventing safe crawling and lifting
Professional installers bring experience, appropriate insurance, and compliance knowledge that can be valuable for complex projects. For straightforward installations in accessible subfloor spaces, DIY installation remains a cost-effective option.
Coordinating with Other Renovation Work
Underfloor insulation often forms part of broader home improvement projects. Coordinate timing and sequencing carefully.
Before Underfloor Insulation:
- Complete any subfloor structural repairs
- Upgrade electrical wiring if planned
- Replace old plumbing if necessary
- Install or repair subfloor moisture barriers
After Underfloor Insulation:
- Install floor coverings
- Complete interior painting
- Add acoustic insulation if required between floors
This sequencing prevents damage to newly installed insulation and ensures all work meets current standards.
Cost Considerations and Budgeting
Understanding project costs helps with planning and budgeting for your underfloor insulation installation.
| Cost Component | Typical Range (2026) | Notes |
|---|---|---|
| R2.0 batts (per m²) | $8 - $15 | Material only |
| R2.5 batts (per m²) | $12 - $20 | Material only |
| Foil insulation (per m²) | $6 - $12 | Material only |
| Support mesh/wire | $50 - $150 | For typical home |
| Safety equipment | $30 - $100 | One-time purchase |
| Tools and accessories | $40 - $80 | If not already owned |
For a 100m² floor area, expect material costs between $1,200 and $2,000 depending on R-value selected. Professional installation typically adds $2,000 to $4,000 depending on access difficulty and project complexity.
Evaluating Results After Installation
Once you install insulation under floor systems, monitor performance to confirm the investment delivers expected benefits.
Immediate Improvements:
- Warmer floors underfoot
- Reduced draughts through floorboards
- More even temperature distribution
- Quieter floors in multi-story homes
Longer-Term Benefits:
- Lower heating bills (typically 10-20% reduction)
- Improved thermal comfort year-round
- Better humidity control
- Reduced condensation issues
Track your energy bills over several months to quantify savings. Most homeowners notice comfort improvements immediately, with financial benefits becoming clear over the first heating season.
Additional Resources and Support
Continuing your education about home insulation helps make informed decisions about current and future projects.
Insulation Supplies Australia offers extensive resources through their blog section, covering topics from underfloor insulation fundamentals to advanced installation techniques. Their expert team can also provide personalized product recommendations based on your specific floor structure and performance goals.
For technical guidance on handling specific installation challenges, Engineer Fix's comprehensive guide provides additional perspectives on addressing thermal bridging and air infiltration issues.
Product Selection Guide
Choosing between available underfloor insulation products depends on several factors specific to your project.
For Standard 90mm Joist Depth:
- R2.5 glasswool batts provide excellent thermal performance
- Pre-cut sizes fit 420mm and 580mm joist spacing
- ECOSE Technology products offer low-dust handling
For Shallow Floor Cavities:
- Reflective foil insulation maximizes performance in limited depth
- Combined foil and batt systems where space permits
- Multi-layer foil products provide enhanced R-values
For Deeper Cavities:
- Higher R-value batts (R3.0 to R4.0) for maximum performance
- Thicker products fill available space effectively
- Consider acoustic benefits of dense insulation
Browse the full range of underfloor insulation products to compare specifications, R-values, and coverage options for your specific requirements.
Installing insulation under floor areas delivers immediate comfort improvements and long-term energy savings, making it one of the most worthwhile home upgrades for Victorian properties with suspended timber floors. By following proper installation techniques, using quality materials, and paying attention to details like securing methods and obstacle handling, you can achieve professional results with a DIY approach. Whether you're renovating an older home or improving a recent purchase, Insulation Supplies Australia provides the quality products, competitive pricing, and expert guidance you need to make your project a success.