

A garage insulation kit offers a practical solution for Australians looking to transform an uninsulated garage into a comfortable, energy-efficient space. Whether you're converting your garage into a workshop, gym, storage area or even a liveable room, proper insulation makes a dramatic difference to temperature control, condensation management and overall comfort. The right kit bundles the materials you need while taking the guesswork out of selecting compatible products for your specific application.
What Makes a Garage Insulation Kit Different
A garage insulation kit isn't just a random collection of batts and foil. It's a coordinated package designed to address the unique challenges garages present compared to standard living spaces.
Most garages face extreme temperature swings, moisture issues from concrete slabs, and construction details that differ from main dwellings. A proper kit accounts for these factors by including thermal batts rated for your climate zone, vapour management materials and often accessories like tape and fixings.
Key components typically included:
- Thermal batts or blankets (glasswool or polyester)
- Vapour control layers or reflective foil
- Fixing clips, staples or adhesive tape
- Installation guides specific to garage applications
- Edge sealing materials
The Department of Energy's insulation guide emphasises that proper material selection depends on the specific assembly and climate, which is why garage-specific kits help match products to the application.
Understanding R-Values for Garage Applications
Choosing the right thermal rating depends on how you'll use the space. A garage used occasionally for storage needs less insulation than one serving as a home gym or workshop.
| Usage Type | Recommended R-Value | Typical Product |
|---|---|---|
| Occasional storage | R1.5 – R2.0 | Light glasswool batts |
| Regular workshop | R2.5 – R3.2 | Medium-density batts |
| Conditioned space | R3.7 – R4.0 | High-performance blankets |
| Attached to house | R2.5+ walls, R4.0+ ceiling | Multi-layer system |
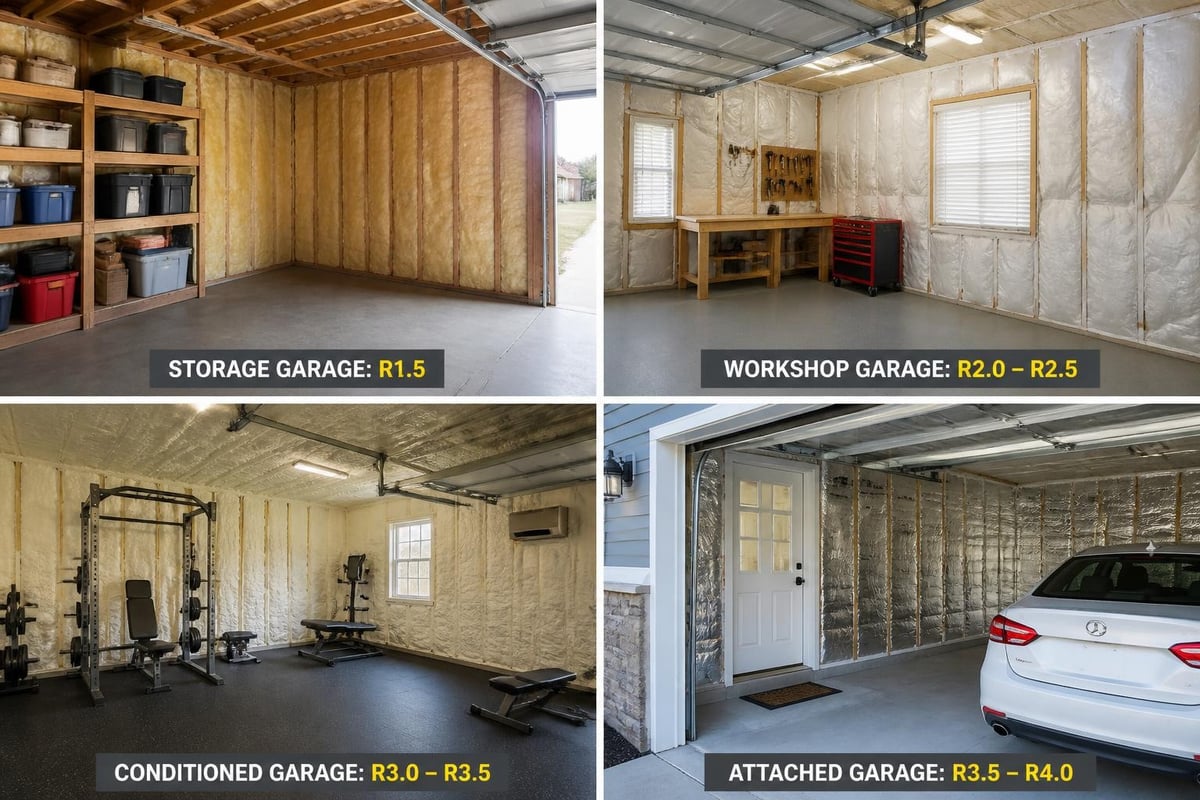
Melbourne and regional Victoria fall within climate zones 6 and 7, where winter heating dominates energy costs. The climate zones guide on the ISA website explains how these zones influence insulation requirements.
Components of a Complete Garage Insulation System
Wall Insulation Materials
Garage walls present different challenges depending on construction type. Timber-framed garages accept standard wall batts between studs, while brick or concrete block walls may need different approaches.
For timber-framed walls between 90mm studs, R2.5 batts provide solid thermal performance. If your garage shares a wall with your home, Building America's compliance brief highlights the importance of properly insulating and air-sealing this partition wall to prevent car exhaust and humidity transfer.
Wall insulation options:
- Glasswool batts (friction-fit between studs)
- Polyester batts (ideal for DIY handling)
- Rigid foam boards (for masonry walls)
- Reflective foil wraps (radiant barrier component)
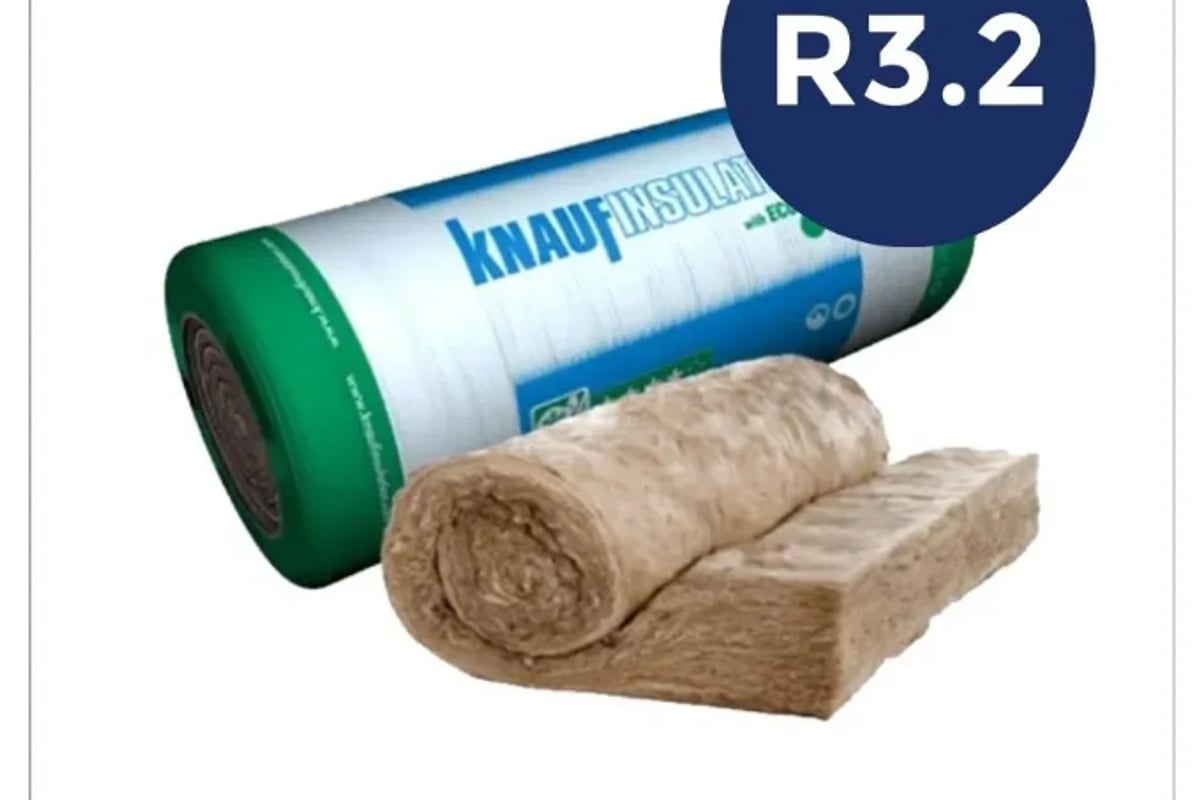
The Earthwool Blanket Unfaced R3.2 130mmx1200mmx13.5m 16.2m² from Knauf works exceptionally well in garage wall cavities where continuous runs reduce installation time. Its ECOSE Technology makes it soft to handle during extended DIY installations.
Ceiling and Roof Insulation
Garage ceilings lose heat faster than any other surface, making them the priority area for insulation investment. Whether you have a flat ceiling with roof space above or an exposed raked ceiling, thermal batts significantly improve comfort.
For standard horizontal ceilings with accessible roof space, install batts between ceiling joists just as you would in a house. Exposed raked ceilings under metal roofing need a different approach, typically using roof blankets stapled to the underside of rafters.
Building Science Corporation's technical guidance on garages recommends prioritising ceiling insulation even when budget limits prevent wall insulation, because heat loss through the ceiling accounts for 25-35% of total garage heat transfer.
Floor and Slab Considerations
Concrete slab floors act as thermal sinks, drawing heat from the space above. While retro-fitting under-slab insulation isn't practical, you can address cold floors in several ways.
Installing underfloor insulation works when you have suspended timber floors above unenclosed space. For concrete slabs, consider insulated floor panels or simply accept that heated garages with slab floors need slightly higher air temperatures to feel comfortable.
| Floor Type | Insulation Approach | Typical R-Value |
|---|---|---|
| Concrete slab | Surface mats or none | N/A |
| Suspended timber | Between joists | R1.5 – R2.5 |
| Raised platform | Rigid foam under | R2.0 – R3.0 |
Choosing Between Pre-Packaged Kits and Custom Solutions
Pre-packaged garage insulation kits offer convenience and often cost savings compared to buying components separately. However, they work best for standard garage sizes and construction types.
When Pre-Packaged Kits Work Best
Standard single or double garages with typical stud spacing (450mm or 600mm centres) and common dimensions suit off-the-shelf kits perfectly. These packages include measured quantities that minimise waste while covering the specified area.
Advantages of packaged kits:
- Matched components designed to work together
- Simplified purchasing with single SKU
- Often bundled at a discount versus separate items
- Included instructions specific to the kit contents
- Appropriate accessory items included
When to Build a Custom Package
Garages with non-standard dimensions, unusual construction details, or specific performance requirements benefit from custom material selection. An experienced insulation supplier can help calculate exact quantities and recommend appropriate products.
Custom approaches make sense for:
- Attached garages requiring specific fire-rating assemblies
- Workshops needing enhanced acoustic control
- Spaces with irregular stud spacing or ceiling heights
- Projects combining multiple insulation types
- Heritage or architecturally significant buildings
Installation Methods and Techniques
DIY Installation Considerations
Installing a garage insulation kit suits confident DIYers with basic tools and reasonable physical fitness. Unlike professional installations in occupied homes, garage projects allow more flexible timelines and learning opportunities.
Essential tools and safety equipment:
- Sharp insulation knife or serrated blade
- Measuring tape and straight edge
- Staple gun (for foil and blankets)
- Safety glasses and dust mask
- Long sleeves and gloves
- Ladder or platform for ceiling work
Consumer Reports' insulation shopping guide reminds DIYers that proper personal protective equipment prevents skin irritation and respiratory discomfort, especially when working overhead in confined roof spaces.
Professional Installation Benefits
While a garage insulation kit simplifies the process, hiring trades ensures compliance with Building Code requirements, proper vapour barrier placement and warranty coverage for the installation workmanship.
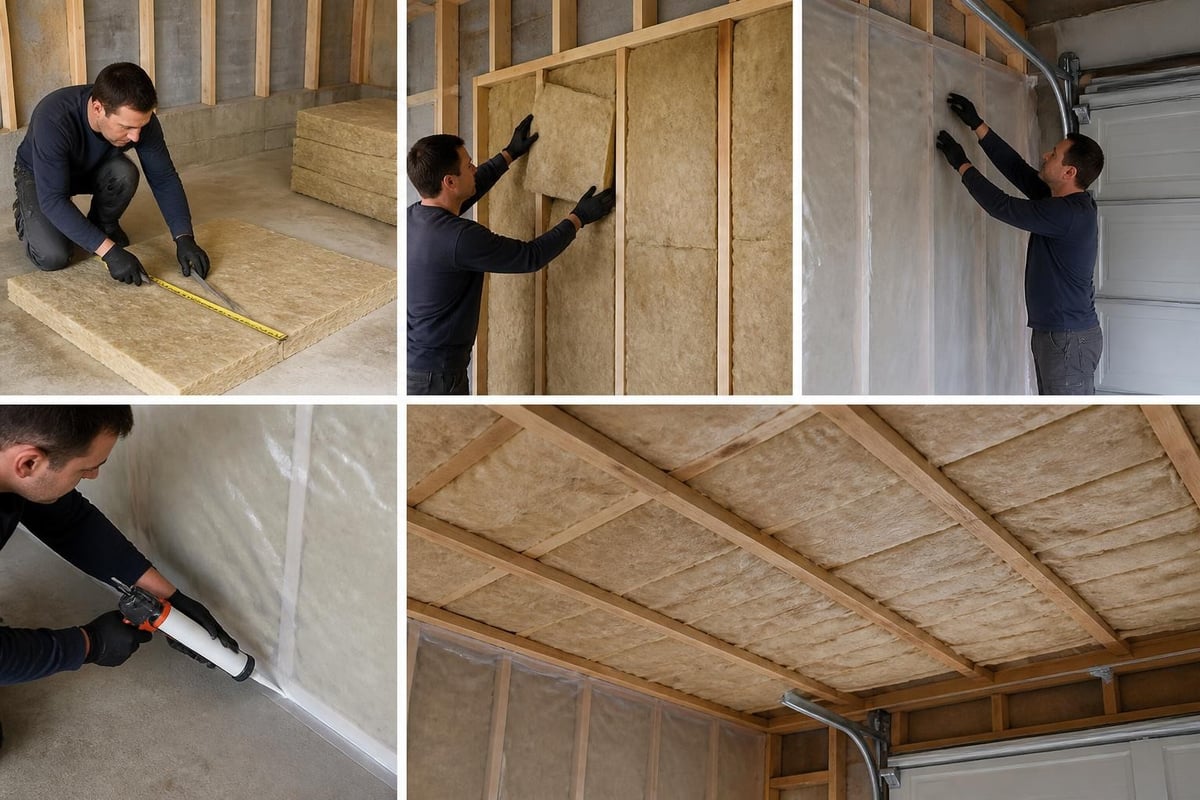
Professional installers bring experience with tricky details like penetrations for electrical boxes, working around existing services, and achieving consistent compression without gaps. Their work typically costs $15–$30 per square metre for labour, depending on project complexity and access difficulty.
Thermal Performance and Energy Savings
Quantifying the exact energy savings from garage insulation depends on variables including climate, garage use patterns, heating/cooling equipment and the temperature difference you're trying to maintain.
Realistic Expectations for Temperature Control
An uninsulated garage in Melbourne typically sits 2–4°C warmer than outside in winter and several degrees hotter in summer. Adding R2.5 wall and R4.0 ceiling insulation typically narrows that gap dramatically.
With insulation but no active heating, expect internal temperatures to stabilise 5–8°C above outdoor minimums in winter. Add a modest heater, and achieving comfortable 18–20°C becomes practical with reasonable running costs.
The ASHRAE standards for building envelope performance provide technical background on how insulation reduces heat flow and the relationship between R-value and energy consumption in various climate zones.
Condensation and Moisture Management
Garages face unique moisture challenges from vehicles bringing in rain and snow, concrete slabs releasing moisture, and temperature differentials causing condensation. Proper insulation installation includes vapour management strategies.
Moisture control strategies:
- Install vapour barriers on the warm side of insulation
- Ensure adequate ventilation (even in insulated garages)
- Seal penetrations and gaps in the building envelope
- Address water entry from doors and windows
- Consider dehumidification in problem cases
Building Science Corporation's parking garage guidance discusses vapour drive and condensation risk in garage assemblies, emphasising that proper material sequencing prevents trapped moisture issues.
Cost Factors and Budget Planning
Material Costs for Common Garage Sizes
A single garage (3m × 6m = 18m²) typically needs 25–30m² of wall insulation (accounting for stud depth and perimeter) plus 18–20m² of ceiling insulation. Material costs vary significantly based on R-value and product type.
| Garage Size | Wall Area | Ceiling Area | Est. Material Cost |
|---|---|---|---|
| Single (3×6m) | 25–30m² | 18–20m² | $350–$650 |
| Double (6×6m) | 35–45m² | 36–40m² | $650–$1,200 |
| Large (7×7m) | 45–55m² | 49–55m² | $900–$1,600 |
These estimates assume mid-range R-values (R2.5 walls, R3.5–R4.0 ceiling) using glasswool batts. Premium products, higher R-values or specialist materials increase costs proportionally.
Additional Components and Accessories
Beyond the primary insulation materials, factor in costs for:
- Vapour barrier or reflective foil wrap ($50–$150)
- Fixing materials (staples, tape, clips) ($30–$80)
- Sealing compounds and gap fillers ($20–$60)
- Safety equipment if not already owned ($40–$100)
- Waste disposal for packaging ($20–$50)
The wall insulation guide explores how different wall constructions affect both material selection and total project costs.
Product Selection by Application Type
Workshop and Hobby Spaces
Garages converted to workshops benefit from enhanced acoustic insulation alongside thermal performance. Power tools, compressors and machinery generate significant noise that proper insulation helps contain.
High-density glasswool batts (22kg/m³ or higher) provide better sound attenuation than standard-density products. Combine thermal batts with acoustic-rated materials for walls separating the workshop from living areas.
Climate-Controlled Storage
Wine storage, classic car collections and sensitive equipment require stable temperatures year-round. These applications justify premium insulation investment with higher R-values and careful air-sealing.
Target R4.0+ in ceilings and R3.2+ in walls. Combine insulation with supplementary heating/cooling sized appropriately for the insulated space rather than an uninsulated garage.
Home Gyms and Multi-Use Spaces
Converting a garage to a gym, studio or home office means meeting comfort standards similar to living spaces. Consider both thermal and acoustic performance, especially if the garage shares walls with bedrooms.
The ceiling insulation guide explains how proper ceiling insulation creates consistent temperature zones and reduces sound transmission to rooms above.
Common Mistakes to Avoid
Compression and Gap Issues
Compressing insulation batts reduces their R-value significantly. A compressed R3.5 batt may perform closer to R2.0 if squeezed into a cavity 20% too narrow. Similarly, gaps around batts create thermal bridges that compromise overall performance.
Cut batts slightly oversized (10–15mm wider than the cavity) so they friction-fit snugly without requiring compression. Split batts lengthwise to fit narrow cavities rather than crushing full-width products.
Incorrect Vapour Barrier Placement
Vapour barriers belong on the warm-in-winter side of the insulation assembly. In Australian climates, this typically means inside the conditioned space. Installing vapour barriers backwards or on both sides of the insulation can trap moisture and cause rot or mould.
Correct vapour barrier placement:
- Warm side (interior) in heating-dominated climates
- Permeable membranes on cool sides to allow outward drying
- No vapour barrier on both sides (creates moisture trap)
- Consider local climate specifics (some zones differ)
Inadequate Sealing Around Penetrations
Electrical boxes, light fittings, vents and service penetrations create gaps in the insulation layer. Failing to seal these carefully undermines the system's performance.
Use appropriate sealants rated for the materials involved. Acrylic caulk works for most gaps, while foam sealant suits larger cavities. Never compress insulation around penetrations – cut carefully and seal the gaps.
Special Considerations for Attached Garages
Garages attached to homes require extra attention to fire safety, air quality and thermal separation. Building codes mandate specific construction details for the shared wall between garage and dwelling.
Fire Rating Requirements
The shared wall typically needs fire-resistance rating (FRR) of 60 minutes or more. This affects both the wall construction and allowable insulation materials. Check local regulations before selecting products.
Glasswool and mineral wool provide excellent fire resistance. Some foam products require protective barriers or aren't permitted in fire-rated assemblies. Consult your local building surveyor about specific requirements.
Air Sealing and Carbon Monoxide Protection
Vehicle exhaust contains carbon monoxide and other pollutants you absolutely must prevent from entering living spaces. Air-seal the garage/house partition wall meticulously, paying special attention to the top plates, bottom plates and service penetrations.
Install weather sealing on the door between garage and house. Consider adding a carbon monoxide detector in rooms adjacent to the garage as an additional safety measure.
Maintenance and Long-Term Performance
Inspection and Upkeep
Quality insulation materials require minimal maintenance but benefit from periodic inspection. Check annually for:
- Water damage from roof leaks or wall penetration
- Sagging or displacement (especially ceiling insulation)
- Gaps developing around installed batts
- Rodent or pest intrusion
- Moisture staining or mould growth
Address issues promptly. Water-damaged insulation loses R-value and may harbour mould. Replace affected sections rather than attempting to dry and reuse compromised materials.
Expected Service Life
Properly installed glasswool and polyester insulation typically lasts 50+ years without significant performance degradation. Reflective foil components may need replacement sooner (15–25 years) if exposed to moisture or mechanical damage.
The North American Insulation Manufacturers Association provides technical resources on insulation longevity and factors affecting long-term thermal performance in various applications.
Regulatory Compliance and Building Codes
Victorian building regulations don't typically require permits for adding insulation to existing structures unless you're simultaneously changing the building envelope or services. However, verifying local requirements prevents issues later.
Contact your local council building department for specific guidance. Some councils want notification of major garage conversions, especially if you're adding heating/cooling systems or changing the use significantly.
Environmental and Health Considerations
Modern glasswool products manufactured with ECOSE Technology contain no added formaldehyde and use rapidly renewable bio-based binders. These products offer improved indoor air quality compared to older insulation types.
Polyester insulation products typically contain 50–80% recycled content from PET bottles. Both glasswool and polyester meet stringent Australian environmental standards and contribute to green building certification programs.
The natural insulation guide explores eco-friendly insulation options and their benefits for health-conscious homeowners concerned about indoor air quality and environmental impact.
Getting Started with Your Project
Measuring and Planning
Accurate measurements prevent costly over-ordering or frustrating shortages mid-project. Measure wall heights and lengths separately, then calculate area. Add 10% for cutting waste on wall insulation, 5% for ceiling areas.
Measurement checklist:
- Wall heights (floor to ceiling/roof line)
- Wall lengths (around perimeter)
- Ceiling area (length × width)
- Stud spacing (to confirm batt widths)
- Cavity depth (to confirm batt thickness)
- Penetrations and obstacles
Sketch a simple floor plan noting dimensions. Photograph unusual details for reference when ordering materials or discussing requirements with suppliers.
Ordering and Delivery Options
Online ordering through specialist retailers streamlines the process. Detailed product pages show specifications, coverage areas and compatibility information. Delivery to site saves the hassle of transporting bulky insulation batts in personal vehicles.
Insulation Supplies Australia offers delivery throughout Victoria with options for residential and commercial sites. Bundle your garage insulation kit components in a single order to optimise freight costs and ensure materials arrive together.
Installing a garage insulation kit transforms an uncomfortable, temperature-extreme space into a functional extension of your home. The right combination of thermal batts, vapour control and careful installation delivers lasting comfort and energy efficiency. Whether you're tackling the project yourself or engaging trades, selecting quality materials suited to your garage's construction and intended use ensures success. Insulation Supplies Australia stocks everything you need for garage insulation projects, from high-performance glasswool batts to reflective foil wraps and installation accessories, with expert guidance and delivery across Victoria.