

Choosing the right ceiling insulation for your Melbourne home can dramatically reduce your energy bills, improve year-round comfort, and increase your property's value. Whether you're building, renovating, or upgrading an older home, understanding ceiling insulation options, R-values, materials, and installation methods will help you make the best decision. This guide walks you through everything you need to know about ceiling insulation in Victoria, from thermal performance and material types to practical installation tips and common mistakes to avoid.
Why Ceiling Insulation Matters in Melbourne
Melbourne's climate presents unique challenges. Hot summers, cold winters, and rapid temperature swings mean your home works hard to maintain comfort.
Without proper ceiling insulation, up to 35% of your heating and cooling energy escapes through the roof. That's money literally floating away.
Key benefits of ceiling insulation include:
- Reduced energy bills year-round (cooling in summer, heating in winter)
- More consistent indoor temperatures throughout the day
- Lower carbon footprint and environmental impact
- Improved acoustic comfort from outside noise
- Enhanced property value and marketability
The Australian Building Codes Board sets minimum insulation standards, but many Melbourne homeowners find that exceeding these minimums delivers better long-term returns. Best ceiling insulation in Melbourne can cut heating and cooling costs by 20-40% annually.
How Heat Moves Through Your Roof
Understanding heat transfer helps you choose the right insulation solution.
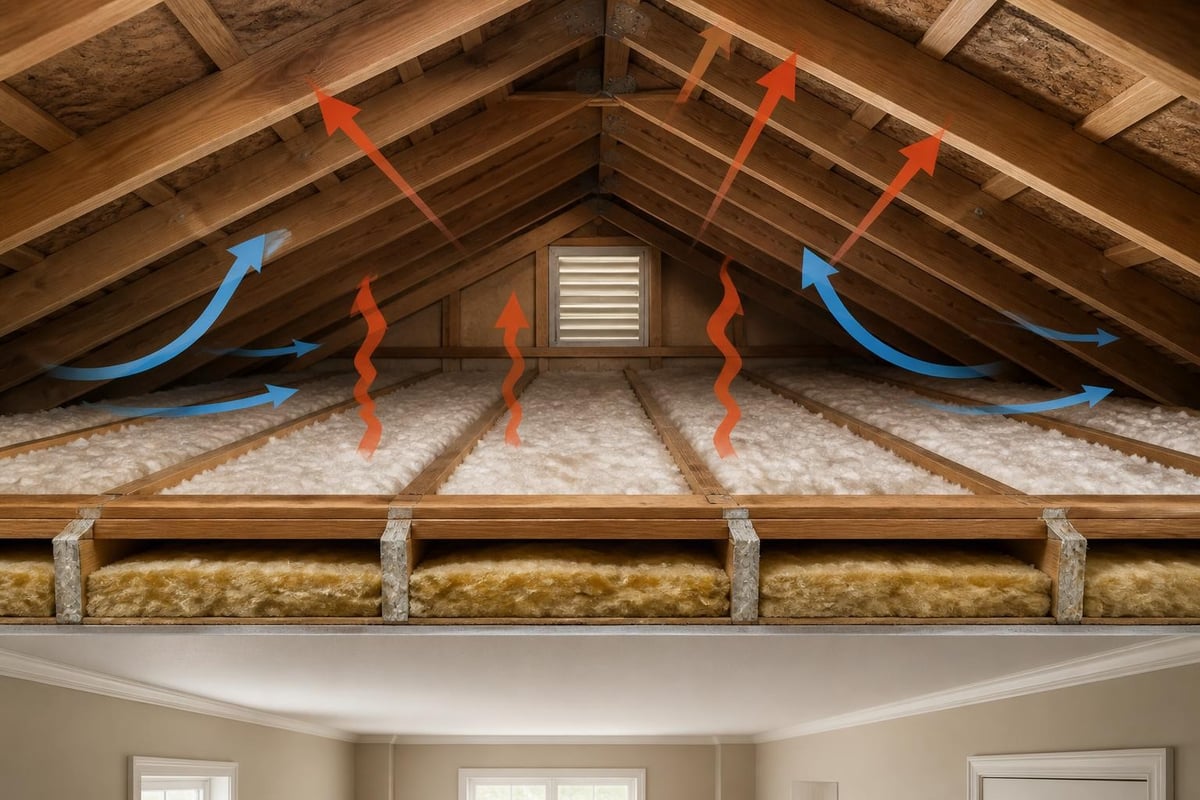
Heat moves three ways: conduction (through solid materials), convection (through air movement), and radiation (through electromagnetic waves). Ceiling insulation addresses all three.
In summer, radiant heat from the sun heats your roof surface. Without a thermal barrier, that heat radiates down into your living spaces. In winter, warm air from inside rises and escapes through an uninsulated ceiling.
Quality ceiling insulation creates a resistance barrier measured by R-value. Higher R-values mean better thermal resistance and improved energy efficiency.
Understanding R-Values for Melbourne Homes
R-value measures thermal resistance. The higher the number, the better the insulation performs.
Melbourne falls into Climate Zone 6 under the National Construction Code. For ceiling insulation, minimum requirements are:
| Application | Minimum R-Value | Recommended R-Value |
|---|---|---|
| Ceiling (standard) | R3.5 | R4.0 - R6.0 |
| Cathedral ceiling | R3.5 | R4.0 - R5.0 |
| Flat roof/ceiling | R3.5 | R5.0 - R6.0 |
Choosing your R-value depends on several factors:
- Roof colour and material (dark roofs absorb more heat)
- Ceiling height and ventilation design
- Home orientation and sun exposure
- Your heating/cooling system efficiency
- Budget and long-term plans for the property
Higher R-values cost more upfront but deliver faster payback through energy savings. The ENERGY STAR insulation factsheet provides detailed guidance on selecting appropriate insulation levels for different climates.
Common Ceiling Insulation Materials
Different materials suit different situations, budgets, and performance requirements.
Glasswool Blankets and Batts
Glasswool remains the most popular ceiling insulation material in Victoria. It's affordable, effective, and widely available.
Modern glasswool products use ECOSE technology, making them softer to handle, low in dust, and free from formaldehyde. They're non-combustible, resist moisture, and won't settle over time.
Glasswool advantages:
- Excellent thermal and acoustic performance
- Fire-resistant and non-combustible
- Lightweight and easy to install
- Good moisture resistance
- Cost-effective for most budgets
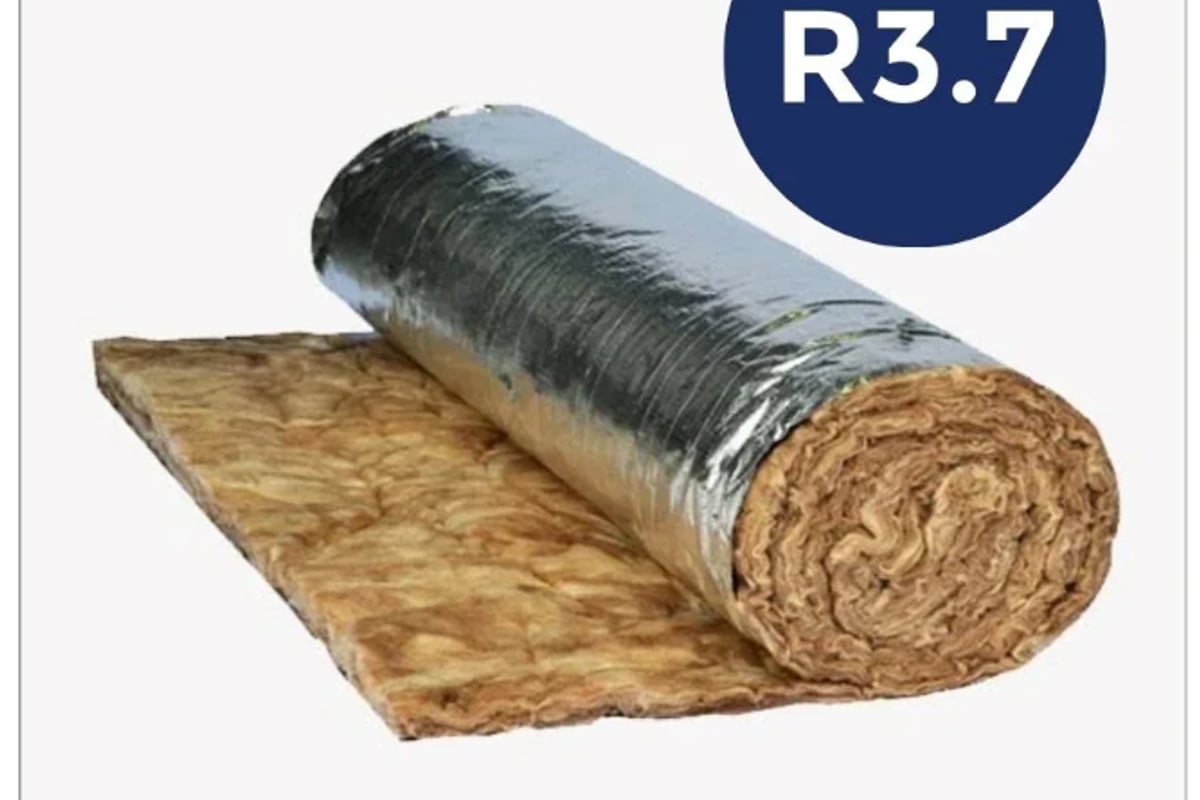
Glasswool ceiling insulation comes in rolls (blankets) or pre-cut batts. Rolls cover larger areas quickly, while batts fit neatly between ceiling joists with minimal cutting. The Thermal Blanket R3.7 22kg/m³ 130mm x 1.2m Roof Insulation Blanket offers premium density and performance for Melbourne's climate, delivering exceptional thermal resistance in both summer and winter conditions.
Polyester Batts
Polyester insulation provides a non-irritant alternative to glasswool. It's made from recycled PET bottles, making it an environmentally friendly choice.
Polyester batts are safe to handle without gloves, ideal for DIY installers. They resist moisture, won't sag, and maintain their R-value over time.
They typically cost 20-30% more than glasswool but offer easier handling for owner-builders tackling their own installation.
Reflective Foil Insulation
Reflective foil works differently from bulk insulation. It reflects radiant heat rather than slowing conductive heat flow.
Foil insulation works best in combination with bulk insulation or in specific applications like roof sarking. Alone, it provides limited R-value but excels at reflecting summer heat away from living spaces.
Installing foil requires proper air gaps on the reflective side. Without an air gap, reflective properties don't work effectively.
Installation Methods and Best Practices
Proper installation determines whether your ceiling insulation delivers promised performance.
Safety first when working in roof spaces:
- Turn off power to ceiling lights and exhaust fans
- Wear protective equipment (gloves, dust mask, long sleeves)
- Use proper lighting and avoid stepping between joists
- Check for asbestos in homes built before 1990
- Ensure adequate ventilation while working
The OSHA attic safety factsheet covers important hazards including heat stress, electrical risks, and fall prevention when working in confined roof spaces.
Installing Batts Between Joists
Ceiling batts fit snugly between ceiling joists without compression. Compressing insulation reduces its R-value significantly.
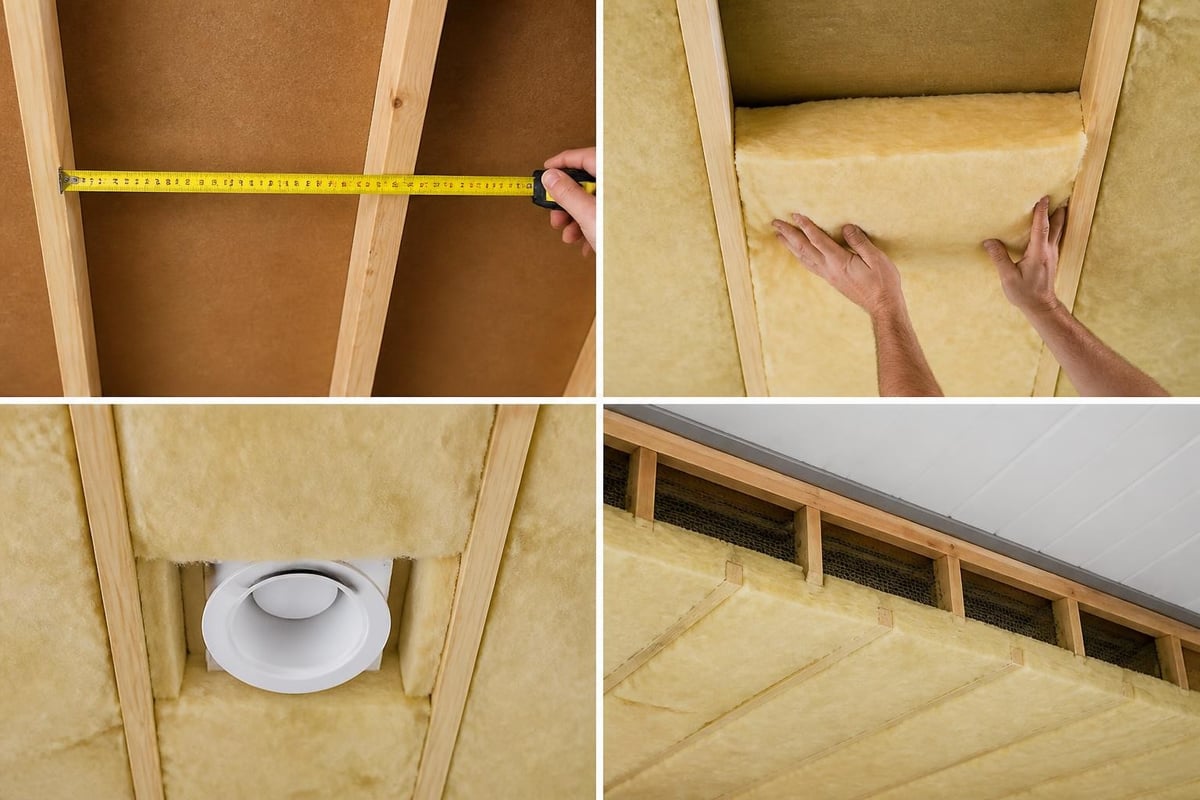
Step-by-step installation process:
- Measure joist spacing (typically 450mm or 600mm centres)
- Select batts matching your joist spacing and depth
- Push batts gently into place without compressing
- Cut around light fixtures, leaving required clearances
- Overlap edges slightly where batts meet
- Keep insulation away from downlights (unless IC-rated)
- Don't cover eave vents or ventilation pathways
For non-IC-rated downlights, maintain at least 200mm clearance. Better yet, upgrade to IC-rated LED downlights that can be safely covered. More guidance on ceiling batts and proper installation techniques helps ensure safe, effective results.
Managing Penetrations and Air Gaps
Gaps around ceiling penetrations create thermal bridges and reduce overall performance.
Seal gaps around exhaust fans, recessed lights, and pipe penetrations before installing insulation. Use fire-rated sealant for electrical penetrations and expanding foam for pipes.
Air sealing makes insulation work harder. Even small gaps allow significant air movement, reducing your effective R-value by 20-40%.
Ventilation and Moisture Control
Ceiling insulation works best in properly ventilated roof spaces. Without ventilation, moisture can accumulate, creating mould risks and reducing insulation effectiveness.
Ventilation requirements for insulated ceilings:
- Maintain eave and ridge ventilation openings
- Never block soffit vents with insulation
- Ensure exhaust fans vent outside (not into roof space)
- Consider whirlybird or ridge vents for improved airflow
- Monitor roof space humidity in high-moisture areas
The Building Science Corporation guidance explains vented versus unvented attic assemblies and moisture control strategies for different climates and building designs.
| Ventilation Type | Application | Benefits |
|---|---|---|
| Eave vents | Standard pitched roofs | Natural airflow, low cost |
| Ridge vents | Continuous along roof peak | Excellent ventilation, weather-protected |
| Whirlybirds | Retrofit applications | Active extraction, no power required |
| Gable vents | End walls of roof space | Cross-ventilation in suitable designs |
Condensation occurs when warm, moist air meets cold surfaces. Proper ventilation and vapour barriers (where required) manage moisture movement and protect your ceiling insulation investment.
The EPA mold and moisture guide provides essential information about preventing moisture problems that can compromise insulation and create health hazards.
Acoustic Performance Benefits
Ceiling insulation doesn't just save energy - it significantly improves acoustic comfort.
Traffic noise, aircraft, neighbours, and rain on metal roofs all transmit through uninsulated ceilings. Quality insulation absorbs sound energy, reducing noise transmission.
Higher-density insulation provides better acoustic performance. Products rated for both thermal and acoustic applications deliver dual benefits.
Sound reduction improvements with ceiling insulation:
- Reduced external noise by 30-50 decibels
- Quieter indoor spaces between floors
- Less echo and reverberation within rooms
- Improved privacy in multi-storey homes
For maximum acoustic benefit, combine ceiling insulation with wall insulation to create comprehensive sound control throughout your home.
Cost Considerations and Return on Investment
Ceiling insulation represents one of the best home improvement investments available.
Material costs vary by R-value, thickness, and coverage area. Professional installation adds labour costs but ensures quality results and warranty protection.
| R-Value | Material Cost (per m²) | DIY Installation Time | Professional Install Cost |
|---|---|---|---|
| R3.5 | $8-12 | 3-5 hours per 50m² | $15-20 per m² |
| R4.0 | $10-15 | 3-5 hours per 50m² | $18-25 per m² |
| R5.0 | $13-18 | 4-6 hours per 50m² | $22-30 per m² |
| R6.0 | $16-22 | 4-6 hours per 50m² | $25-35 per m² |
Typical payback periods for Melbourne homes:
- R3.5 ceiling insulation: 3-5 years
- R4.0 ceiling insulation: 4-6 years
- R5.0+ ceiling insulation: 5-8 years
These estimates assume average energy costs and usage patterns. Homes with electric heating/cooling or poor existing insulation see faster returns.
Beyond energy savings, ceiling insulation adds resale value. Energy-efficient homes command premium prices and sell faster in competitive markets.
Retrofit Challenges and Solutions
Adding ceiling insulation to existing homes presents unique challenges compared to new construction.
Common retrofit obstacles include:
- Limited roof space access
- Existing downlights and electrical wiring
- Varied joist spacing and depths
- Previously installed inadequate insulation
- Asbestos concerns in older homes
Access hatches smaller than 450mm x 450mm make installation difficult. Consider enlarging access or creating additional entry points for easier material movement.
Homes built before 1990 may contain asbestos insulation materials, particularly vermiculite. The CDC asbestos prevention guidance provides specific warnings about vermiculite attic insulation and recommends professional testing before disturbing any suspected materials.
Working Around Existing Insulation
Adding new insulation over old delivers better performance than leaving gaps. However, proper layering matters.
If existing insulation has degraded, compressed, or become contaminated with moisture or pests, remove it before installing new material. Damaged insulation provides little benefit and can harbour mould or allergens.
When topping up, place new insulation perpendicular to existing layers. This reduces gaps and thermal bridging through framing members.
Never combine faced insulation layers. Vapour barriers between insulation layers can trap moisture, creating condensation problems.
Common Installation Mistakes to Avoid
Even experienced DIYers make ceiling insulation mistakes that reduce performance and create safety hazards.
Top installation errors:
- Compressing insulation to fit (reduces R-value proportionally)
- Covering non-IC-rated downlights (fire hazard)
- Blocking eave ventilation (moisture and heat buildup)
- Leaving gaps around penetrations (thermal bridging)
- Installing over wet or damaged timber (rot and mould risks)
- Stepping between joists onto ceiling plaster (injury risk)
The Building America Solution Center guidance provides detailed technical information about proper installation practices, including baffles, air sealing, and ventilation requirements.
Thermal Bridging Through Framing
Ceiling joists create thermal bridges where heat bypasses insulation. This reduces your effective whole-ceiling R-value by 10-15%.
Minimize bridging by:
- Choosing insulation that completely fills joist depth
- Adding a perpendicular second layer if space allows
- Using continuous insulation strategies where possible
The Continuous Insulation resource explains advanced techniques for reducing thermal bridging in roof and ceiling assemblies, particularly relevant for flat roofs and cathedral ceilings.
Choosing the Right Product for Your Project
Selecting ceiling insulation means matching product characteristics to your specific needs.
Decision factors to consider:
- R-value requirements - Climate zone, ceiling type, and performance goals
- Joist spacing and depth - Determines batt width and maximum thickness
- Installation method - DIY versus professional install affects product choice
- Budget constraints - Balance upfront cost against long-term savings
- Special requirements - Acoustic performance, moisture resistance, fire rating
For standard Melbourne ceiling applications with 90-100mm joist depth and 450mm or 600mm spacing, R2.5 to R4.0 glasswool batts provide excellent value and performance.
Deeper roof spaces accommodate higher R-values. If you have 150mm+ depth available, R5.0 or R6.0 products deliver maximum thermal performance.
| Home Type | Recommended R-Value | Product Type | Priority |
|---|---|---|---|
| Older weatherboard | R4.0 - R5.0 | Glasswool batts | Thermal + acoustic |
| Brick veneer | R3.5 - R4.0 | Glasswool/polyester | Thermal efficiency |
| Double-storey | R4.0 - R5.0 | High-density glasswool | Thermal + acoustic |
| Metal roof | R5.0 - R6.0 | Reflective + bulk | Radiant heat control |
The Insulation Supplies Australia blog offers detailed product comparisons and selection guides tailored to Victorian climate conditions and common building types.
Professional Installation Versus DIY
Many homeowners successfully install ceiling insulation themselves, saving on labour costs. Others prefer professional installation for safety, warranty, and time considerations.
DIY ceiling insulation works well when:
- You have good roof space access and lighting
- Joist spacing is regular and straightforward
- You're comfortable working in confined spaces
- Timeline is flexible around weather and availability
- Basic safety equipment is already on hand
Professional installation makes sense for:
- Complex roof designs with multiple penetrations
- Limited or difficult access points
- Homes with asbestos concerns requiring testing
- Tight project timelines requiring quick completion
- Installations requiring building permits or inspections
Licensed installers carry insurance, understand building codes, and typically offer workmanship warranties. For comprehensive whole-house projects, professional installation often delivers better long-term value despite higher upfront costs.
Maintenance and Long-Term Performance
Quality ceiling insulation requires minimal maintenance but benefits from periodic inspection.
Recommended maintenance schedule:
- Visual roof space inspection every 2-3 years
- Check for moisture staining or mould growth
- Verify insulation hasn't been disturbed or compressed
- Ensure ventilation pathways remain clear
- Look for pest activity or nesting materials
Glasswool and polyester insulation maintain their R-value indefinitely under normal conditions. They don't settle, decompose, or degrade with age like some older insulation types.
Water damage from roof leaks can compress insulation and reduce performance. Address leaks immediately and allow affected insulation to dry completely. Replace insulation that remains compressed or shows mould growth.
Renovations and electrical work sometimes disturb ceiling insulation. Always reinstate insulation properly after any roof space work to maintain thermal performance.
Ceiling insulation delivers exceptional value for Melbourne homeowners through lower energy bills, improved comfort, and enhanced property appeal. By understanding R-values, materials, installation requirements, and common pitfalls, you can make confident decisions that benefit your home for decades. Whether you're tackling a DIY retrofit or planning new construction, Insulation Supplies Australia provides the expert advice, quality products, and competitive prices to make your insulation project straightforward and successful.