

Wall wrap is one of those building materials that doesn't get much attention, yet it plays a critical role in protecting your home from moisture damage, improving energy efficiency, and extending the lifespan of your walls. If you're planning a new build, renovation, or even just trying to understand what's already in your walls, understanding wall wrap will help you make smarter decisions about your building envelope.
What Is Wall Wrap and Why Do You Need It?
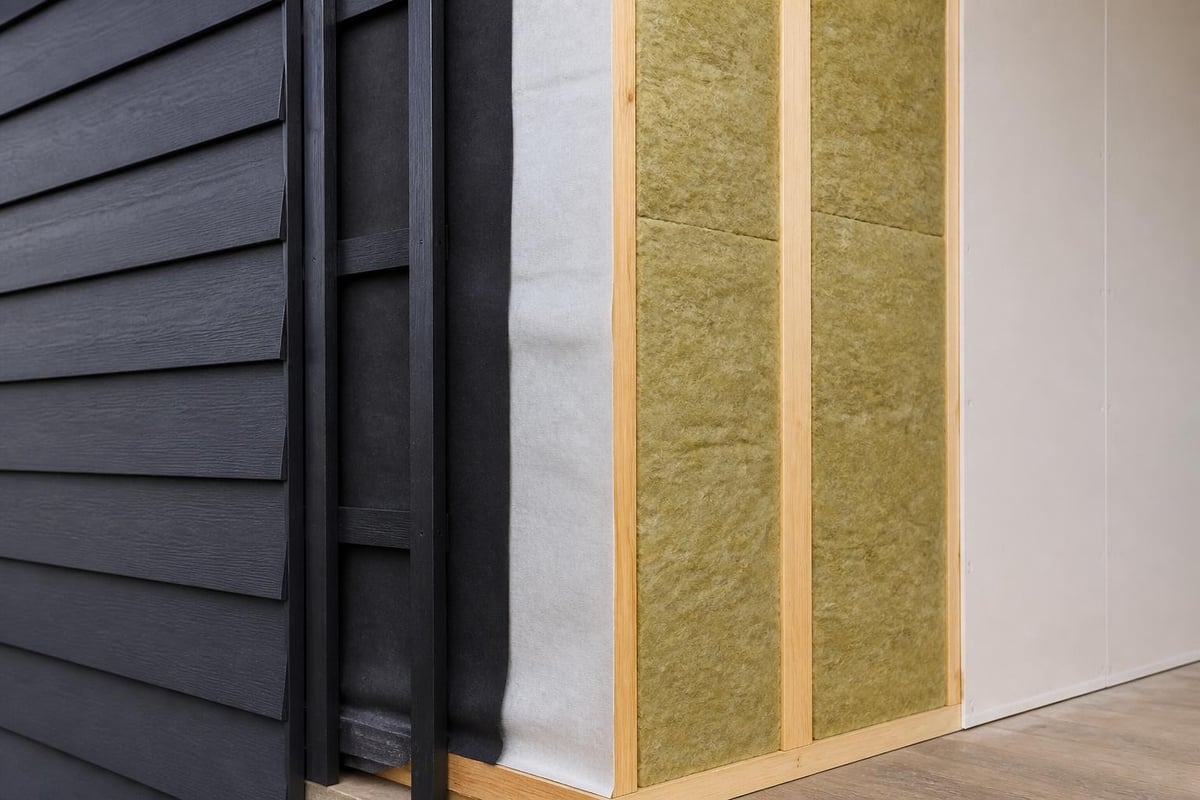
Wall wrap is a breathable membrane installed on the external side of wall frames, typically over the wall studs and behind the cladding. It acts as a weather-resistive barrier (WRB) that protects wall cavities from wind-driven rain and moisture while allowing water vapour to escape from inside the wall. This dual action is crucial for preventing condensation, mould, and structural damage.
In Australian climates, where we experience everything from hot, humid summers to cold, wet winters, wall wrap helps maintain a healthy building envelope. It stops liquid water from penetrating into wall cavities while letting interior moisture vapour pass through. Without this protection, moisture can accumulate in wall insulation and timber framing, leading to rot, mould growth, and reduced thermal performance.
The Building Science Behind Wall Wrap
The concept of rain control in buildings relies on multiple defence layers. Wall wrap forms one essential layer in this system. When wind drives rain against external cladding, some water inevitably finds its way through joints, cracks, or behind cladding boards. Wall wrap provides a second line of defence, directing this water downward and outward before it reaches the structural frame or insulation.
What makes wall wrap different from plastic sheeting is its permeability. While it blocks liquid water, it allows water vapour molecules to pass through. This matters because buildings generate internal moisture from cooking, showering, and even breathing. That moisture needs somewhere to go. A breathable wall wrap lets vapour escape outward, preventing condensation inside wall cavities.
Types of Wall Wrap Available in 2026
Not all wall wrap products are created equal. Understanding the different types helps you choose the right one for your project.
Permeable vs Non-Permeable Wall Wrap
Permeable wall wrap allows water vapour to pass through while blocking liquid water. This is the most common type used in Australian residential construction. It's sometimes called breathable building wrap or vapour-permeable membrane. The Drystud Wall Wrap Permeable is a popular example that offers 40.5m² coverage per roll and combines wind protection with moisture control.
Non-permeable wall wrap blocks both liquid water and vapour. These are less common in modern construction but may be specified in certain applications where vapour control is managed differently within the wall assembly.
Spunbonded, Woven, and Mechanically Attached
Different manufacturing processes create different performance characteristics:
- Spunbonded membranes are made from continuous filaments bonded together, creating a strong, tear-resistant material
- Woven membranes use interlaced fibres, offering high strength but potentially lower water resistance
- Mechanically attached systems include membranes designed specifically for stapling or nailing to timber frames
| Wall Wrap Type | Water Resistance | Vapour Permeability | Durability | Best Application |
|---|---|---|---|---|
| Spunbonded permeable | Excellent | High | Very good | General residential |
| Woven permeable | Good | Medium-high | Excellent | High-wind areas |
| Non-permeable | Excellent | Blocked | Good | Specific engineered systems |
Each type has its place depending on climate zone, wall construction method, and cladding type.
How Wall Wrap Improves Energy Efficiency
Beyond moisture protection, wall wrap significantly impacts your home's thermal performance. While it's not insulation itself, it works alongside products like wall insulation to maximise energy efficiency.
Wind Infiltration Reduction
Wind doesn't just make your home feel drafty. It actively moves heat energy out of your home in winter and brings hot air in during summer. Wall wrap creates a continuous barrier that reduces air infiltration through wall cavities. Even with insulation batts installed, uncontrolled air movement can reduce thermal performance by 20-40%.
Think of wall wrap as a windbreaker for your walls. Just as a windproof jacket keeps you warmer than a fluffy jumper alone, wall wrap prevents wind from stripping heat from your insulation.
Moisture Impact on Insulation Performance
Wet insulation loses much of its R-value. Water conducts heat roughly 25 times more efficiently than air. When insulation absorbs moisture, it becomes a thermal bridge rather than a thermal barrier. Wall wrap prevents this by keeping bulk water away from insulation materials, ensuring they maintain their intended thermal resistance.
Integration with Air Barrier Systems
Modern building codes increasingly require continuous air barriers to minimise uncontrolled air leakage. When properly detailed and sealed at penetrations, joints, and edges, wall wrap can contribute to the air barrier system. Understanding drainage planes and their integration with air barriers helps create walls that perform as designed.
Installation Best Practices for Wall Wrap
Proper installation makes the difference between wall wrap that protects your home for decades and one that fails within years. Here's what you need to know.
Planning Your Installation Sequence
- Install wall wrap after framing is complete and bracing (if required) is in place
- Work from bottom to top, ensuring each upper course overlaps the lower course
- Create a continuous barrier with proper overlap at all joints
- Integrate with window and door flashing before installing windows
- Complete all penetrations (pipes, vents, electrical) before cladding
Overlap and Fastening Requirements
Horizontal overlaps should be at least 150mm, with the upper sheet overlapping the lower sheet to shed water. Vertical overlaps need minimum 150mm as well. Some manufacturers specify larger overlaps in high-wind zones or for particular cladding types.
Fastening considerations:
- Use corrosion-resistant staples or cap nails
- Space fasteners 300-450mm along studs
- Keep fasteners 50-75mm from edges to prevent tearing
- Avoid over-compression that damages the membrane
Detailing Around Openings
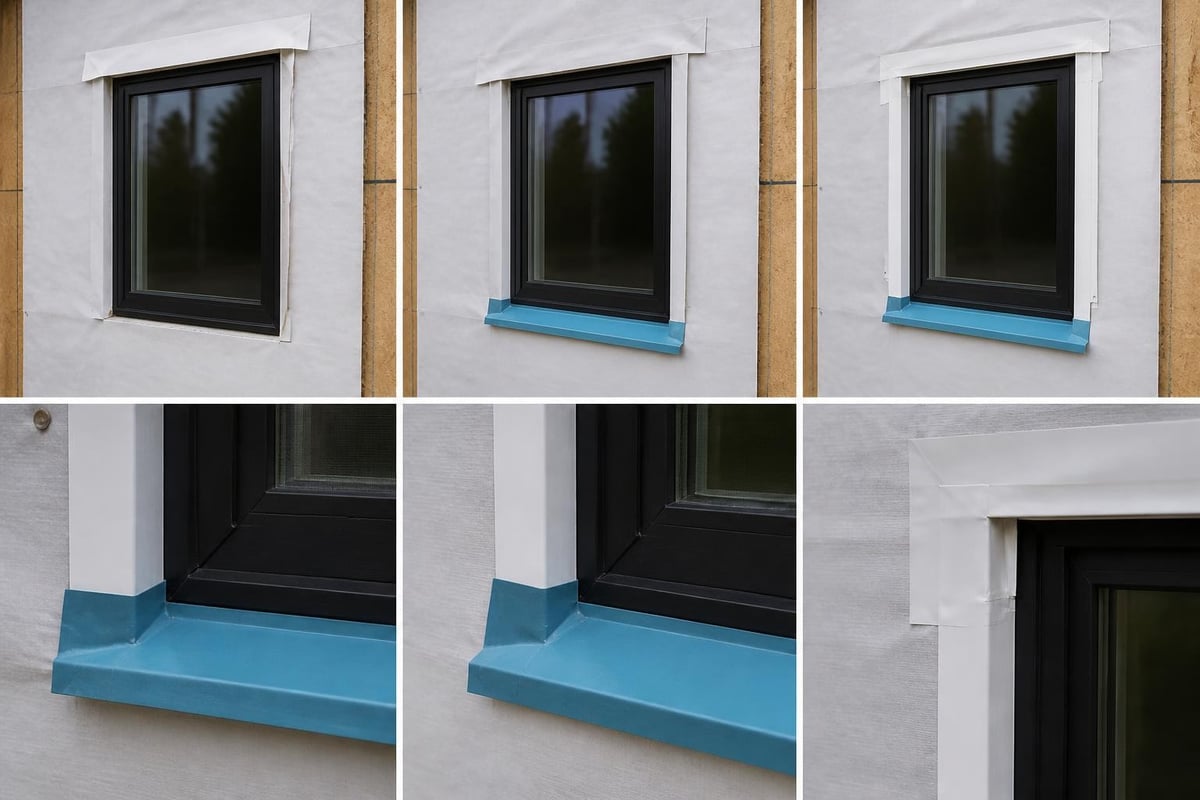
Windows and doors require special attention. The wall wrap should integrate with head, sill, and jamb flashing to create a continuous drainage path. Many moisture problems originate at window openings where flashing and wall wrap weren't properly integrated.
The EPA's moisture control guidance emphasises that proper detailing at penetrations is critical for long-term performance. Even small gaps can allow significant water entry over time.
Common Wall Wrap Mistakes to Avoid
Even experienced builders sometimes make errors with wall wrap installation. Being aware of these common mistakes helps you avoid them.
Reverse Lapping
Installing wall wrap upside down or reverse-lapping (lower sheet over upper sheet) creates horizontal shelves that catch and direct water into the wall cavity instead of away from it. This defeats the entire purpose of the membrane. Always remember: upper sheets go over lower sheets, like roof tiles.
Inadequate Overlap at Joins
Skimping on overlap to save material is false economy. A 75mm overlap instead of the specified 150mm creates potential water entry points. Wind-driven rain can work its way through inadequate overlaps, especially in exposed locations.
Missed Integration Points
Critical integration points include:
- Bottom of wall to foundation or floor system
- Top of wall to roof system or next level
- Window and door openings
- Service penetrations (plumbing, electrical, HVAC)
- External corners and complex geometry
Each of these requires specific detailing to maintain continuity of the weather barrier.
Damage During Construction
Wall wrap exposed to UV radiation degrades over time. Most products have limited UV exposure ratings, often 60-120 days. Leaving wall wrap exposed for months before installing cladding can lead to degradation and failure. Additionally, construction traffic, material handling, and other trades can tear or puncture the membrane if not protected.
Wall Wrap and Building Code Requirements
Australian building regulations address wall wrap through the National Construction Code (NCC) and Australian Standards. While specific requirements vary by climate zone and construction type, understanding the framework helps ensure code compliance.
Weather-Resistive Barriers in the NCC
The NCC requires external walls to resist moisture penetration and protect the building from deterioration. Wall wrap fulfils this requirement as part of a properly designed wall system. The specific performance requirements depend on:
- Climate zone (from hot-humid in Darwin to cold in alpine Victoria)
- Wall construction type (brick veneer, weatherboard, rendered)
- Wind classification for the site
- Bushfire Attack Level (BAL) rating in bushfire-prone areas
Australian Standards for Membranes
AS/NZS 4200 series standards cover pliable building membranes and underlays, including weather-resistive barriers. These standards define:
- Water resistance testing methods
- Vapour permeability classifications
- Tensile strength requirements
- UV resistance ratings
- Installation specifications
Choosing wall wrap that meets these standards ensures you're using products tested and certified for Australian conditions.
Selecting the Right Wall Wrap for Your Climate
Victoria's climate varies from coastal temperate to alpine cold, and your wall wrap choice should reflect your specific location and building design.
Vapour Permeability Considerations
In heating-dominated climates (most of Victoria), you generally want high vapour permeability to allow interior moisture to escape outward. The ASHRAE guidance on heat, air, and moisture control provides technical background on these hygrothermal considerations.
However, in mixed climates or buildings with air conditioning, vapour drive can reverse seasonally. Understanding your specific building science requirements helps select the appropriate permeability rating.
High-Wind and Coastal Exposures
Coastal Victoria and exposed hilltop sites face higher wind-driven rain loads. These locations benefit from:
- Higher-strength membranes with better tear resistance
- More conservative overlap specifications
- Additional fastening at edges and in the field
- Consideration of secondary drainage planes behind certain claddings
The Building America technical guidance on drainage planes offers practical recommendations for high-exposure conditions.
Compatibility with Cladding Types
Different claddings interact differently with wall wrap:
| Cladding Type | Drainage Gap Needed | Wall Wrap Considerations |
|---|---|---|
| Brick veneer | Yes (cavity) | Standard permeable, tied with wall ties |
| Weatherboard | Recommended | Ensure continuity at board joints |
| Fibre cement sheet | Yes (batten/cavity) | High permeability preferred |
| Rendered | Depends on system | Follow render manufacturer specs |
| Metal cladding | Yes (batten/cavity) | Prevent membrane contact with metal |
Working with products from trusted suppliers like Insulation Supplies Australia ensures you're getting materials appropriate for your specific wall system.
Wall Wrap Performance Under Extreme Weather
Australia's increasingly variable weather patterns make resilience an important consideration. Understanding how wall wrap performs during extreme events helps you build more durable homes.
Severe Wind Events and Cyclones
High-wind events can drive rain horizontally and even upward, testing every weak point in your building envelope. Research documented in NIST technical reports on envelope performance shows that well-detailed wall wrap systems significantly reduce water intrusion even during severe wind-driven rain.
In cyclone-rated construction, wall wrap must resist higher wind pressures without tearing, maintain adhesion of fasteners, and prevent water entry through increased pressure differential across the wall.
Bushfire Considerations
In bushfire-prone areas, ember attack is a significant concern. Wall wrap itself won't prevent ember penetration, but it works as part of a system. Ensuring:
- No gaps at terminations and penetrations
- Integration with ember-resistant sarking
- Proper sealing at all vulnerable points
creates a more bushfire-resilient building envelope.
Flood and Water Inundation
While wall wrap protects against wind-driven rain, it's not designed for immersion or prolonged water contact. In flood-prone areas, additional moisture management strategies are needed. However, after flood events, wall wrap that has maintained its integrity helps walls dry out faster by allowing vapour to escape while preventing additional water entry during rain.
Maintenance and Long-Term Performance
Once installed and covered with cladding, wall wrap requires no maintenance. However, understanding its long-term performance helps with future renovation or repair decisions.
Expected Service Life
Quality wall wrap products properly installed and protected from UV exposure should last 50+ years. The limiting factor is usually UV exposure if left uncovered, or physical damage during construction. Once protected by cladding, degradation is minimal.
Signs of Wall Wrap Failure
While you can't see wall wrap after construction, certain symptoms may indicate problems:
- Water stains on interior walls
- Mould growth in wall cavities (visible during renovations)
- Deteriorating wall insulation
- Unexplained increases in heating/cooling costs
- Visible water damage to wall framing
These symptoms don't always mean wall wrap failure, but they warrant investigation.
Repair and Renovation Considerations
When renovating or removing cladding, inspect wall wrap condition. Look for:
- Tears or punctures
- Degraded areas where UV penetrated
- Failed fastening points
- Damage from pests or moisture
Damaged sections should be patched or replaced before re-cladding. Use patches that overlap damaged areas by at least 150mm and are made from compatible material.
Wall Wrap vs Other Building Membranes
Building terminology can be confusing. Understanding the differences between various membranes helps you specify and purchase the right products.
Wall Wrap vs Vapour Barrier
These serve different functions. Wall wrap (WRB) goes on the external side of insulation and blocks liquid water while allowing vapour transmission. Vapour barriers (or vapour control layers) go on the warm-in-winter side of insulation and resist vapour transmission. In most Victorian climates, you need wall wrap on the outside and often don't need a separate vapour barrier on the inside.
Wall Wrap vs Sarking
Sarking traditionally refers to reflective foil or blanket material installed under roof cladding. Some products marketed as "wall sarking" are actually reflective wall wraps. True reflective wall wrap includes a reflective layer facing an air gap for radiant heat control, plus water resistance. Standard wall wrap focuses purely on water and wind resistance without reflective properties.
Wall Wrap vs Building Paper
Traditional building paper (sometimes called tarpaper or roofing felt) was made from felt impregnated with asphalt. Modern wall wrap has largely replaced building paper in new construction due to superior:
- Lighter weight
- Easier handling
- Better tear resistance
- Higher vapour permeability (in breathable versions)
- Longer UV exposure tolerance
However, some builders still use building paper in specific applications or prefer it for particular cladding types.
Cost Considerations and Value
Understanding the economics of wall wrap helps put it in perspective within your overall building budget.
Material Costs per Square Metre
Wall wrap typically costs $0.50 to $2.50 per square metre depending on:
- Brand and product specifications
- Permeability rating and performance features
- Roll size and coverage
- Purchase volume
A typical single-storey house might need 150-200m² of wall wrap, making material costs relatively modest within the total building budget.
Installation Labour
If hiring professional installation, labour typically costs more than materials. Expect $2-5 per square metre for installation depending on:
- Wall complexity and number of penetrations
- Site access and working conditions
- Whether installation is standalone or part of a package
- Local labour rates
DIY installation is feasible for confident renovators, potentially saving significant labour costs.
Value Proposition: Prevention vs Remediation
Preventive investment:
- Wall wrap material: $300-500 for average house
- Installation labour: $400-1000 professional or $0 DIY
Remediation after moisture failure:
- Wall frame repairs: $5,000-20,000+
- Mould remediation: $3,000-10,000+
- Insulation replacement: $2,000-5,000
- Re-cladding: $10,000-40,000+
The mathematics clearly favour proper installation from the start.
Practical Tips for DIY Wall Wrap Installation
If you're tackling wall wrap installation yourself, these practical tips will help ensure success.
Tools and Materials Checklist
Essential tools:
- Hammer tacker or staple gun with appropriate staples
- Sharp utility knife and replacement blades
- Tape measure and straight edge
- Chalk line for layout
- Ladder or scaffolding for upper levels
Materials needed:
- Wall wrap (calculate area plus 10-15% for overlaps and waste)
- Corrosion-resistant staples or cap nails
- Building tape for sealing joins and patches
- Flashing tape for window and door integration
Weather Considerations During Installation
Avoid installing wall wrap during:
- Rain or immediately before predicted rain
- High wind that makes handling difficult
- Extreme heat that makes surfaces too hot
- Freezing conditions if using tape products
Ideal conditions are dry, mild days with light wind. Start early to maximize working time before afternoon winds pick up.
Quality Control Checkpoints
Before covering with cladding, verify:
- All overlaps face the correct direction (upper over lower)
- Minimum overlap dimensions are met
- Fasteners are secure and properly spaced
- All penetrations are properly detailed
- Integration with flashing at openings is correct
- No tears or damage requiring repair
- Bottom edge is properly terminated to foundation/floor
Taking photos during installation creates a record that may be valuable for future reference or if questions arise.
The Future of Wall Wrap Technology
Building science continues to evolve, and wall wrap technology advances with it. Understanding trends helps you make future-proof decisions.
Smart Membranes and Monitoring
Emerging technologies include membranes with embedded sensors that monitor moisture levels within wall cavities. While currently niche and expensive, these systems may become more accessible, allowing early detection of moisture problems before visible damage occurs.
Improved Permeability and Strength
Manufacturers continue developing materials that offer:
- Higher tear resistance without increased thickness
- Better vapour permeability without sacrificing water resistance
- Improved UV resistance for longer safe exposure periods
- Enhanced compatibility with new cladding and insulation materials
Integration with Whole-Building Systems
Modern building design increasingly treats the envelope as an integrated system rather than separate components. Future wall wraps may include:
- Pre-printed installation guides and overlap markers
- Self-sealing fastener penetrations
- Integrated air barrier properties
- Color coding for different climate applications
How Wall Wrap Integrates with Your Insulation System
Wall wrap and insulation work together as complementary parts of your wall system. Understanding this relationship maximizes performance.
Protecting Insulation Performance
Insulation products like those available through Insulation Supplies Australia's wall collection rely on staying dry to maintain their R-value. Wall wrap provides the exterior protection that keeps bulk water away from insulation batts or blankets.
Installation Sequence Matters
Correct sequence is:
- Frame walls
- Install wall wrap over studs
- Install insulation between studs
- Install interior lining
- Install exterior cladding
Installing insulation before wall wrap is difficult and risks compromising the exterior barrier. Following the proper sequence creates a wall that performs as designed.
Compatibility with Different Insulation Types
Wall wrap works with all common insulation types:
- Glasswool batts benefit from exterior moisture protection while allowing vapour to escape
- Polyester insulation is less moisture-sensitive but still performs better when protected
- Reflective insulation requires an air gap that wall wrap helps maintain
- Rigid foam boards need wall wrap for the drainage plane even though the foam itself resists moisture
Each insulation type has specific installation requirements, but all benefit from properly installed wall wrap.
Wall wrap might not be the most glamorous building material, but it's one of the most important for long-term building performance and durability. By protecting wall cavities from moisture while allowing them to breathe, wall wrap prevents costly damage and maintains insulation effectiveness for decades. Whether you're building new, renovating, or simply maintaining your home, understanding wall wrap helps you make informed decisions about your building envelope. Insulation Supplies Australia offers quality wall wrap products and expert advice to help Victorian homeowners, renovators, and builders protect their investment with confidence.