

Installing roof insulation is one of the smartest improvements you can make to your home. Whether you're tackling a renovation, building new, or simply looking to cut energy bills and stay comfortable year-round, understanding roof insulation how to install properly makes all the difference. This guide walks you through the entire process, from choosing the right product to completing the installation safely and effectively. You'll learn what materials work best in Victorian conditions, how to measure and prepare your roof space, and the step-by-step techniques that ensure lasting performance.
Understanding Roof Insulation Basics
Before you start any roof insulation how to project, it's essential to understand what you're working with and why it matters. Roof insulation creates a thermal barrier between your living space and the outside environment, helping keep heat in during winter and out during summer.
Australian homes lose up to 35% of heating and cooling energy through an uninsulated roof. That's money disappearing into thin air every season.
Why Roof Insulation Matters in Victoria
Victoria's climate swings from freezing winter nights to scorching summer days. Your roof bears the brunt of these temperature extremes. Without proper insulation, heat radiates straight through your ceiling in summer and escapes through the roof in winter.
The National Construction Code sets minimum thermal performance requirements, but exceeding these standards delivers better comfort and bigger energy savings. Most Victorian homes benefit from R3.5 to R6.0 roof insulation, depending on your climate zone and roof construction.
Types of Roof Insulation Materials
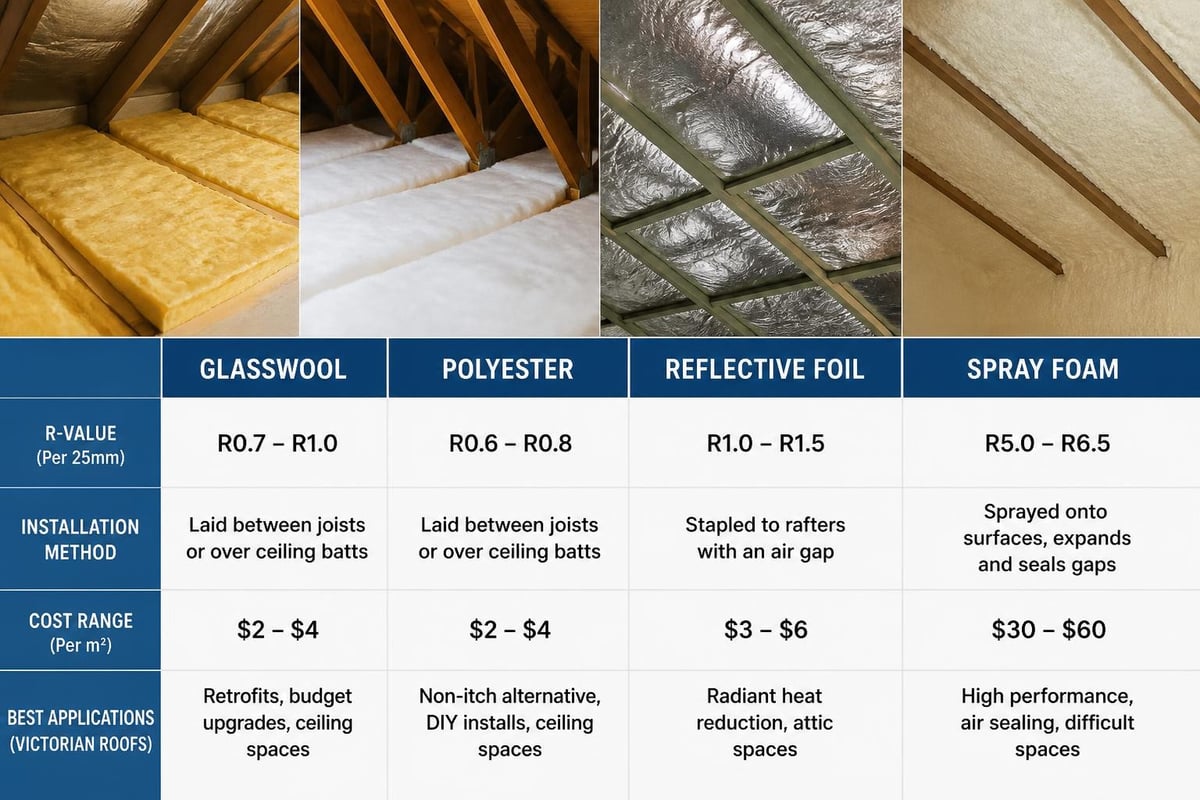
Several materials suit roof applications, each with distinct characteristics:
- Glasswool blankets and batts – affordable, effective, widely available in various R-values
- Polyester batts – non-itch, moisture-resistant, excellent for DIY installation
- Reflective foil – works as radiant barrier, often combined with bulk insulation
- Spray foam – professional application, air seals and insulates simultaneously
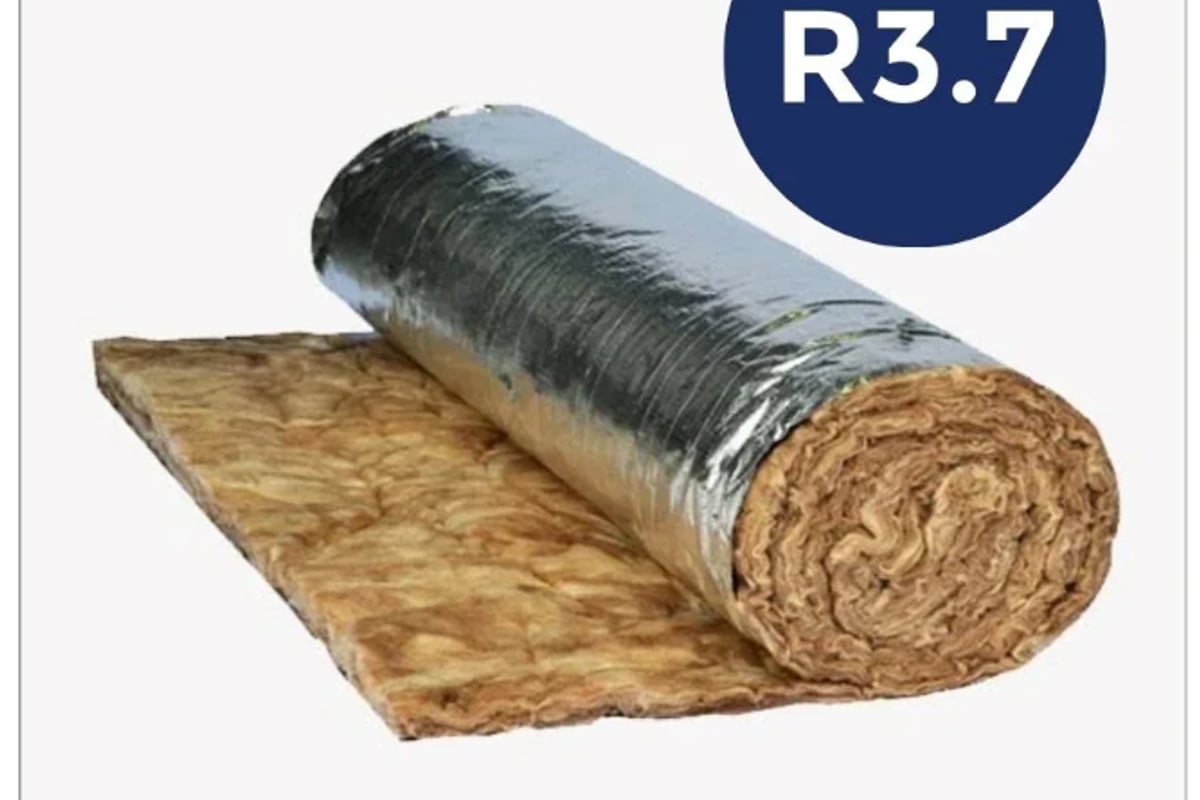
For most DIY roof insulation how to projects, glasswool or polyester batts and blankets offer the best balance of performance, cost, and ease of installation. Higher-density products like the Thermal Blanket R3.7 22kg/m³ 130mm x 1.2m Roof Insulation Blanket deliver superior thermal resistance while remaining manageable for owner-builders.
Planning Your Roof Insulation Project
Proper planning prevents problems and ensures you buy the right amount of material. This phase of your roof insulation how to journey sets you up for success.
Measuring Your Roof Space
Start by measuring the ceiling area below your roof. For a simple rectangular ceiling, multiply length by width. Add 10% extra to account for cuts, odd spaces, and overlaps.
Key measurements to record:
- Total ceiling area (length × width)
- Distance between ceiling joists (typically 450mm or 600mm)
- Joist depth (determines maximum insulation thickness)
- Clearances around downlights, vents, and chimneys
If your roof has multiple sections, skylights, or irregular shapes, sketch a simple floor plan and break it into measurable rectangles. Measure each section separately, then add them together.
Choosing the Right R-Value
R-value measures thermal resistance. Higher numbers mean better insulation performance. Your choice depends on:
| Factor | Recommended R-Value |
|---|---|
| Melbourne metro | R3.5 – R6.0 |
| Regional Victoria (cold zones) | R5.0 – R7.0 |
| Standard comfort | R4.0 – R5.0 |
| Premium efficiency | R6.0+ |
Most Victorian renovators installing ceiling insulation choose between R4.0 and R6.0 for optimal comfort and value. Check your local climate zone in the NCC or YourHome design guide for specific recommendations.
Safety Equipment and Tools
Safety comes first in any roof insulation how to project. Roof spaces can be hazardous, with low clearances, exposed nails, electrical wiring, and limited ventilation.
Essential safety gear:
- Disposable coveralls or long sleeves and pants
- Dust mask or P2 respirator
- Safety glasses or goggles
- Gloves (nitrile or leather)
- Sturdy boots with grip
- Head torch or bright work light
- Hard hat for low-clearance roofs
Required tools:
- Sharp utility knife or insulation saw
- Tape measure (5m or longer)
- Straightedge or T-square
- Permanent marker
- Staple gun (if required for foil or blankets)
- Sturdy ladder rated for your weight plus materials
Never work in a roof space alone. Always have someone nearby who can assist if needed.
Preparing the Roof Space
Preparation is where many DIY roof insulation how to projects succeed or fail. Taking time to prepare properly ensures safe, effective installation and prevents costly mistakes down the track.
Inspecting and Cleaning
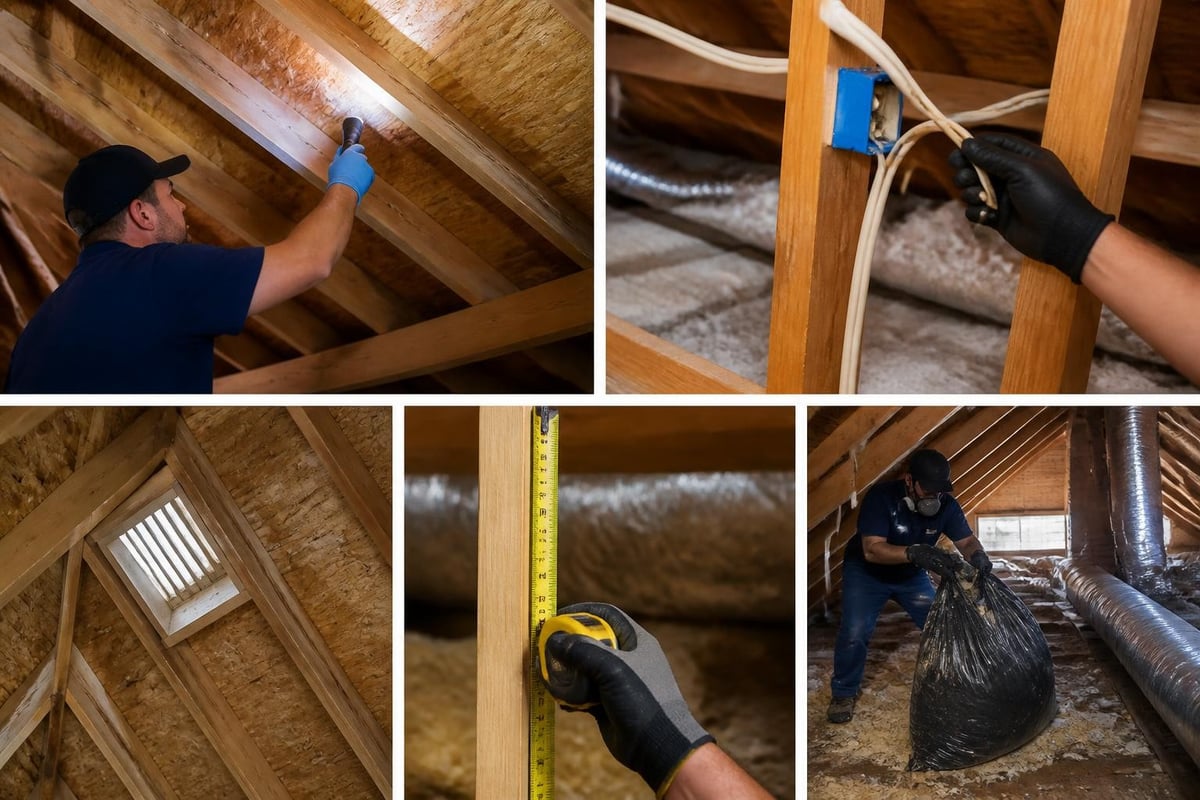
Before you carry insulation into the roof, inspect the space thoroughly. Look for:
- Roof leaks – water stains, damp patches, daylight showing through gaps
- Electrical issues – exposed wiring, damaged cables, old transformers
- Structural damage – cracked or sagging joists, missing bracing
- Pests – rodent droppings, wasp nests, termite damage
- Existing insulation – damaged, compressed, or incorrectly installed material
Address any issues before installing new insulation. The EPA provides guidance on moisture control that highlights why fixing leaks first is critical.
Clear away debris, old insulation scraps, and any stored items. Sweep or vacuum dust from ceiling joists where you'll be placing the new insulation.
Electrical Clearances Around Downlights
Downlights and halogen fittings generate significant heat. Installing insulation too close creates fire risk and voids warranties.
Australian Standards require:
- Minimum 200mm clearance around non-IC-rated downlights
- No clearance needed for IC-rated (Insulation Contact) downlights
- Protective covers or boxes around non-IC fittings if insulation contact is unavoidable
Check each downlight for an IC rating label. If you're unsure, treat it as non-IC and maintain clearance. Purpose-built downlight protectors create safe barriers while allowing insulation coverage.
Ventilation and Airflow
Proper roof ventilation prevents moisture buildup and extends insulation life. Most Victorian roofs use passive ventilation through eave vents, ridge vents, or whirlybirds.
Maintain ventilation by:
- Never blocking eave vents with insulation
- Keeping a 25-50mm air gap between insulation and roof deck
- Installing baffles or spacers if insulation approaches the roof line
- Ensuring ventilation paths remain clear from eave to ridge
The Building America Solution Center offers detailed guidance on balancing insulation and ventilation in various roof configurations. Following these principles helps prevent condensation and maintains healthy roof spaces.
Step-by-Step Roof Insulation Installation
Now comes the practical roof insulation how to process. Follow these steps methodically for professional results, whether you're installing batts between joists or laying blankets across the ceiling.
Installing Batts Between Ceiling Joists
Batts are pre-cut sections designed to fit between standard joist spacings. This method suits most residential roof spaces and offers straightforward DIY installation.
Installation process:
-
Start at the furthest point from the entry hatch. Work backwards toward your exit so you don't trap yourself or compress installed insulation.
-
Unfold each batt carefully in the roof space. Don't compress or fold batts before installation, as this reduces their R-value.
-
Fit batts snugly between joists. The insulation should friction-fit without gaps, but don't compress it to fit. Trim batts with a sharp knife if joists aren't standard spacing.
-
Butt joints tightly. When placing multiple batts end-to-end, push them together firmly to eliminate gaps. Small air spaces reduce overall thermal performance.
-
Cut around obstacles. Use a straightedge and sharp knife to cut neat openings for pipes, wiring, and roof penetrations. Leave small clearances (10-20mm) rather than compressing insulation around obstacles.
-
Never cover recessed lights unless they're IC-rated. Maintain required clearances using downlight covers if needed.
Laying Insulation Blankets
Blankets come in long rolls, perfect for covering large areas quickly. They're particularly effective for roof insulation projects where you want continuous coverage.
The installation technique differs slightly from batts:
Blanket installation steps:
-
Roll out the blanket perpendicular to ceiling joists, starting from one edge of the roof space.
-
Overlap edges by 50-100mm where two blankets meet. This eliminates thermal bridging at seams.
-
Secure if needed. Some blanket products require stapling to joists or roof framing. Follow manufacturer instructions for your specific product.
-
Trim to length using a straightedge and utility knife. Cut blankets slightly longer than needed and tuck edges against walls or framing.
-
Work methodically across the roof space, maintaining consistent coverage and overlap.
Higher-density blanket products deliver superior performance in tight spaces. When you need maximum R-value without adding excessive thickness, premium glasswool blankets offer excellent thermal resistance per millimetre.
Insulating Around Roof Penetrations
Pipes, vents, chimneys, and other roof penetrations require careful attention. Poor detailing around these features creates thermal weak points.
| Penetration Type | Installation Method |
|---|---|
| Plumbing vents | Cut insulation to fit around pipe, maintain 25mm clearance if pipe gets hot |
| Electrical cables | Lay insulation over or under cables (never around), ensure cables aren't compressed |
| Exhaust fans | Maintain 100mm clearance, ensure ducting vents outside not into roof space |
| Chimneys | Follow Building Code clearances (typically 200mm minimum), use non-combustible material if closer |
| HVAC ducts | Insulate ducts separately before installing ceiling insulation around them |
Take extra time around penetrations. Gaps here account for significant heat loss despite representing small areas.
Ensuring Complete Coverage
The effectiveness of your roof insulation how to project depends heavily on eliminating gaps and thermal bridges. Even small gaps can reduce overall performance by 20-40%.
Achieve complete coverage by:
- Pushing insulation into ceiling-wall junctions
- Filling small gaps with offcuts rather than leaving voids
- Maintaining consistent thickness across the entire ceiling
- Avoiding compression, which dramatically reduces R-value
- Checking coverage from below with a bright torch (light shouldn't show through)
Remember that insulation works by trapping air. Compressing it squeezes out air pockets and reduces thermal resistance. If a batt doesn't fit without compressing, trim it or choose a thinner product for that space.
Advanced Roof Insulation Techniques
Beyond basic batt installation, several advanced roof insulation how to techniques deliver enhanced performance in specific situations.
Insulating Cathedral Ceilings
Cathedral (raked) ceilings follow the roof line without a flat ceiling space. These require different approaches:
Two main methods:
-
Between-rafter installation – Fit insulation between roof rafters, maintaining ventilation gap above. Requires careful sizing and often a vapour barrier on the warm side.
-
Below-rafter installation – Add rigid insulation boards or foil-faced batts below rafters, then finish with plasterboard. This method is easier to detail correctly and offers better thermal performance.
The Building Science Corporation provides detailed guidance on insulating cathedral ceilings and managing moisture in these assemblies. Cathedral ceiling insulation how to projects often benefit from professional advice, as moisture management becomes critical.
Combining Bulk and Reflective Insulation
Many Victorian homes achieve optimal performance by combining bulk insulation (batts or blankets) with reflective foil. This hybrid approach addresses both conductive and radiant heat transfer.
Effective combinations include:
- Foil sarking under roof tiles plus glasswool batts between ceiling joists
- Reflective blanket installed over bulk insulation with air gap maintained
- Foil-faced batts providing both bulk and reflective properties in one product
When combining materials, ensure any reflective surface faces an air space of at least 25mm to work effectively. Reflective insulation touching another surface provides no radiant barrier benefit.
Upgrading Existing Insulation
If your roof already has some insulation, you might be able to add more rather than replace it. This roof insulation how to approach suits homes with old, thin, or compressed insulation.
Adding insulation over existing:
-
Assess current insulation – Check thickness, condition, and R-value. Remove any damaged or moisture-affected material.
-
Calculate total R-value – You can generally add R-values when layering insulation (e.g., existing R2.5 + new R3.0 = R5.5 total).
-
Install perpendicular to joists – Lay new batts or blankets across existing insulation and ceiling joists. This covers thermal bridges created by timber framing.
-
Avoid excessive weight – Check with a structural engineer if total insulation thickness exceeds 300mm or if your ceiling structure is old or damaged.
The Department of Energy's comprehensive insulation guide explains how to assess existing insulation and calculate effective R-values when adding layers.
Common Mistakes to Avoid
Learning what not to do is just as important as mastering roof insulation how to techniques. These common errors can compromise performance, create safety hazards, or void product warranties.
Gaps and Compression Issues
Gaps between batts create thermal bridges where heat flows freely. Even a 5% gap can reduce overall R-value by 25% or more.
Compression is equally problematic. Squashing insulation into a space that's too small eliminates the air pockets that provide thermal resistance. A compressed R4.0 batt might perform like R2.5 or worse.
Solutions:
- Measure joist spacing accurately before ordering
- Cut batts slightly oversized for a friction fit
- Use offcuts to fill small gaps rather than stretching batts
- Never force thick insulation into shallow spaces
Moisture and Vapour Barrier Errors
Moisture management matters in roof insulation how to projects. Water reduces insulation performance and can cause mould, rot, and structural damage.
Common moisture mistakes:
- Installing vapour barriers on the wrong side (cold side instead of warm side)
- Creating double vapour barriers that trap moisture in assemblies
- Blocking ventilation pathways with insulation
- Installing insulation over existing moisture damage without fixing the source
Most Australian roof insulation installations don't require vapour barriers, as bulk insulation breathes naturally. The EPA's moisture control guidance helps identify when vapour control might be necessary in your climate and construction type.
Safety Oversights
Roof spaces pose multiple hazards:
- Falling through ceilings – Always step on ceiling joists, never between them on plasterboard
- Heat exhaustion – Roof spaces can exceed 50°C in summer; work early morning or late evening
- Electrical shock – Never touch wiring or electrical fixtures; turn off power to the area if working near cables
- Dust and fibres – Wear proper respiratory protection, especially with glasswool products
Take breaks regularly, stay hydrated, and never rush. A methodical approach to roof insulation how to projects prevents injuries and delivers better results.
Finishing and Quality Checks
Your roof insulation how to project isn't complete until you've verified quality and performance. These final steps ensure your investment delivers the expected benefits.
Post-Installation Inspection
Once all insulation is installed, conduct a thorough inspection:
Inspection checklist:
- ☐ All ceiling areas covered without gaps
- ☐ Insulation not compressed or damaged
- ☐ Required clearances maintained around downlights and hot fixtures
- ☐ Ventilation pathways remain clear
- ☐ Insulation secured where required (foil, blankets)
- ☐ No insulation blocking eave vents
- ☐ Roof space clean and free of insulation scraps
- ☐ All tools and materials removed from roof space
Use a bright torch to check from below for light showing through gaps. Any light penetration indicates incomplete coverage.
Energy Performance Testing
Within a few weeks of completing your roof insulation how to project, you should notice:
- More consistent indoor temperatures throughout the day
- Reduced heating and cooling costs
- Less reliance on air conditioning in summer
- Warmer ceilings in winter
- Quieter indoor environment (insulation also dampens noise)
Track your energy bills for 3-6 months to quantify savings. Most properly insulated Victorian homes see 20-40% reduction in heating and cooling energy use.
Documentation and Warranties
Keep records of:
- Product specifications and R-values installed
- Purchase receipts and delivery documentation
- Installation date and who performed the work
- Photos of completed installation (before closing up ceiling spaces)
- Manufacturer warranty information
This documentation helps with future renovations, property sales, and warranty claims if any issues arise. Many quality insulation products include 50-year warranties, but these require proof of purchase and proper installation.
| Documentation Item | Why It Matters | Where to Store |
|---|---|---|
| Product specs & R-values | Building compliance, resale value | Property folder + photos |
| Installation photos | Warranty claims, future reference | Digital backup + cloud storage |
| Purchase receipts | Warranty validation, tax deductions | Financial records |
| Safety certificates | Electrical clearance verification | Property folder |
Maintaining Your Roof Insulation
Insulation is largely maintenance-free, but periodic checks ensure continued performance. Include roof insulation how to maintain as part of your regular home maintenance schedule.
Annual Inspections
Once yearly, briefly inspect your roof space:
- Check for new leaks or water stains
- Look for signs of pest activity
- Verify insulation hasn't been disturbed or damaged
- Ensure ventilation remains unobstructed
- Confirm downlight clearances are still maintained
Address any issues immediately. Small problems become expensive if left unattended.
When to Add or Replace Insulation
Consider upgrading or adding insulation when:
- You notice increased energy bills without other cause
- Indoor temperatures become harder to regulate
- You're undertaking major renovations
- Existing insulation is damaged, compressed, or moisture-affected
- You're improving other building envelope elements (windows, sealing)
Modern insulation products significantly outperform materials from 15-20 years ago. If your home has old, thin insulation, adding contemporary high-R-value products from Insulation Supplies Australia's roof collection can deliver substantial comfort and efficiency improvements.
Dealing with Moisture Issues
If you discover moisture or condensation in your roof space:
- Identify the source – leaking roof, condensation from bathroom fans, plumbing leaks
- Fix the cause before addressing damage
- Remove wet insulation – it won't dry properly and may harbour mould
- Dry out the space thoroughly before installing new insulation
- Install exhaust fan ducting if bathroom steam is condensing in the roof
The ORNL research on sealed attic moisture performance provides technical background on how moisture moves through roof assemblies and when professional intervention might be necessary.
Understanding roof insulation how to install correctly transforms your home's comfort and efficiency while protecting your investment for decades. From selecting the right materials and R-values for Victoria's climate to executing safe, thorough installation and maintaining performance over time, each step matters.
Whether you're a DIY renovator tackling your first project or an experienced owner-builder, Insulation Supplies Australia provides the quality products, expert guidance, and competitive pricing you need to succeed. Browse our complete range of roof and ceiling insulation solutions, compare specifications, and order online with confidence knowing you're getting trusted products backed by genuine expertise and fast delivery across Victoria.