

A roof insulation blanket is one of the most effective ways to control temperature, reduce energy bills and improve comfort in Australian homes. Whether you're building new, renovating or upgrading an existing roof, understanding how these flexible glasswool products work and which specifications suit your project can make all the difference. This guide walks you through everything from R-values and installation methods to product selection and performance expectations for Victorian climates.
What Is a Roof Insulation Blanket
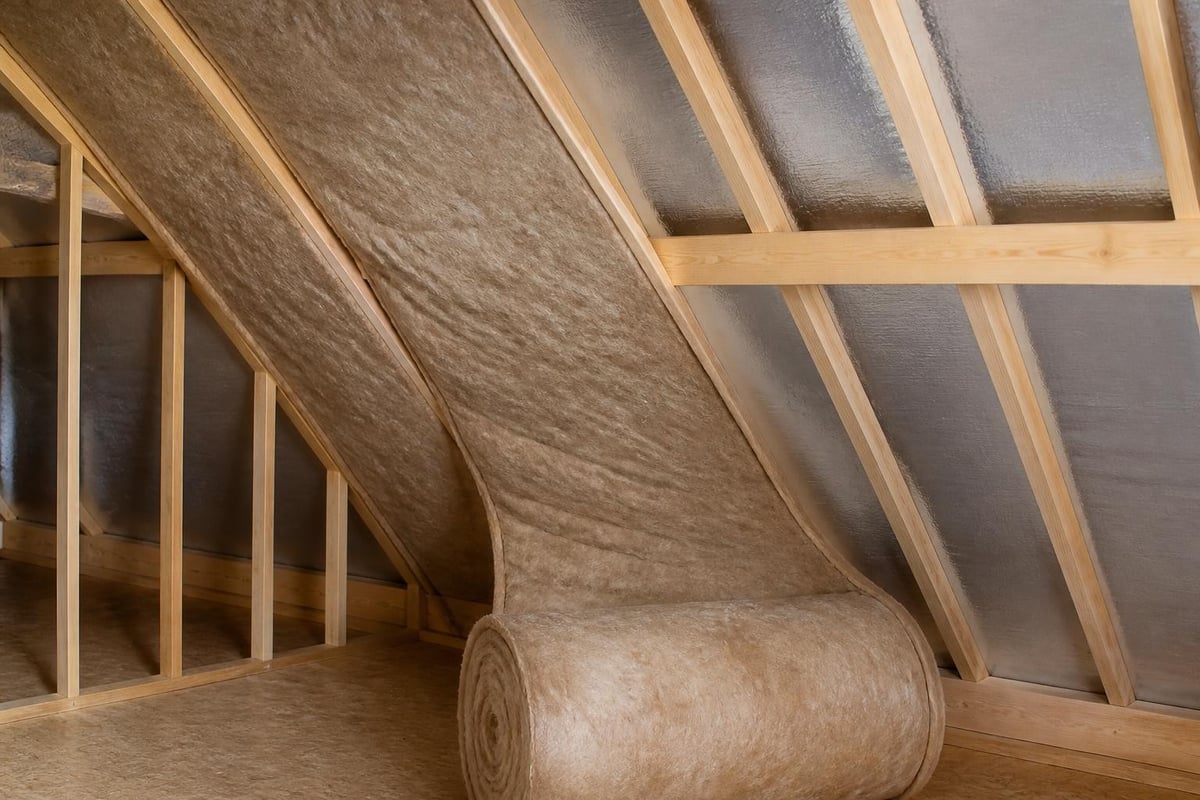
A roof insulation blanket is a continuous roll or length of glasswool insulation designed specifically for installation beneath metal or tiled roofing. Unlike pre-cut batts, blanket insulation comes in wide rolls (typically 1200mm) that can be unrolled across rafters or between purlins, providing seamless thermal coverage with minimal joints.
The blanket format offers several practical advantages. You can cut the material to exact lengths on site, reducing waste and allowing faster installation over large roof areas. Most products feature unfaced glasswool construction, though some include a reflective foil facing to boost radiant heat control.
Key characteristics of roof insulation blankets include:
- Continuous roll format (often 13.5m to 15m long)
- Widths designed to suit standard rafter and purlin spacing
- Glasswool construction with varying densities
- Available in multiple R-values from R1.5 to R6.0
- Soft, flexible handling for easier manoeuvring in tight roof spaces
Blanket products are manufactured using advanced technologies that reduce dust and improve handling comfort. They're particularly well-suited to long roof runs, skillion roofs and industrial-style homes where cutting batts to size would be time-consuming.
How Roof Insulation Blankets Control Heat Transfer
Roof spaces in Australian homes can reach extreme temperatures during summer. Metal roofing absorbs solar radiation and can hit 70°C or higher on a hot day, turning your ceiling cavity into an oven. A roof insulation blanket works by trapping still air within its glasswool fibres, slowing the movement of heat from the hot roof surface down into your living spaces.
The R-value measures this thermal resistance. Higher R-values mean better insulation performance. A blanket with R3.0 provides moderate resistance, suitable for milder climates, while R4.0 to R6.0 products deliver the performance needed for Melbourne's hot summers and cold winters.
During winter, the same insulation prevents warmth generated by your heating system from escaping through the roof. This two-way benefit makes roof insulation one of the most cost-effective energy upgrades available.
Understanding R-Value Requirements
Victoria's climate zones require different minimum R-values under the National Construction Code. Most Melbourne metro areas fall into climate zone 6 or 7, where recommended roof insulation R-values range from R3.5 to R6.0 depending on roof type and construction.
| Climate Zone | Recommended Roof R-Value | Typical Application |
|---|---|---|
| Zone 6 (mild) | R3.5 - R4.0 | Coastal areas, moderate climates |
| Zone 7 (cool temperate) | R4.0 - R6.0 | Melbourne metro, inland Victoria |
| Zone 8 (alpine) | R6.0+ | High country, extreme cold |
Choosing the right R-value depends on your roof construction, available ceiling cavity depth and budget. Thicker blankets with higher R-values require more space but deliver superior long-term performance and energy savings. The U.S. Department of Energy provides detailed guidance on matching insulation levels to different climate requirements.
Types and Specifications of Roof Insulation Blankets
Roof insulation blankets come in various densities, thicknesses and R-values. Understanding these specifications helps you select the right product for your specific roof design and performance goals.
Density Variations
Glasswool blanket density typically ranges from 11kg/m³ to 22kg/m³. Higher-density products offer improved thermal performance in the same thickness and often provide better acoustic control. They're also more resilient and easier to handle during installation, though they cost slightly more per square metre.
Common density grades include:
- Standard density (11-14kg/m³): Economical option for basic thermal control
- Medium density (16-18kg/m³): Balanced performance and value
- High density (20-22kg/m³): Premium performance, enhanced acoustic control, better handling
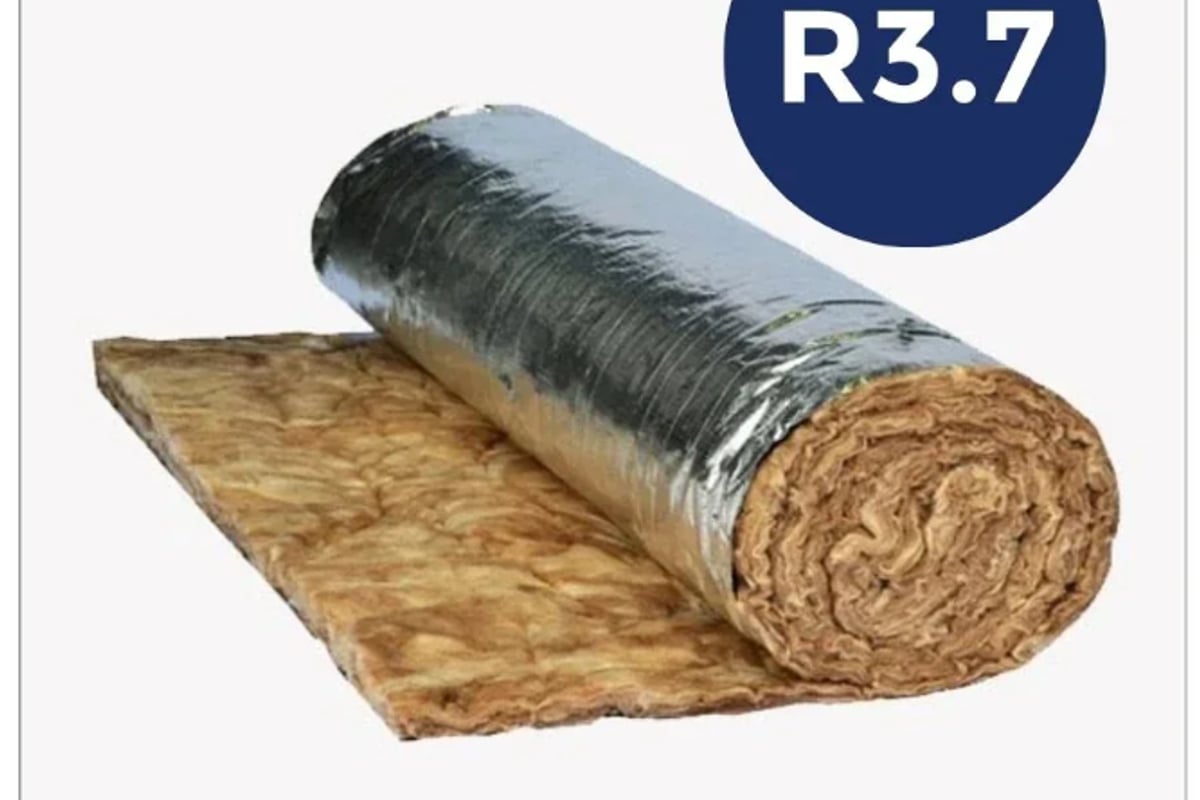
A product like the Thermal Blanket R3.7 22kg/m³ 130mm x 1.2m Roof Insulation Blanket demonstrates how higher density improves thermal efficiency. At 22kg/m³, it delivers R3.7 in just 130mm thickness, making it ideal for roofs with limited cavity depth.
Thickness and R-Value Options
The thickness of your roof insulation blanket directly affects its R-value, though density also plays a role. Standard thicknesses range from 75mm to 200mm, with most residential applications using 130mm to 160mm products.
Selecting the appropriate thickness requires checking your ceiling cavity depth. Measure from the top of your ceiling plasterboard to the underside of your roof battens or purlins. You need enough clearance to install the blanket without compression, as squashing the insulation significantly reduces its R-value.
| Thickness | Typical R-Value Range | Best Application |
|---|---|---|
| 75-90mm | R1.5 - R2.5 | Retrofit, limited cavity depth |
| 130-145mm | R3.0 - R4.0 | Standard residential roofs |
| 160-200mm | R4.5 - R6.0 | High-performance homes, extreme climates |
When browsing roof insulation options, always verify that your chosen product's thickness will fit your roof assembly without compression.
Installation Methods and Best Practices
Installing a roof insulation blanket requires careful planning and attention to detail. While the continuous roll format simplifies coverage, proper technique ensures maximum thermal performance and longevity.
Preparing the Roof Space
Before installation, inspect the roof cavity for any moisture issues, ventilation requirements or structural concerns. Check that sarking or roof underlay is properly installed and that there are no gaps or damage that could allow water penetration. Research from Building Science Corporation highlights the importance of controlling condensation risk in roof assemblies, particularly in climate zones with significant temperature swings.
Ensure adequate working light and ventilation in the roof space. Summer roof cavity temperatures can be dangerous, so plan installation work for early morning or late afternoon when conditions are cooler.
Cutting and Fitting
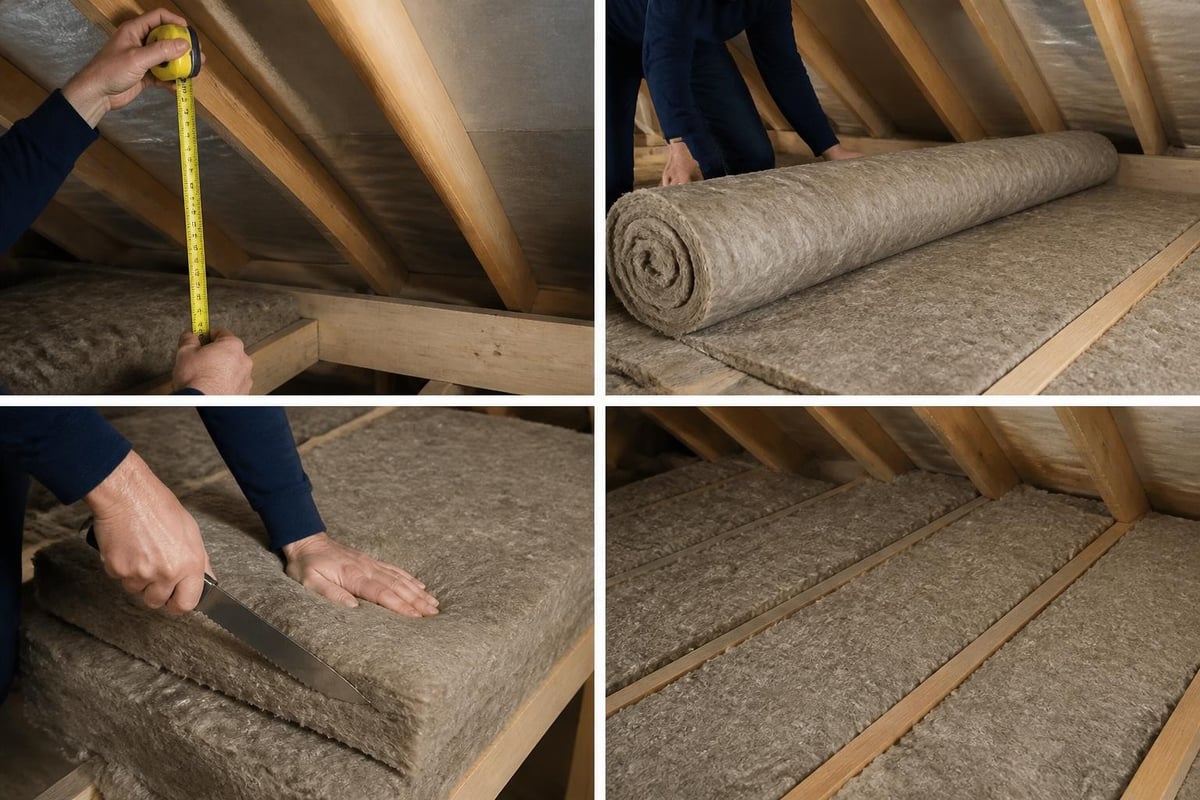
Unroll the blanket across rafters or between purlins, cutting to length as needed. Most installers work from the ridge down toward the eaves, allowing each section to drape naturally over the roof framing.
Installation steps:
- Measure the run from ridge to eaves or wall plate
- Add 50-100mm extra length for a secure tuck at each end
- Cut the blanket cleanly using a sharp knife or insulation saw
- Position the blanket so it covers framing members where possible
- Ensure the product sits snugly without gaps or compression
- Secure with insulation stays or support wires if required
Avoid compressing the blanket when fitting around roof penetrations, vents or services. Compression reduces the trapped air space and dramatically lowers thermal resistance. If you need to fit around obstacles, cut neat openings and seal any gaps with offcuts rather than squashing the main layer.
Safety and Handling Considerations
Modern glasswool blankets manufactured with low-dust technologies are much more comfortable to handle than older products. However, basic safety practices still apply.
Always wear:
- Long sleeves and gloves
- Safety glasses or goggles
- A dust mask (P2 rated minimum)
- Enclosed footwear with good grip
Work on secure footing using roof trusses, planks or temporary platforms. Never step directly on ceiling plasterboard, as it won't support your weight. Plan your movements carefully to avoid damaging the insulation or creating safety hazards.
Performance Factors and Long-Term Value
The performance of your roof insulation blanket depends on more than just its stated R-value. Installation quality, moisture control and ventilation all play critical roles in delivering lasting benefits.
Moisture and Condensation Management
Glasswool insulation is air-permeable, meaning moisture vapour can move through it. In cold weather, warm humid air from your home can migrate into the ceiling cavity and condense when it meets cold roof surfaces. The Building America Solution Center offers detailed technical guidance on preventing interstitial condensation through proper vapor control and air sealing.
In most Victorian homes, adequate roof ventilation prevents moisture buildup. Ensure your eave vents and ridge vents (if fitted) remain clear. If you're installing insulation in an unvented roof assembly, consult with a building professional about vapor barrier requirements and condensation risk.
Thermal Bridging and Coverage Gaps
Even the best roof insulation blanket loses effectiveness if installation leaves gaps or thermal bridges. Thermal bridging occurs when heat bypasses the insulation through structural elements like rafters or purlins. While some bridging is unavoidable, you can minimise it by:
- Overlapping blanket edges where sections meet
- Covering framing members where ceiling cavity depth allows
- Sealing penetrations around pipes, wires and ducts
- Avoiding compression that creates thin spots in coverage
Consistent, gap-free installation can improve actual thermal performance by 15-30% compared to poorly fitted insulation, even when using the same R-value product.
Comparing Blanket vs Batt Insulation
Homeowners often wonder whether a roof insulation blanket or pre-cut batts offer better value. Both have distinct advantages depending on your project scope and roof design.
When Blanket Insulation Makes Sense
Blanket products excel in situations requiring long continuous runs. If you're insulating a large open-plan home, a skillion roof or an industrial-style building with wide spacing between walls, blankets reduce installation time and minimise joins.
The continuous roll format also suits DIY renovators who want flexibility to cut custom lengths on site. You'll generate less waste because you're cutting exactly what you need rather than working with fixed batt sizes.
When Batts Are More Practical
Pre-cut batts work well for smaller areas, complex roof shapes with lots of hips and valleys, or retrofit jobs where you're working around existing services and obstructions. Batts are easier to manoeuvre in tight spaces and simpler to install between closely spaced rafters.
For projects mixing both approaches, you might use blanket insulation for main roof areas and batts for smaller sections, dormers or around chimneys. When comparing different product formats across the Insulation Supplies Australia range, consider your specific roof layout and installation conditions.
Fire Performance and Code Compliance
Fire safety is a critical consideration in roof insulation selection. All insulation products used in Australian residential construction must meet specific fire safety standards, and roof assemblies face particular scrutiny because fire can spread rapidly through ceiling cavities.
Glasswool blanket insulation is inherently non-combustible. It won't ignite or contribute fuel to a fire, making it a safe choice for roof applications. However, the overall fire performance of your roof assembly depends on all components, including roof coverings, sarking and any foil facings.
The International Institute of Building Enclosure Consultants provides detailed analysis of fire performance requirements for low-slope and pitched roof assemblies. For homes in bushfire-prone areas or where building codes require enhanced fire protection, verify that your complete roof system meets the relevant Bushfire Attack Level (BAL) rating.
Cost Considerations and Return on Investment
Investing in a quality roof insulation blanket delivers measurable energy savings and improved comfort. Understanding the cost factors helps you make informed decisions that balance upfront expense with long-term value.
Price Factors
Several variables affect the cost of roof insulation blankets:
- R-value and thickness: Higher-performance products cost more per square metre
- Density: Premium high-density glasswool adds to material cost
- Roll size and coverage: Larger rolls offer better economy per square metre
- Brand and technology: Advanced manufacturing processes may command premium pricing
When comparing products, calculate the total installed cost per square metre including both materials and labour (if hiring installers). A higher R-value product that costs 20% more upfront but delivers 40% better thermal performance often provides superior value over its lifetime.
Energy Savings and Payback Period
Proper roof insulation typically reduces heating and cooling costs by 20-50% depending on your home's existing insulation levels, climate zone and energy usage patterns. In Melbourne's variable climate, the savings accumulate year-round as you reduce both summer cooling and winter heating demand.
Most homeowners in Victoria see payback periods of 3-7 years for roof insulation upgrades. Homes starting with little or no insulation achieve the fastest returns, while projects upgrading from moderate to high R-values take longer to recoup costs but still deliver worthwhile savings.
Factors improving your return on investment:
- Larger temperature differentials between inside and outside
- Longer daily heating/cooling cycles
- Higher energy prices
- Better-quality installation with minimal gaps or compression
- Complementary upgrades like sealing air leaks and improving windows
Selecting the Right Product for Your Project
Choosing the best roof insulation blanket requires matching product specifications to your specific home design, budget and performance goals. Start by establishing your project requirements.
Assessing Your Needs
Measure your roof area to calculate total square metres requiring insulation. Check ceiling cavity depth at multiple points, particularly near eaves where space is often most limited. Identify your climate zone and review recommended R-values for compliance with building codes and energy efficiency targets.
Consider your installation approach. DIY installers should prioritise products with comfortable handling characteristics and clear installation instructions. If engaging professional installers, focus on specifying the right R-value and confirming product availability and delivery timing.
Product Selection Checklist
Use this checklist when evaluating different roof insulation blanket options:
- R-value meets or exceeds code requirements for your climate zone
- Thickness fits within available ceiling cavity depth (with 10-20mm clearance)
- Roll width suits your rafter or purlin spacing
- Coverage area matches your project scope (plus 10% for waste)
- Density appropriate for your performance and budget goals
- Delivery timeframe aligns with your construction schedule
- Product specifications verified through manufacturer documentation
For homes across Melbourne and Victoria, the R3.7 and R4.0 collections offer excellent options balancing performance with practical installation requirements.
Maintenance and Longevity
Once properly installed, a roof insulation blanket requires minimal maintenance and provides decades of reliable thermal performance. Understanding what can affect longevity helps you protect your investment.
Inspection and Monitoring
Inspect your roof insulation every few years, particularly after severe weather events or if you notice changes in heating/cooling costs or comfort levels. Look for:
- Moisture staining indicating leaks or condensation issues
- Compressed or displaced sections from roof repairs or pest activity
- Gaps around new penetrations or service installations
- Sagging or separation from support stays
Address any issues promptly. Water damage can compress glasswool and reduce its R-value permanently. Even minor roof leaks can cause significant insulation degradation if left uncorrected.
Expected Service Life
Quality glasswool roof insulation blankets typically last 40-70 years in Australian conditions when properly installed and protected from moisture. The material doesn't degrade, settle or lose thermal performance over time like some other insulation types.
Factors that can reduce service life include chronic moisture exposure, physical damage from roof repairs, or compression from improper modifications to ceiling spaces. Guidelines from ASTM F479 provide technical specifications for maintaining insulation blankets in service, though these focus primarily on industrial applications.
Common Installation Mistakes to Avoid
Even experienced renovators can make errors that compromise roof insulation performance. Being aware of these common pitfalls helps ensure your installation delivers full value.
Compression and Over-Stuffing
The most frequent mistake is compressing insulation to fit into tight spaces or cramming too much material into limited cavity depth. Glasswool works by trapping air, and compression eliminates those air pockets. A compressed R4.0 blanket might perform at R2.5 or lower.
Always measure cavity depth accurately and select a product with appropriate thickness. If space is limited, choose a higher-density blanket that achieves your target R-value in less thickness rather than compressing a thicker, lower-density product.
Poor Coverage at Edges and Penetrations
Gaps around roof penetrations, at eaves or where roof planes meet create thermal bypass paths that significantly reduce overall insulation effectiveness. Take time to trim and fit insulation carefully around:
- Exhaust fan ducts
- Plumbing stacks and vents
- Electrical cables and junction boxes
- Downlight housings (maintaining required clearances)
- Ridge and hip joints
Use offcuts to fill small gaps and ensure continuous coverage across the entire roof plane.
Ignoring Ventilation Requirements
Blocking eave vents with insulation prevents essential roof cavity ventilation. Always maintain clear airflow paths at eaves, and ensure insulation stops short of vent openings. Some installations use baffles or chutes to maintain airflow while extending insulation coverage toward the eaves.
Proper ventilation is particularly important in climate zones with significant humidity or temperature swings. The ASHRAE Standard 90.1 framework includes provisions for roof insulation placement that support effective moisture control and energy performance.
Combining Roof Insulation with Other Efficiency Upgrades
A roof insulation blanket delivers maximum benefit when integrated with complementary energy efficiency improvements. Consider these upgrades as part of a comprehensive approach to home comfort and efficiency.
Air Sealing and Draft Proofing
Insulation controls conductive heat transfer, but it can't stop air leakage. Seal gaps around ceiling penetrations, light fittings and access hatches to prevent warm or cool air escaping into the roof cavity. Even small gaps can account for 15-25% of heating and cooling losses.
Common air leakage points include:
- Recessed downlight housings
- Ceiling exhaust fan surrounds
- Ceiling access hatches
- Top plates where walls meet ceilings
- Service penetrations
Use appropriate sealants, gaskets or covers designed for each application type. For downlights, consider replacing older fittings with IC-rated LED units that can be safely covered with insulation.
Roof Ventilation and Reflective Barriers
Proper roof ventilation works alongside insulation to manage summer heat. Ridge vents, whirlybirds or powered exhaust fans remove hot air accumulating in the roof cavity, reducing the heat load your insulation must resist.
Some roof insulation blankets include reflective foil facing to reduce radiant heat transfer. While the primary thermal resistance comes from the glasswool core, the foil surface can provide additional benefit in metal roof applications where radiant heat is significant.
Wall and Floor Insulation
Insulating your roof is an excellent start, but comprehensive thermal control requires addressing walls and floors as well. Heat moves through the entire building envelope, and tackling all surfaces delivers the most dramatic comfort improvements and energy savings.
Explore wall insulation and underfloor insulation options to create a complete thermal envelope. Prioritise roof and ceiling first (where heat loss/gain is typically greatest), then progressively upgrade other building elements as budget allows.
A roof insulation blanket offers an efficient, cost-effective way to improve thermal comfort and reduce energy costs in homes across Melbourne and Victoria. By understanding R-values, installation requirements and product specifications, you can select and install the right solution for your specific roof design and climate conditions. Whether you're tackling a DIY renovation or specifying materials for a professional installation, Insulation Supplies Australia provides the products, technical guidance and delivery options you need to achieve lasting insulation performance.