

Choosing the right roof insulation transforms your home's comfort and slashes energy bills year-round. In 2026, Australian homeowners face more insulation options than ever, from traditional glasswool blankets to modern reflective systems. Understanding R-values, material types, and installation requirements helps you make informed decisions that deliver lasting performance. Whether you're building new, renovating, or upgrading an existing home, proper roof insulation remains one of the most cost-effective improvements you can make.
Why Roof Insulation Matters in Australian Homes
Your roof absorbs more solar radiation than any other part of your house. During summer, an uninsulated roof cavity can reach temperatures above 65°C, radiating heat down into living spaces and forcing air conditioners to work overtime. In winter, warm air generated by heating systems rises and escapes through an uninsulated roof, wasting energy and money.
Effective roof insulation creates a thermal barrier that slows heat transfer in both directions. Studies from ENERGY STAR show that proper attic and roof insulation can reduce heating and cooling costs by 15 to 20 percent across most climate zones. Australian conditions make these savings even more pronounced, particularly in Victoria where seasonal temperature swings demand year-round thermal control.
Beyond energy savings, roof insulation delivers:
- Improved comfort: More stable indoor temperatures with fewer hot and cold spots
- Noise reduction: Acoustic dampening from external sounds like rain and traffic
- Moisture control: Reduced condensation risk when properly installed with ventilation
- Asset protection: Extended HVAC lifespan due to reduced system cycling
The National Construction Code mandates minimum R-values for new builds and major renovations, but many older homes were built before these requirements existed or have degraded insulation that no longer performs as designed.
Understanding R-Values and Thermal Performance
R-value measures thermal resistance: how effectively insulation resists heat flow. Higher R-values indicate better insulating performance. In Australian roof applications, R-values typically range from R1.5 to R7.0, depending on climate zone, roof type, and specific building requirements.
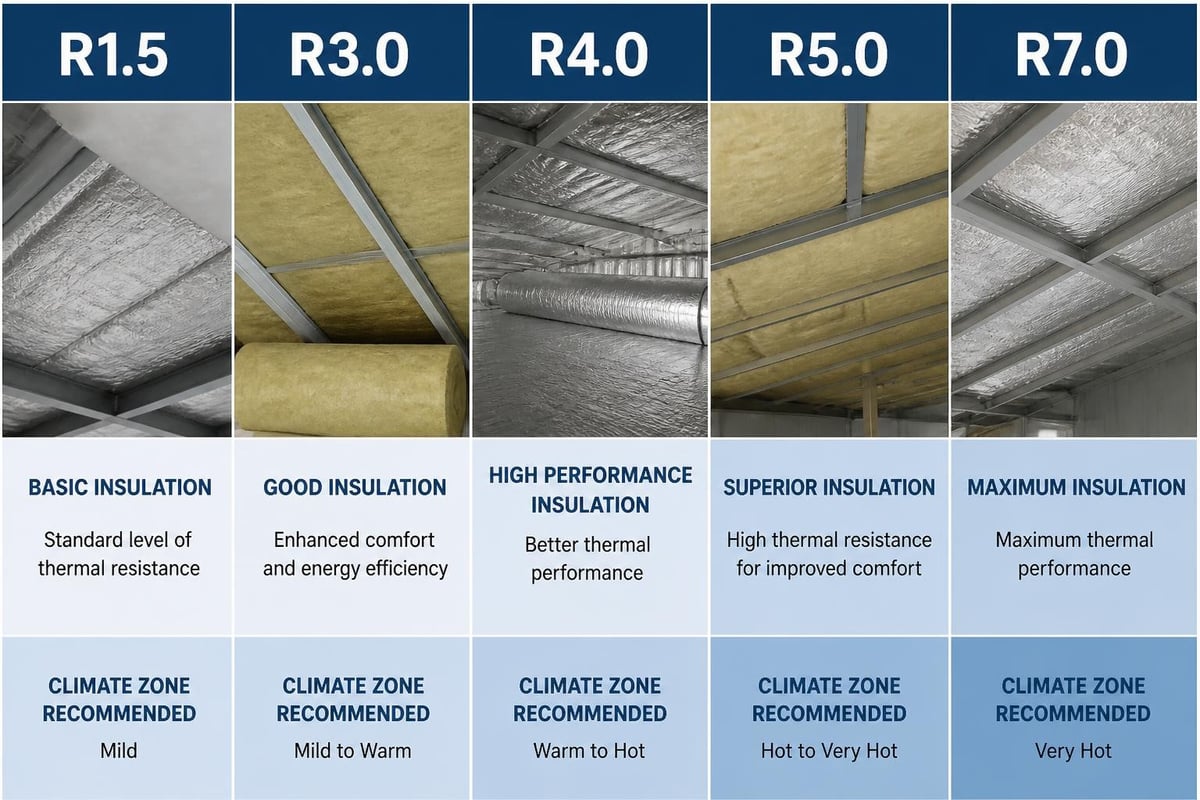
Climate zone determines your minimum R-value requirements. Victoria sits primarily in Zone 6 (mild temperate) and Zone 7 (cool temperate), where Building Code of Australia recommendations suggest:
| Climate Zone | Minimum Roof R-Value | Typical Applications |
|---|---|---|
| Zone 6 (Melbourne metro) | R4.1 | Standard residential, most renovations |
| Zone 7 (Regional Victoria) | R5.0 | Higher altitude areas, alpine regions |
| High-performance targets | R6.0–R7.0 | Passive house, premium builds |
These minimums represent regulatory baselines. Many homeowners choose higher R-values to maximise comfort and future-proof against rising energy costs. The U.S. Department of Energy's insulation guide emphasises that installing higher-than-minimum R-values typically costs only marginally more during initial installation but delivers compounding savings over decades.
R-value effectiveness depends on correct installation. Compression, gaps, and air infiltration dramatically reduce real-world performance. A compressed R6.0 batt performing at R4.0 wastes your investment and leaves comfort on the table.
Types of Roof Insulation Materials
Australian roof insulation products fall into several categories, each with distinct characteristics, applications, and performance profiles.
Glasswool Blanket and Batts
Glasswool remains the most popular roof insulation material across Australia. Modern glasswool products use advanced manufacturing technologies like ECOSE®, making them softer to handle, lower in dust, and easier to install than older fibreglass products.
Key advantages:
- Excellent thermal performance across all R-value ranges
- Non-combustible, providing fire safety benefits
- Good acoustic properties for noise control
- Cost-effective for most residential applications
- Available in batts (pre-cut segments) and blankets (continuous rolls)
Glasswool blankets suit long, uninterrupted roof runs, particularly in new construction where timber or steel framing is exposed. The Earthwool Blanket Unfaced R3.2 offers 16.2m² coverage per roll, making it efficient for larger projects. Higher-density glasswool products deliver improved thermal performance and enhanced structural integrity.
Batts work better for retrofit applications and spaces with frequent obstructions like roof penetrations, wiring, and structural cross-bracing. Pre-cut dimensions simplify handling and reduce waste when working around obstacles.
Polyester Insulation
Polyester batts offer an alternative for homeowners concerned about handling fibrous materials or working in tight roof spaces. Made from recycled PET plastic bottles, polyester insulation is non-itch, hypoallergenic, and easy to cut and shape.
Polyester typically costs more than glasswool at equivalent R-values but provides:
- Safe, comfortable handling without protective equipment
- Excellent recovery after compression during installation
- Moisture resistance without performance degradation
- Environmental benefits from recycled content
Reflective Foil and Multi-Cell Systems
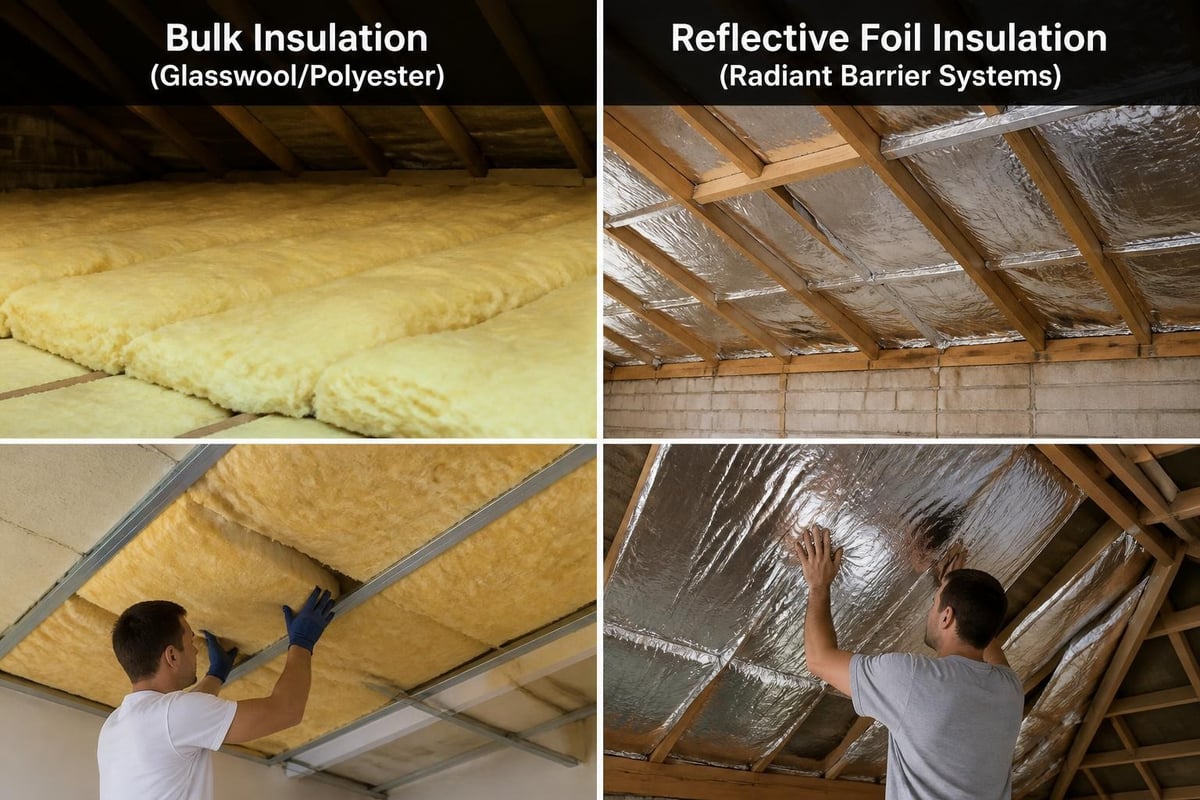
Reflective insulation uses aluminium foil layers to reflect radiant heat rather than absorb it. These systems work differently from bulk insulation (glasswool, polyester), performing best when facing an air gap of at least 25mm.
Reflective products include:
- Single-sided foil laminates
- Double-sided reflective barriers
- Multi-cell bubble or foam-core systems
Under metal roofing, reflective sarking combined with bulk insulation creates a hybrid system that addresses both radiant and conductive heat transfer. The reflective layer faces down into the roof cavity, while bulk insulation between rafters handles conductive heat flow through the roof structure.
Installation Methods and Best Practices
Proper installation determines whether your roof insulation delivers its rated R-value or underperforms due to gaps, compression, and air leakage. DIY installation is achievable for many homeowners and renovators, but understanding correct techniques is essential.
Preparing the Roof Cavity
Before installing any roof insulation:
- Inspect for moisture damage: Check for roof leaks, water stains, and existing mould
- Address structural issues: Repair damaged rafters, trusses, and roof decking
- Seal major air leaks: Gap-fill around exhaust fans, downlights, and service penetrations
- Clear debris: Remove old insulation (if replacing), dust, and construction waste
- Plan ventilation: Ensure soffit vents, ridge vents, or whirlybirds remain unobstructed
Air-sealing before insulating prevents heated or cooled air from escaping around insulation edges. Building Science Corporation's technical guidance on roof assemblies emphasises that air barriers matter as much as thermal resistance in achieving designed performance.
Installing Batts and Blankets
Glasswool and polyester batts install between roof rafters or ceiling joists. Follow these steps for optimal results:
Measure accurately: Batts should fit snugly between framing members without compression. Standard Australian framing sits at 450mm or 600mm centres. Purchase insulation sized for your specific framing spacing.
Cut cleanly: Use a sharp insulation knife or serrated blade. Compress the batt slightly while cutting for clean edges that spring back to full thickness.
Avoid compression: Never squash insulation to fit into undersized spaces. Compressed glasswool or polyester loses thermal resistance proportional to thickness reduction. An R6.0 batt compressed by 30% performs closer to R4.2.
Work around obstacles: Cut insulation to fit around cross-bracing, wiring, and plumbing. Split batts horizontally if necessary, placing one layer below and one above obstructions.
Maintain ventilation clearance: Leave gaps around soffit vents and don't block airflow paths. Roof ventilation removes moisture and prevents condensation in ceiling cavities.
The thermal blanket products in the R3.7 range deliver strong performance for standard Victorian roof applications. For higher-specification builds or cooler regional areas, R5.0 and R6.0 options provide enhanced thermal control.
Safety Considerations
Roof cavity work involves several hazards:
- Heat stress: Roof spaces exceed 50°C in summer; work early morning or evening
- Structural safety: Walk only on ceiling joists or install temporary walkboards; never step on ceiling plaster
- Electrical safety: Identify and avoid live electrical cables; isolate circuits if necessary
- Respiratory protection: Wear a P2-rated dust mask even with low-dust modern glasswool
- Protective clothing: Long sleeves, gloves, and safety glasses minimise skin and eye irritation
Professional installation makes sense for difficult roof configurations, homes with asbestos concerns, or when confidence in DIY execution is low.
Roof Insulation for Different Construction Types
Australian roofs vary significantly in construction method, requiring tailored insulation approaches.
Pitched Tile and Metal Roofs
Most Australian homes feature pitched roofs with tile or metal cladding. These roofs typically include:
- Roof cladding (tiles or metal sheets)
- Roof battens or purlins
- Sarking or roofing underlay
- Rafters or trusses
- Ceiling joists
- Ceiling lining (plasterboard)
Insulation installs either between rafters (directly under the roof deck) or between ceiling joists (above the ceiling, below the ventilated roof cavity). Ceiling-level installation is more common in Australian construction and easier to install, especially in retrofit situations.
Metal roof considerations: Metal roofing conducts heat rapidly, making insulation essential. Reflective sarking under metal roofing provides radiant barrier benefits while serving as a secondary weather barrier. Bulk insulation between ceiling joists completes the thermal envelope.
Tile roof considerations: Terracotta and concrete tiles provide some thermal mass, moderating heat transfer compared to metal. However, uninsulated tile roofs still require bulk insulation for code compliance and comfort.
Cathedral and Skillion Ceilings
Cathedral ceilings follow the roof pitch with no attic space above. Insulation installs between rafters, requiring careful attention to ventilation and vapour management.
Ventilation requirements: Create a continuous air gap between roof sarking and insulation top surface. This typically requires:
- Roof rafter depth exceeding insulation thickness by 30–50mm
- Soffit intake vents at eaves
- Ridge vents or high-level exhaust ventilation
- Baffles or spacers to maintain airflow channel
Condensation control: Cathedral ceiling assemblies risk condensation if warm, moist interior air reaches cold roof surfaces. Proper vapour barriers on the warm (interior) side and ventilation channels on the cold (roof) side manage moisture safely.
Flat and Low-Slope Roofs
Flat roofs (actually low-slope, typically 1–5 degrees) require different insulation strategies than pitched roofs. Above-deck insulation using rigid foam boards is common in commercial construction but rare in Australian residential work.
Most flat-roof residential applications use ceiling-level insulation similar to conventional homes, with membrane waterproofing providing weather protection. Ensure adequate drainage and inspect regularly for pooling water that may indicate structural sagging or blocked outlets.
Combining Roof and Ceiling Insulation with Other Systems
Roof insulation doesn't work in isolation. Effective thermal envelopes integrate multiple building elements.
Insulation and Ventilation
Ventilation and insulation work together, not against each other. Roof ventilation removes moisture and heat from the roof cavity, preventing:
- Condensation damage to timber framing
- Mould growth on ceiling surfaces
- Insulation degradation from persistent moisture
- Premature roof structure deterioration
Whirlybird vents, ridge vents, gable vents, and soffit vents provide passive airflow. Ensure insulation installation doesn't block these ventilation paths, particularly at eaves where soffit vents provide intake air.
Wall and Floor Insulation Integration
Thermal performance depends on the entire building envelope, not just the roof. Heat loss occurs through walls, floors, windows, and doors as well as ceilings. Wall insulation and underfloor insulation complete the thermal envelope, preventing heat from finding alternative escape routes.
A well-insulated roof combined with uninsulated walls creates marginal overall improvement. Prioritise insulation investments based on:
- Regulatory requirements: Meet code minimums for your climate zone
- Existing conditions: Address the worst-performing elements first
- Budget constraints: Staged improvements over time still deliver value
- Project scope: Coordinate insulation with renovation timelines
Cool Roofs and Reflective Surfaces
Cool roof coatings and light-coloured roofing materials reduce solar heat gain by reflecting rather than absorbing radiation. Lawrence Berkeley National Laboratory's research on cool roofs demonstrates that reflective roof surfaces can reduce roof surface temperatures by 25–30°C compared to dark surfaces.
Cool roofs complement insulation by reducing the heat load that insulation must handle. The combination delivers better performance than either strategy alone, particularly valuable in hot Australian summers.
Upgrading Existing Roof Insulation
Many Victorian homes built before 2000 have inadequate or degraded roof insulation. Upgrading existing insulation improves comfort and energy efficiency without major structural work.
Assessing Current Insulation
Before upgrading:
- Identify existing type: Glasswool, rockwool, polyester, or reflective systems
- Measure thickness: Estimate R-value based on material type and compressed thickness
- Check condition: Look for water damage, compression, gaps, and vermin damage
- Evaluate coverage: Note uninsulated areas, particularly around access hatches and eaves
Insulation installed in the 1980s and 1990s may have compressed significantly, reducing its effective R-value. Glasswool batts rated R1.5 when new might now perform at R1.0 or lower due to compression and dust accumulation.
Replacement vs Top-Up
Two upgrade approaches exist:
Complete replacement: Remove old insulation entirely and install new product sized for current Building Code requirements (R4.1+ in Melbourne). Replacement makes sense when existing insulation is damaged, contaminated, or extremely low-performing.
Top-up installation: Add new insulation over existing material to achieve target R-value. Top-up works when existing insulation remains in good condition but doesn't meet current standards. Calculate combined R-values by adding existing and new layers (e.g., existing R2.0 + new R3.0 = total R5.0).
Ensure existing insulation is dry and undamaged before topping up. Wet or mouldy insulation requires removal and moisture-source remediation before installing new product.
DIY vs Professional Installation
Owner-builders and confident DIYers can successfully install roof insulation with proper planning and safety equipment. Professional installation may be preferable when:
- Roof access is difficult or dangerous
- Existing asbestos requires licensed removal
- Electrical hazards complicate safe working
- Project scale exceeds available time or labour
- Building permit requirements mandate licensed trades
Professional installers complete work faster and carry insurance covering installation defects and accidental damage. DIY installation costs less but requires time, tools, and tolerance for working in challenging conditions.
Cost Considerations and Return on Investment
Roof insulation represents one of the highest-return home improvements available. Material costs vary based on R-value, area, and product type, but payback periods typically range from 3 to 7 years through reduced heating and cooling bills.
Material Costs
Approximate 2026 pricing for common roof insulation products:
| Product Type | R-Value | Typical Price Range (per m²) |
|---|---|---|
| Glasswool batts | R2.5–R3.5 | $6–$12 |
| Glasswool batts | R4.0–R5.0 | $10–$18 |
| Glasswool batts | R6.0–R7.0 | $16–$28 |
| Polyester batts | R2.5–R4.0 | $12–$22 |
| Reflective blanket | Varies | $4–$10 |
These ranges reflect retail pricing for quality products from established manufacturers. Bulk purchases for large projects may attract volume discounts. Calculate total project cost by multiplying ceiling area by per-square-metre pricing, adding 10% for waste and cuts around obstacles.
Energy Savings Estimates
A typical Melbourne home with 150m² of ceiling area upgrading from no insulation (or degraded R1.0) to R5.0 can expect:
- Annual heating cost reduction: $400–$600
- Annual cooling cost reduction: $200–$350
- Total annual savings: $600–$950
- Simple payback period: 4–6 years (based on $3,000–$4,500 material and installation cost)
Actual savings depend on home size, construction type, existing insulation levels, heating/cooling systems, occupant behaviour, and energy tariffs. Homes with ducted heating or cooling typically see larger absolute savings than those with localised systems.
Rebates and Incentives
Australian government energy efficiency programs periodically offer insulation rebates or incentives. The Victorian Energy Upgrades (VEU) program may provide discounts through accredited installers. Check current program availability and eligibility before purchasing, as schemes change regularly.
The U.S. Energy Efficient Home Improvement Credit provides international context for how governments incentivise insulation upgrades, though Australian programs operate independently with different criteria.
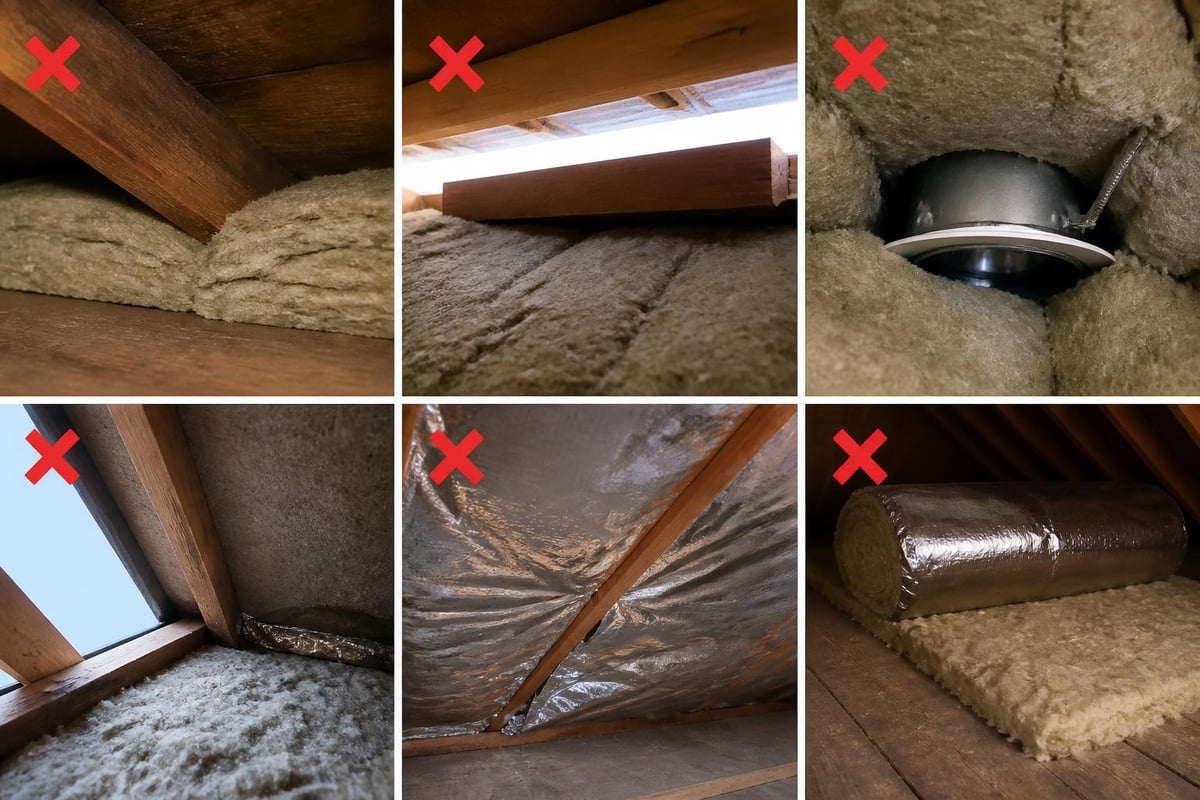
Common Roof Insulation Mistakes to Avoid
Poor installation undermines insulation performance and can create new problems. Avoid these frequent errors:
Compressing insulation: Squashing batts to fit tight spaces reduces R-value proportionally. Use correctly sized products or split batts around obstacles rather than forcing oversized material into insufficient depth.
Covering downlights without protection: Older halogen downlights generate significant heat. Installing insulation directly over non-IC-rated lights creates fire risk. Use downlight covers or replace with IC-rated LED fixtures before insulating.
Blocking ventilation: Soffit vents provide essential roof cavity airflow. Don't pack insulation into eaves, blocking intake air. Use baffles or leave 50mm clearance to maintain ventilation paths.
Ignoring air sealing: Insulation slows conductive heat transfer but doesn't stop air movement. Seal gaps around exhaust fans, plumbing penetrations, and access hatches before insulating for maximum performance.
Incorrect vapour barrier placement: When using faced insulation, the vapour barrier (foil or kraft facing) always faces the warm side (downward toward living spaces in Australian roof applications). Reversed barriers trap moisture within insulation layers.
Ignoring manufacturer specifications: Each insulation product has specific installation requirements regarding compression limits, framing spacing, and application restrictions. Read and follow technical data sheets to ensure warranty coverage and rated performance.
Acoustic Benefits of Roof Insulation
Thermal insulation delivers significant acoustic benefits alongside energy performance. Roof cavities transmit external noise from rain, hail, aircraft, and street traffic. Insulation absorbs sound energy, reducing noise transmission into living spaces.
Glasswool and polyester insulation provide excellent acoustic dampening due to their fibrous structure. Sound waves entering the material lose energy through friction as they move through thousands of tiny fibres.
Acoustic performance factors:
- Material density: Higher-density insulation absorbs more sound energy
- Thickness: Thicker batts provide better low-frequency absorption
- Coverage completeness: Gaps and uninsulated areas allow sound leakage
- Assembly construction: Ceiling mass and framing connection also affect sound transmission
For homeowners prioritising noise control alongside thermal performance, dedicated acoustic insulation products offer enhanced sound-absorption characteristics. Standard thermal insulation still provides meaningful noise reduction compared to uninsulated roofs, making acoustic benefits a valuable secondary outcome of roof insulation upgrades.
Roof Insulation in Renovations and Extensions
Renovation projects provide ideal opportunities to upgrade roof insulation. When ceilings are exposed during structural work, insulation installation becomes simpler and more cost-effective than retrofit-only projects.
New Extensions and Additions
New construction must meet current Building Code requirements. In Victoria's climate zones, this typically means R4.1 minimum for standard builds, with many projects targeting R5.0 or higher for improved performance.
Plan insulation early in the design phase:
- Ensure rafter or truss depth accommodates target R-value plus ventilation clearance
- Coordinate with electricians regarding downlight type and insulation clearances
- Specify insulation type and R-value on building plans for permit approval
- Order materials before framing completion to avoid project delays
Retrofit During Renovations
Ceiling replacement or major interior work creates access for insulation upgrades. Remove old ceiling linings carefully if reusing them, or plan for complete replacement with modern plasterboard.
With ceiling linings removed:
- Install new insulation from below, working from ceiling joist level
- Access every cavity without crawling through roof spaces
- Integrate vapour barriers and air-sealing details properly
- Inspect and upgrade wiring, plumbing, and structural elements simultaneously
Staged renovations might address insulation room-by-room rather than whole-house at once. This spreads costs over time while delivering progressive comfort improvements.
Choosing the Right Product for Your Project
Selecting appropriate roof insulation depends on multiple factors specific to your home and project requirements.
Climate and Location
Melbourne metro areas require minimum R4.1, but cooler regional Victorian locations benefit from R5.0 to R6.0. Coastal homes face different challenges than alpine properties. Assess your specific climate zone and consider exceeding minimum requirements for long-term performance.
Roof Type and Construction
Metal roofs benefit from reflective sarking combined with bulk insulation. Tile roofs can work effectively with bulk insulation alone. Cathedral ceilings need depth planning for ventilation clearances. Flat roofs may require professional assessment to determine optimal insulation strategy.
Budget and Performance Goals
Higher R-values cost more but deliver better performance. Balance upfront cost against long-term savings and comfort objectives. R4.0 insulation represents a sweet spot for many Victorian homeowners: exceeding code minimums while remaining cost-effective.
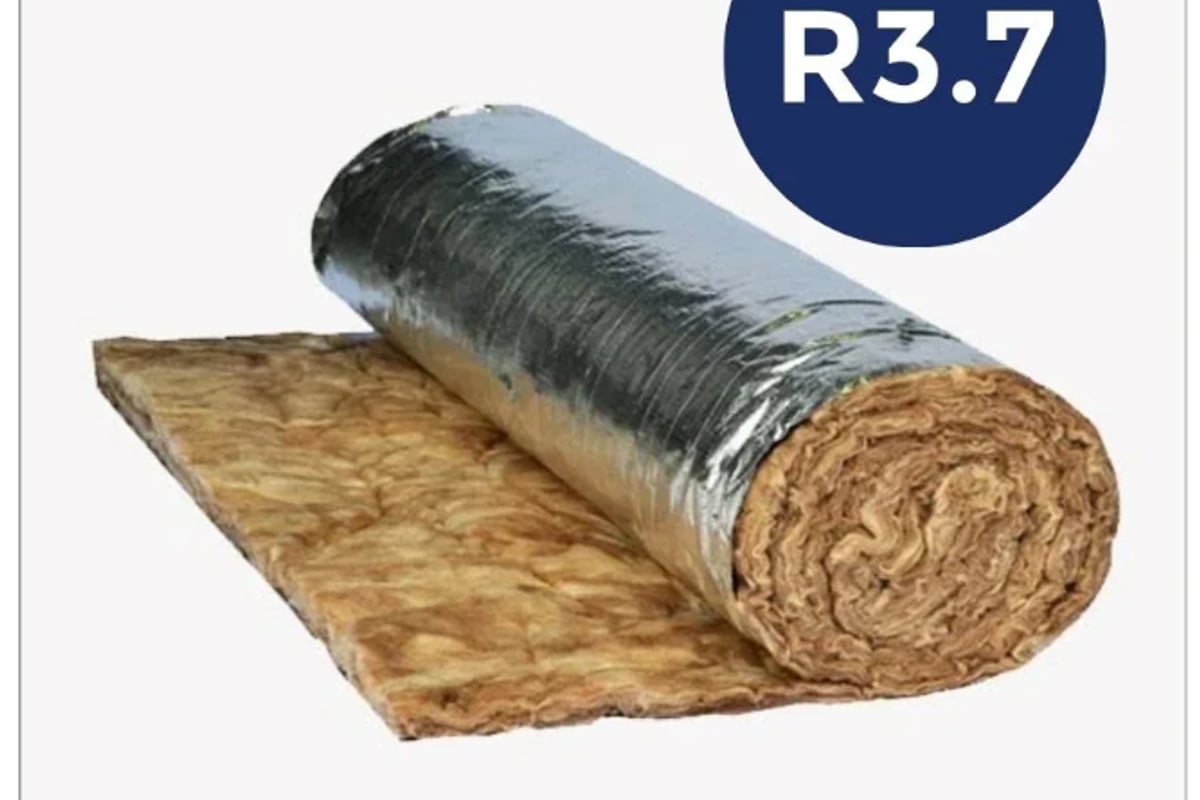
A premium glasswool product like the Thermal Blanket R3.7 offers higher density construction for improved thermal resistance and durability, making it particularly suitable for demanding applications or homes where maximum performance justifies the investment.
Installation Method
DIY installation suits standard roof configurations with safe access and straightforward layouts. Complex roofs, safety concerns, or time constraints may justify professional installation despite higher total cost.
Roof insulation remains the foundation of energy-efficient, comfortable Australian homes. Understanding R-values, material types, and proper installation techniques empowers homeowners and renovators to make informed decisions that deliver lasting value. Whether you're upgrading an existing home or planning new construction, selecting quality products matched to your climate zone and application ensures optimal thermal performance and comfort year-round. Insulation Supplies Australia stocks a comprehensive range of roof insulation products suitable for Victorian homes, with expert guidance available to help you choose the right solution for your project, delivered direct to your site across Melbourne and regional Victoria.