

Choosing the right roof ceiling insulation for your home can feel overwhelming, especially when you're faced with different materials, R-values, and installation methods. But getting it right makes a massive difference to your comfort and energy bills. In Victoria's climate, where we experience cold winters and hot summers, proper roof ceiling insulation acts as your first line of defence against temperature extremes. Whether you're building new, renovating, or simply upgrading an existing home, understanding how ceiling insulation works and what options suit your needs will help you make a confident, informed decision.
Why Roof Ceiling Insulation Matters for Victorian Homes
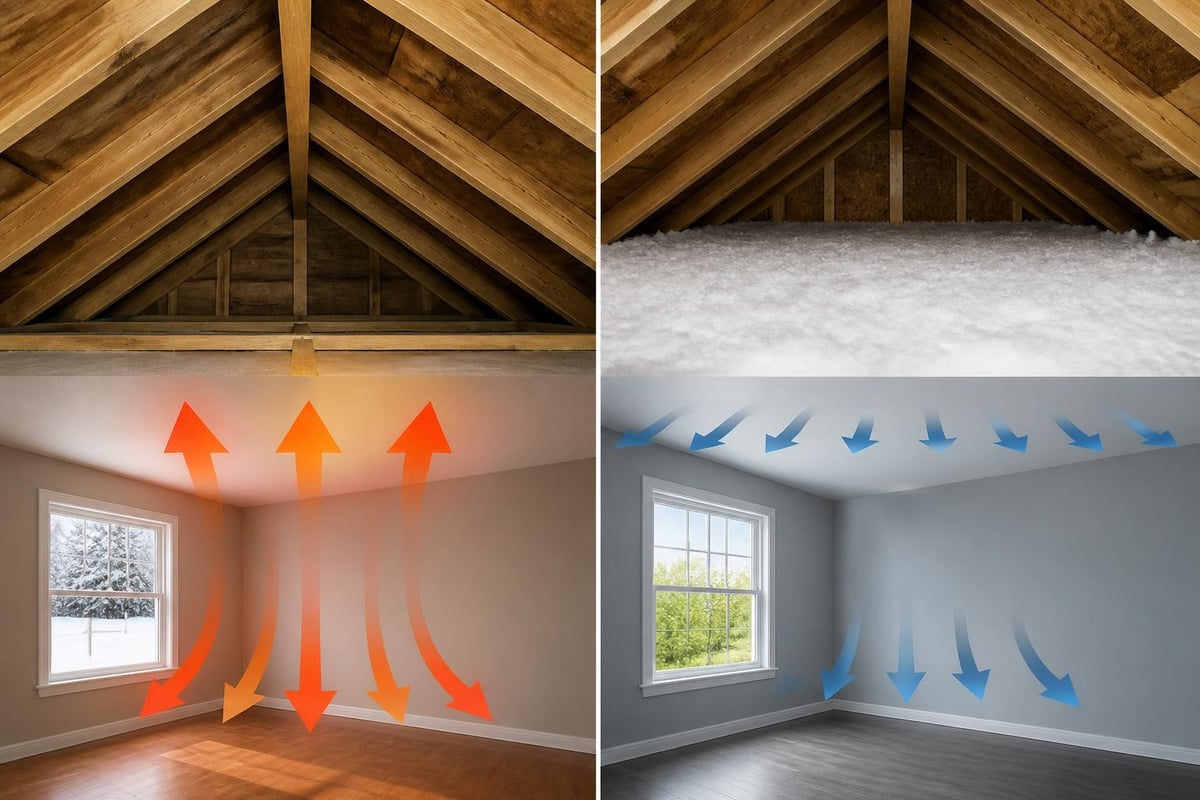
Your roof and ceiling are where most heat transfer happens in any home. During summer, radiant heat from the sun beats down on your roof, turning your ceiling space into an oven. In winter, warm air rises and escapes through an uninsulated or poorly insulated ceiling. Either way, you're losing money and comfort.
Roof ceiling insulation creates a thermal barrier that slows this heat movement. It keeps your home warmer in winter and cooler in summer, reducing your reliance on heating and cooling systems. The result is lower energy bills, improved comfort, and a smaller carbon footprint.
According to ENERGY STAR's attic insulation guidance, proper ceiling and attic insulation can reduce heating and cooling costs by up to 15% in many climates. In Victoria, where temperature swings can be dramatic, the savings are often even more noticeable.
Key Benefits of Upgrading Your Ceiling Insulation
- Lower energy bills through reduced heating and cooling costs
- Improved year-round comfort with more stable indoor temperatures
- Reduced environmental impact by lowering energy consumption
- Better acoustic performance that dampens external noise
- Increased property value with better energy efficiency ratings
These benefits apply whether you're insulating a new build or retrofitting an older home. The key is choosing the right product and ensuring it's installed correctly.
Understanding R-Values and Thermal Performance
The R-value is the single most important number when shopping for roof ceiling insulation. It measures thermal resistance, how well the material resists heat flow. The higher the R-value, the better the insulation performs.
In Victoria, the National Construction Code (NCC) sets minimum R-value requirements for ceiling insulation based on climate zone. Most of Victoria falls into Climate Zone 6 or 7, requiring minimum ceiling insulation of R4.0 to R6.0 for new builds and major renovations.
| Climate Zone | Location Examples | Minimum Ceiling R-Value |
|---|---|---|
| Zone 6 | Melbourne, Geelong | R4.0 - R5.0 |
| Zone 7 | Ballarat, Bendigo | R5.0 - R6.0 |
| Zone 8 | Alpine regions | R6.0 - R7.0 |
But here's the thing: meeting minimum code is just that, minimum. Many homeowners choose to exceed these requirements, especially when energy efficiency and comfort are priorities. Ceiling insulation collections often include products ranging from R2.0 through to R8.0, giving you flexibility to match your budget and performance goals.
How to Choose Your Target R-Value
Start by checking what's currently installed (if anything). Many older homes have little or no ceiling insulation, or outdated products that have compressed or deteriorated over time.
Then consider your goals. Are you chasing maximum energy savings? Building to a high sustainability standard? Working within a tight budget? Each scenario might lead to a different R-value choice.
For most Victorian homes, R4.0 to R6.0 represents the sweet spot between upfront cost and long-term performance. Higher R-values like R7.0 or R8.0 make sense in very cold climates or for homes targeting passive house standards.
Types of Roof Ceiling Insulation Available
Not all roof ceiling insulation is created equal. Different materials suit different applications, budgets, and installation methods. Here's what you need to know about the main types available in Australia.
Glasswool Batts and Blankets
Glasswool remains the most popular choice for ceiling insulation in Australian homes. It's affordable, effective, and widely available in a range of R-values and dimensions.
Batts are pre-cut rectangular sections designed to fit between ceiling joists (typically 430mm or 580mm spacing). They're quick to install and ideal for standard residential construction.
Blankets (also called rolls) come in continuous lengths, perfect for covering large ceiling areas or irregular joist spacing. They can be cut to size on site and work well in both new builds and retrofits.
Products like the Thermal Blanket R3.7 offer high-density glasswool construction for improved thermal performance, making them suitable for roof insulation applications where space is limited but performance requirements are high.
Polyester Batts
Polyester insulation is made from recycled plastic bottles and offers several advantages over traditional glasswool. It's non-irritating, doesn't require protective clothing during installation, and performs well in humid environments.
While slightly more expensive than glasswool, polyester batts are popular with DIY renovators who value ease of handling and low-dust installation. They're also naturally resistant to moisture and won't sag or settle over time.
Reflective Foil and Bulk Insulation Combinations
Some ceiling insulation products combine bulk insulation (like glasswool or polyester) with reflective foil layers. This combination addresses both conductive and radiant heat transfer, providing enhanced performance in hot climates.
Reflective foil alone (without bulk insulation) isn't enough for most Victorian applications, but it can complement bulk insulation by reflecting radiant heat back towards the roof in summer.
Installation Methods: DIY vs Professional
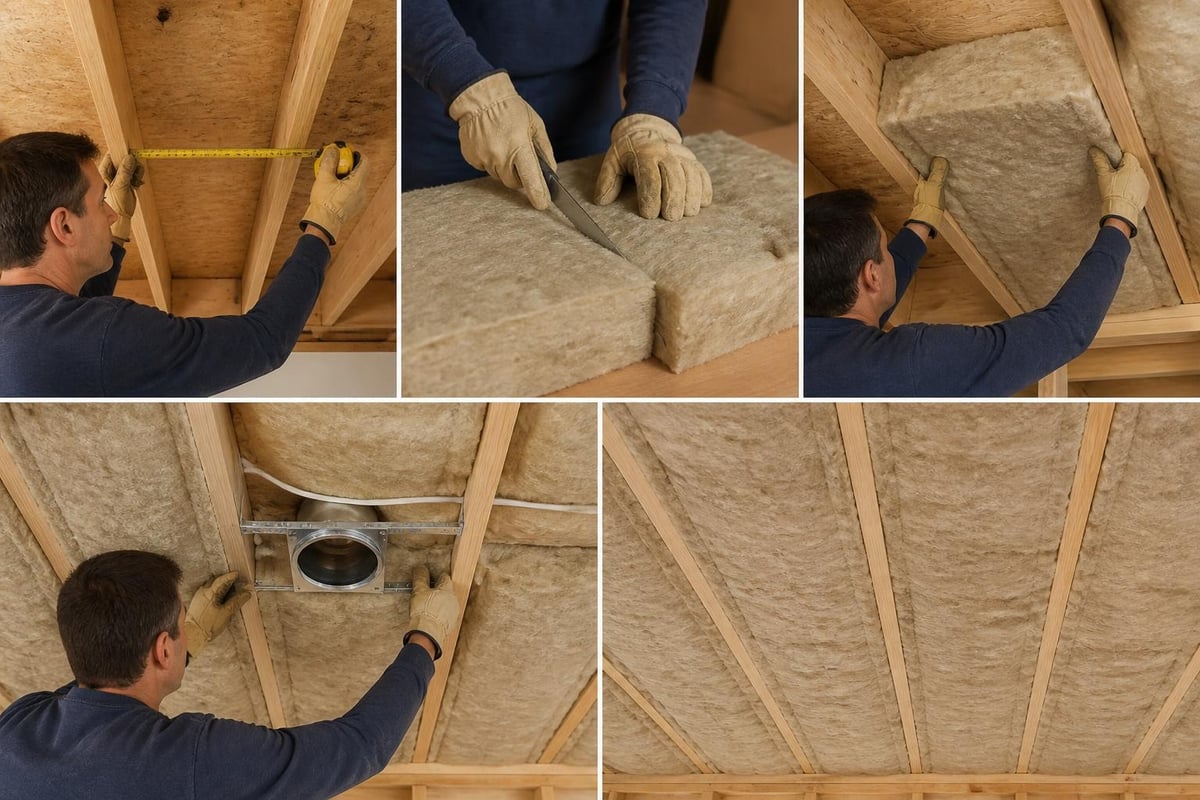
Installing roof ceiling insulation yourself can save money, but it's not suitable for everyone. The decision depends on your skill level, the type of ceiling space you're working with, and safety considerations.
When DIY Installation Makes Sense
You can tackle ceiling insulation as a DIY project if:
- You have a clear, accessible ceiling cavity with adequate height and no obstructions
- You're comfortable working at heights and in confined spaces
- You can safely manage electrical wiring and light fittings (turn off power first)
- You're using batts or easy-to-handle polyester insulation
- You understand proper installation techniques (no gaps, no compression)
The Building America Solution Center provides detailed guidance on proper installation practices that prevent common mistakes like compressed insulation, gaps around penetrations, and blocked ventilation.
When to Call a Professional
Professional installation is worth considering when:
- Your ceiling has complex wiring, ducting, or recessed lighting
- The ceiling cavity is cramped, awkward, or unsafe to access
- You're installing blown-in insulation that requires specialized equipment
- You want to ensure warranty coverage and code compliance
- You're combining insulation with air sealing or other energy upgrades
Vented vs Unvented Ceiling Assemblies
An important design decision involves whether your ceiling cavity should be vented or unvented (conditioned). This choice affects insulation placement, moisture management, and overall building performance.
Traditional Vented Ceilings
Most Australian homes use vented ceiling assemblies. Insulation sits on top of the ceiling (between or over the joists), while the roof space above remains ventilated to the outside through eave vents, ridge vents, or gable vents.
This approach works well in most climates and keeps the roof space cool in summer, reducing the risk of moisture problems. The PNNL guidance on vented versus unvented attics explains how proper ventilation helps manage moisture and prevents ice dams in cold climates (less relevant in Victoria but still important for moisture control).
Unvented (Conditioned) Ceiling Assemblies
In an unvented assembly, insulation is placed at the roofline rather than the ceiling plane, bringing the roof space inside the thermal envelope. This approach suits homes with HVAC equipment or ductwork in the roof space, preventing energy losses from exposed ducts.
Building Science Corporation's guide to conditioned attics details the design considerations, including the need for continuous air barriers and careful moisture management. While less common in Australian residential construction, unvented assemblies are gaining traction in high-performance homes.
The choice between vented and unvented affects your insulation selection, installation details, and even ventilation strategy for the entire home.
Common Installation Mistakes to Avoid
Even with the right product, poor installation can compromise performance. Here are the most common roof ceiling insulation mistakes and how to avoid them.
Compression and Gaps
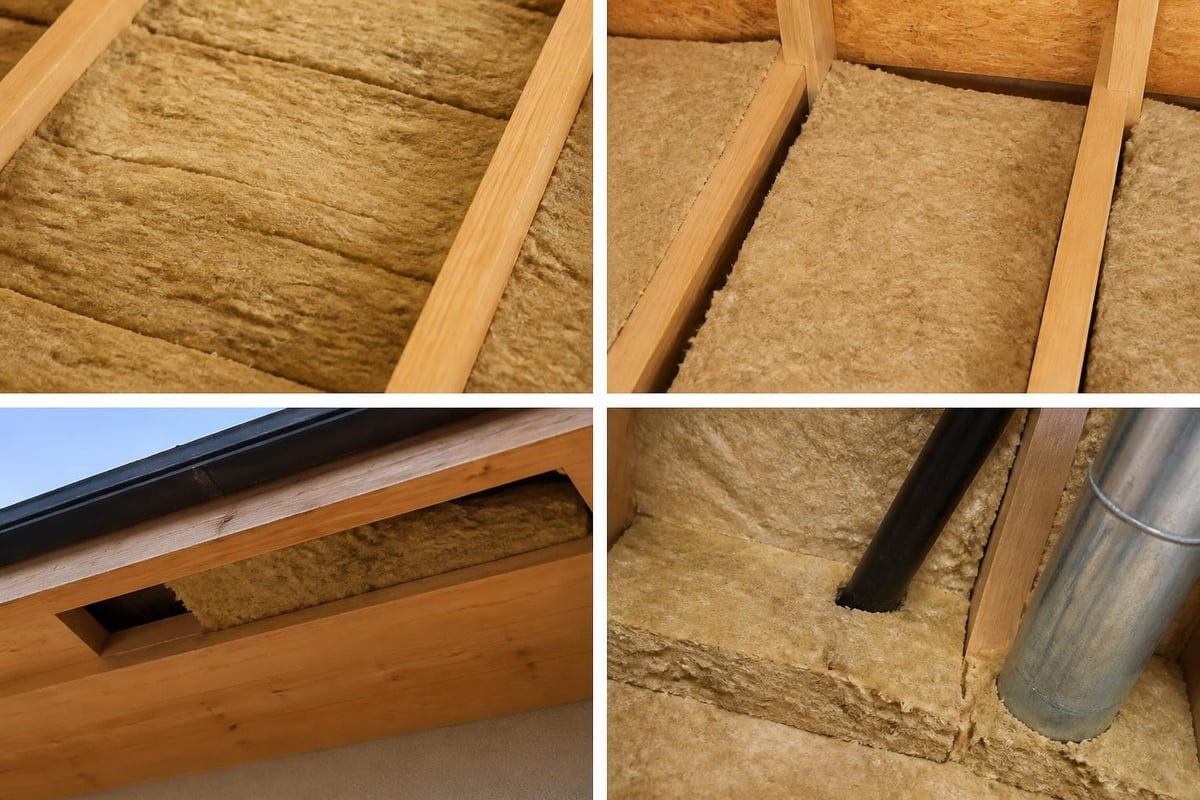
Compressed insulation loses R-value. If you stuff R6.0 insulation into a space designed for R4.0, you're wasting money and reducing performance. Always choose insulation thickness that matches your available space.
Gaps around the edges, near walls, or around penetrations (lights, vents, hatches) create thermal bridges where heat escapes. Professional installers call these "thermal bypasses," and they can reduce whole-ceiling performance by 30% or more even when they represent less than 5% of the total area.
Blocking Ventilation
Never block soffit vents or ridge vents with insulation in a vented ceiling assembly. Proper airflow prevents moisture buildup and extends roof life. Install baffles or chutes to maintain clear airflow paths from eave to ridge while still achieving full insulation coverage.
Ignoring Air Sealing
Roof ceiling insulation works best when combined with proper air sealing. Gaps around ceiling penetrations, recessed lights, exhaust fans, and access hatches allow conditioned air to escape and outdoor air to enter.
According to Energy.gov's guidance on insulation and air-sealing credits, air sealing should happen before or during insulation installation for maximum effectiveness. Seal gaps with appropriate materials (caulk, foam, gaskets) before laying batts or blankets.
| Common Problem | Impact on Performance | Solution |
|---|---|---|
| Compressed batts | 20-40% R-value loss | Choose correct thickness |
| Gaps and voids | Up to 30% heat loss | Careful cutting and fitting |
| Blocked ventilation | Moisture damage, mould | Install ventilation baffles |
| No air sealing | High air leakage | Seal before insulating |
Upgrading Existing Roof Ceiling Insulation
Many Victorian homes built before 2006 have inadequate or no ceiling insulation. Upgrading is one of the most cost-effective energy improvements you can make.
Assessing What You Have
Before buying new insulation, check your existing ceiling. You'll need to:
- Access the ceiling space safely (use a sturdy ladder and proper lighting)
- Identify the type of insulation currently installed (if any)
- Measure its thickness and estimate its R-value
- Look for damage, compression, moisture staining, or gaps
- Note any obstructions (wiring, ducting, recessed lights)
If you find old insulation in poor condition, wet or contaminated insulation, or suspected asbestos materials, get professional advice before proceeding. Some older insulation products contain materials that require specialist removal.
Top-Up vs Full Replacement
Sometimes you can simply add a layer of new insulation on top of existing material to boost overall R-value. This works well when:
- Existing insulation is in good condition (dry, uncompressed, no damage)
- Current R-value is just below target (topping up R2.0 to R4.0, for example)
- You're working with compatible materials (glasswool on glasswool)
Full replacement makes more sense when existing insulation is damaged, contaminated, severely compressed, or when you're doing a major renovation that requires ceiling work anyway.
The ASHRAE Handbook guidance on thermal insulation provides technical detail on combining insulation layers and calculating total system R-values for multi-layer assemblies.
Roof Insulation Collections and Product Selection
When you're ready to buy, having access to a wide range of products at different R-values helps you find the perfect match for your project. Organised collections make comparing options straightforward.
For ceiling applications in Victorian homes, R4.0 insulation represents the baseline for new work in Melbourne and Geelong, while R5.0 and R6.0 collections offer enhanced performance for colder areas or homeowners chasing maximum efficiency.
When choosing specific products, consider:
- Joist spacing: 430mm or 580mm determines batt width
- Available ceiling depth: matches insulation thickness to avoid compression
- Coverage area: calculate square metres and buy accordingly
- Handling preferences: glasswool vs polyester for DIY installation
Reputable suppliers like Insulation Supplies Australia stock products from trusted manufacturers, ensuring you're getting quality materials that meet Australian standards. Products are clearly labeled with R-values, dimensions, and coverage information, making selection and ordering simple.
Acoustic Performance as a Bonus
Many ceiling insulation products also improve acoustic performance, reducing noise transfer between floors in multi-story homes or dampening external noise from traffic and neighbours. Acoustic insulation collections include products specifically designed for superior sound absorption, though standard thermal insulation still provides useful acoustic benefits.
Compliance with Building Codes and Standards
All roof ceiling insulation in Australia must comply with the National Construction Code (NCC) and relevant Australian Standards. This ensures minimum performance levels and safety.
Meeting NCC Requirements
The NCC specifies minimum R-values for ceiling insulation based on climate zone. These requirements apply to:
- New residential buildings
- Extensions and additions over certain sizes
- Major renovations that alter the thermal envelope
The International Energy Conservation Code materials provide a useful international comparison, though Australian builders and homeowners must follow NCC requirements as interpreted by state building authorities.
Product Certification and Standards
Look for insulation products that comply with:
- AS/NZS 4859.1: Materials specification for bulk thermal insulation
- AS 4200.2: Pliable building membranes and underlays
- CodeMark certification: Third-party verification of NCC compliance
Reputable suppliers only stock certified products that meet these standards. Check product labels and specifications before purchasing.
Cost Considerations and Return on Investment
Roof ceiling insulation delivers strong financial returns through reduced energy bills. Understanding costs helps you budget effectively and make informed decisions.
Typical Product Costs
Insulation pricing varies based on:
- R-value: Higher R-values cost more per square metre
- Material type: Polyester typically costs more than glasswool
- Brand and quality: Premium products command higher prices
- Purchase volume: Larger orders often attract better pricing
As a rough guide, expect to pay between $8 and $25 per square metre for quality ceiling insulation materials, with installation (if using professionals) adding $15 to $35 per square metre depending on access and complexity.
Calculating Payback Period
Energy savings from ceiling insulation depend on:
- Your current heating and cooling costs
- The R-value improvement (from nothing to R4.0 saves more than from R2.0 to R4.0)
- Your climate zone and temperature extremes
- How much you use heating and cooling
Most Victorian homeowners see payback periods of 3 to 7 years for ceiling insulation upgrades, with ongoing savings continuing for the 50+ year lifespan of quality insulation products.
The Insulation Institute's guide to unvented roofs also discusses long-term value considerations when designing high-performance roof assemblies.
Maintaining Your Roof Ceiling Insulation
Once installed, quality insulation requires minimal maintenance. However, periodic checks ensure it continues performing as intended.
Annual Inspection Checklist
- Check for compression from stored items or foot traffic in roof space
- Look for moisture staining indicating roof leaks or condensation
- Inspect around penetrations for gaps that may have opened
- Verify ventilation paths remain clear in vented assemblies
- Watch for pest activity (rodents, birds) that might disturb insulation
Most problems are caught early with simple visual checks once or twice a year. Address any issues promptly to prevent performance degradation.
When to Consider Replacement
Well-installed insulation can last 50 years or more, but replacement becomes necessary if:
- Moisture damage or mould growth occurs
- Insulation becomes severely compressed or displaced
- You're renovating and have the opportunity to upgrade
- Building codes have changed significantly since installation
Getting roof ceiling insulation right delivers decades of comfort, energy savings, and peace of mind. Whether you're building new, renovating, or simply upgrading an older home, choosing the appropriate R-value and ensuring quality installation makes all the difference. Insulation Supplies Australia helps Victorian homeowners, builders, and renovators find the perfect ceiling insulation solution with expert advice, quality products from trusted manufacturers, competitive pricing, and fast delivery across Melbourne and regional Victoria. Explore our ceiling insulation collections today and take the first step towards a more comfortable, energy-efficient home.